The Perfect 30-Minute Dinner Science: Easy One-Pan Garlic Butter Chicken and Asparagus
By Chef Hamid | Homely Recipe
The Science of Home Cooking
⏰ The Physics of Time Scarcity: Why One-Pan Meals Matter
Let me talk to you honestly about something that affects nearly every working American I know.
You walk through the door at 6:47 PM after commuting forty-five minutes from a job that demanded your focus for nine hours straight. Your children need homework help. Your partner is equally exhausted. Everyone is hungry now, not in ninety minutes after you have prepped, cooked, plated, and cleaned up a meal that required three cutting boards, two sauté pans, a pot for sides, and seventeen ingredient prep stepss.
This is not laziness. This is decision fatigue. This is time poverty. And the food industry knows it, which is why ultra-processed frozen dinners, drive-through windows, and meal delivery apps generate billions in revenue despite delivering suboptimal nutrition and genuine dissatisfaction.
Here is what I have learned after fifteen years as a food scientist and home cook: the number of dishes you dirty is inversely proportional to your likelihood of cooking at home consistently. More dishes equal more resistance. More resistance equals more takeout. More takeout equals less control over what enters your body.
The one-pan meal is not a compromise. It is a strategic optimization of time, effort, and cleanup while maintaining—and often exceeding—the nutritional and sensory quality of more complex preparations.
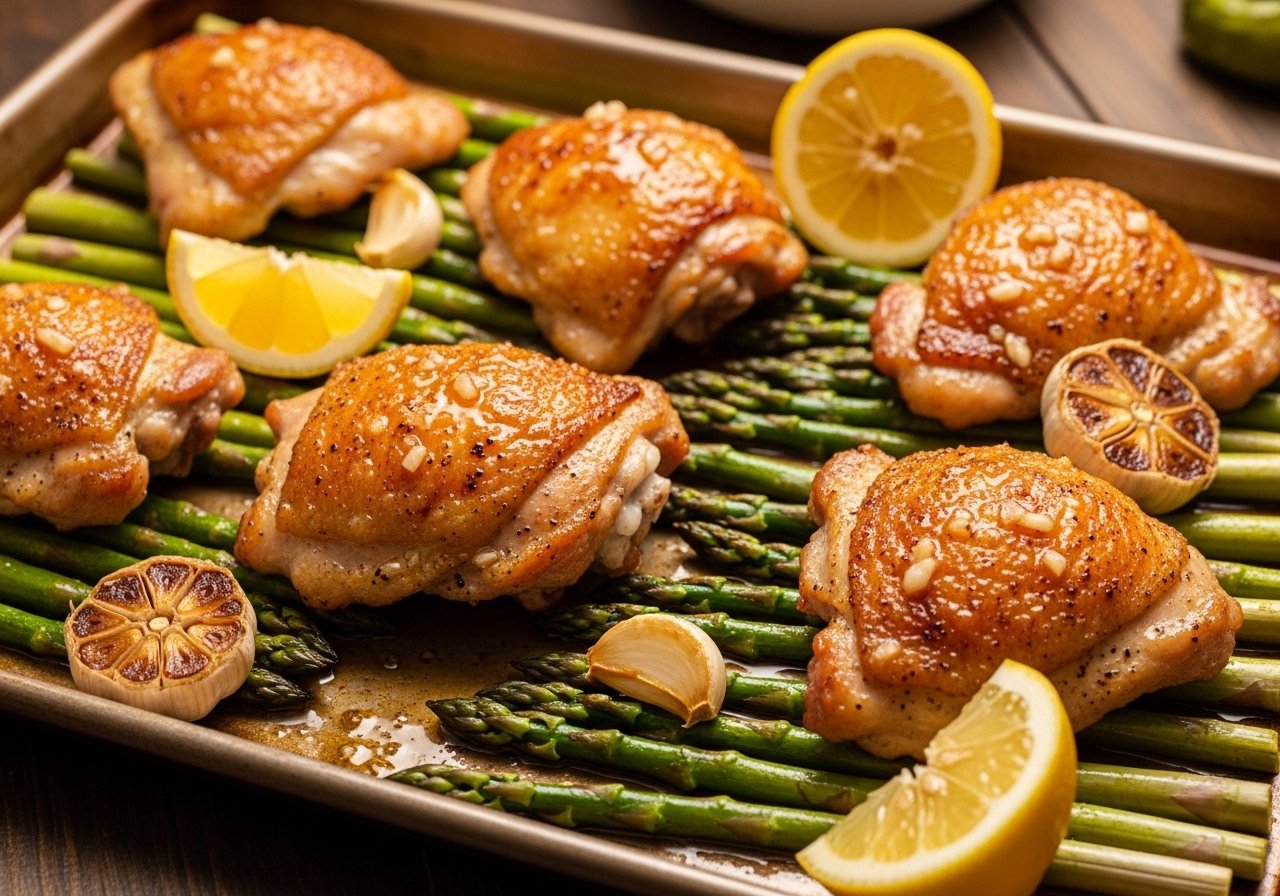
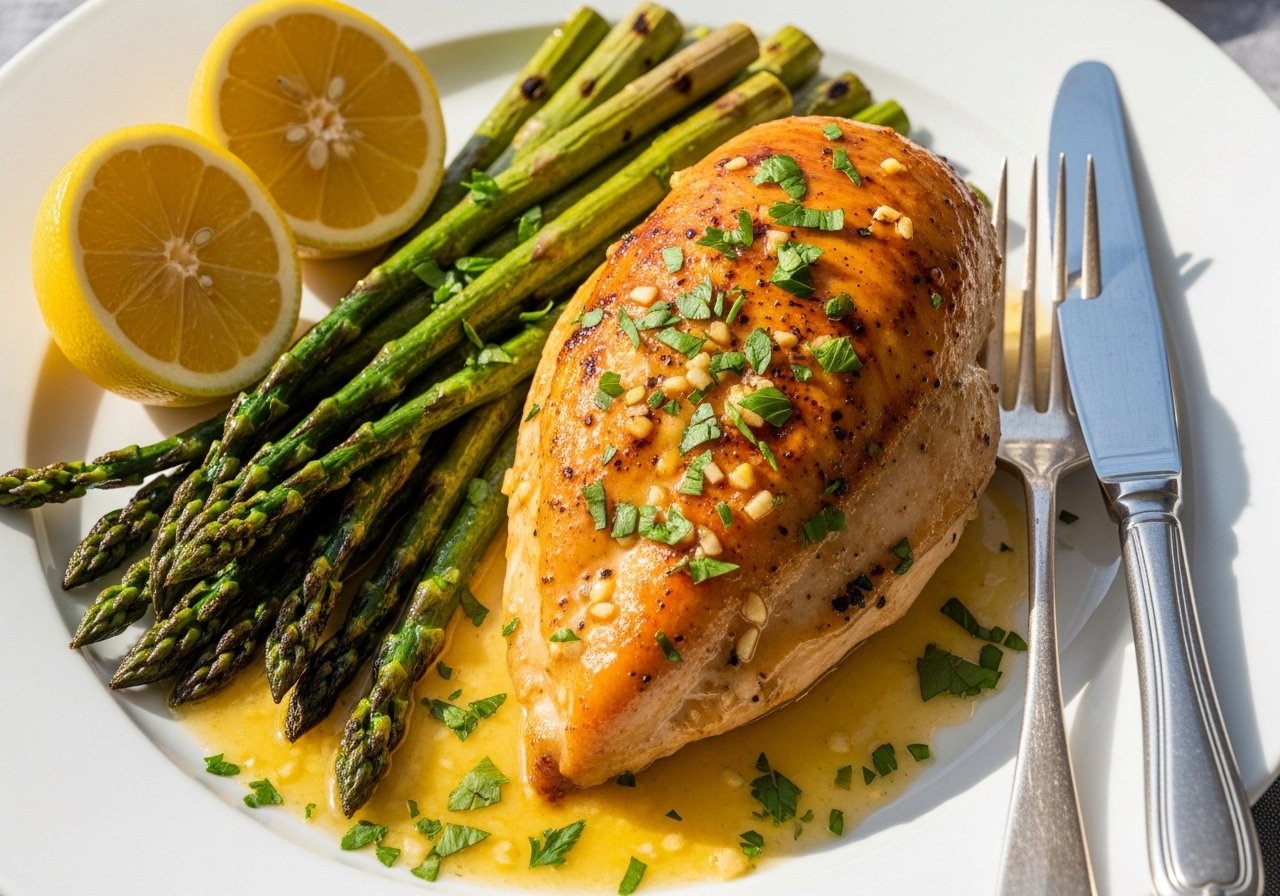
This garlic butter chicken and asparagus recipe delivers complete, balanced macronutrients (high protein, moderate healthy fats, low glycemic carbohydrates), takes thirty minutes from refrigerator to table, dirties exactly one sheet pan, one knife, and one cutting board, and produces restaurant-quality results through the application of three fundamental cooking science principles: the Maillard reaction, controlled emulsification, and strategic timing of ingredient additions.
You are not cutting corners. You are applying physics and chemistry to solve a real problem: how to feed yourself and your family real food on a Tuesday night when everything feels impossible.
Let me show you the science.
🔬 The Maillard Reaction: Why Cold Pans Are the Enemy of Flavor
If you have ever wondered why restaurant chicken tastes dramatically better than your home-cooked version despite using similar ingredients, the answer is almost always surface temperature management and understanding the Maillard Reaction.
What Is the Maillard Reaction?
Named after French chemist Louis-Camille Maillard who first described it in 1912, the Maillard Reaction is a complex series of chemical reactions between amino acids (from proteins) and reducing sugars that occurs when food is heated above approximately 280°F / 138°C.
This is not caramelization (which involves only sugars and no proteins). The Maillard Reaction produces hundreds of different flavor compounds and aromatic molecules that create the savory, complex, slightly nutty taste we associate with properly browned meat.
The chemical mechanism is extraordinarily complex, but the simplified version looks like this:
Amino Acids
+
Reducing Sugars
+
Heat
→
Melanoidins (Brown Pigments)
+
Flavor Compounds
Amino Acids+Reducing Sugars+Heat→Melanoidins (Brown Pigments)+Flavor Compounds
What this means for your chicken:
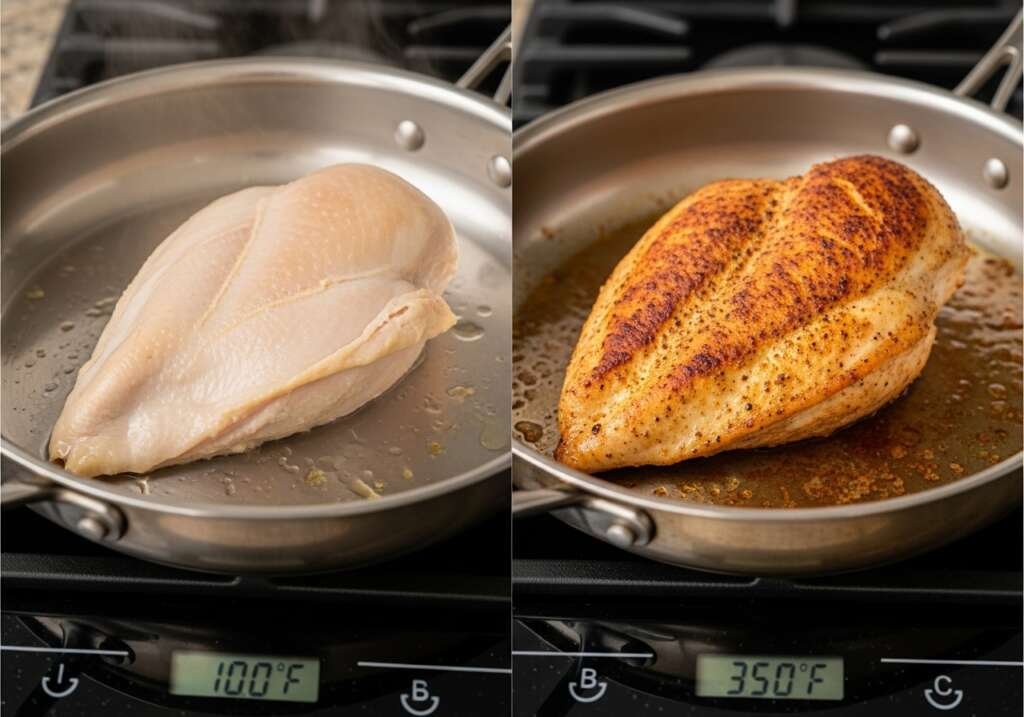
When you place a piece of chicken on a preheated hot surface, the exterior surface rapidly heats above the 280°F threshold. The proteins on the surface denature (unfold), exposing amino acid chains. These chains react with naturally present sugars in the meat, producing golden-brown color and deeply savory flavor.
The Maillard reaction is a chemical reaction between amino acids and reducing sugars.
But here is the critical part that most home cooks miss: the Maillard Reaction cannot occur in the presence of excess surface moisture.
Water has a boiling point of 212°F / 100°C at sea level. As long as water is present on the surface of your chicken, evaporative cooling keeps the surface temperature at or below 212°F—well below the 280°F threshold needed for the Maillard Reaction to begin. Instead of browning, the chicken steams. Instead of developing complex flavors, it tastes bland and looks pale.
Why a Cold Pan Destroys the Maillard Reaction
When you place chicken in a cold pan and then turn on the heat, the chicken slowly warms along with the pan. During this slow temperature ramp, moisture from the interior of the chicken migrates to the surface and begins evaporating. But because the pan temperature is still low, this moisture evaporates slowly, creating a steam environment around the meat.
By the time the pan finally reaches proper searing temperature, the chicken has been essentially steaming in its own moisture for several minutes. The exterior is wet, pale, and rubbery. You have missed the entire Maillard window.
The correct technique: Preheat your sheet pan in a 425°F / 218°C oven for 5 full minutes before adding the chicken. When the chicken hits the screaming-hot pan surface, surface moisture flash-evaporates within seconds, and the Maillard Reaction begins immediately. You get deep golden-brown color, crispy skin (if using skin-on chicken), and exponentially more flavor.
🧈 The Emulsification Secret: How Lemon Juice and Butter Become a Silky Sauce
One of the signature elements of this recipe is the garlic butter sauce that coats the chicken and asparagus. This is not just melted butter with lemon juice dumped in. This is a stable emulsion—a sophisticated mixture of fat and water that normally want to separate but are held together through mechanical and chemical intervention.
Understanding Emulsions
An emulsion is a mixture of two immiscible liquids (liquids that normally do not mix, like oil and water). In culinary applications, we typically create emulsions of fat (butter, oil) and water-based liquids (stock, lemon juice, wine).
Without intervention, fat and water separate immediately due to differences in molecular polarity. Water molecules are polar (they have positive and negative ends) and are attracted to other polar molecules. Fat molecules are nonpolar and are repelled by water.
Asparagus is not just for crunch; it’s a powerhouse of Vitamin K and antioxidants
To create a stable emulsion, you need two things:
- Mechanical agitation — whisking, blending, or shaking to break one liquid into tiny droplets suspended in the other
- Emulsifiers — molecules that have both polar (water-loving) and nonpolar (fat-loving) ends, allowing them to bridge the gap between fat and water
Butter contains approximately 80% fat, 16% water, and 3-4% milk proteins. These milk proteins, particularly casein and whey proteins, act as natural emulsifiers.
The Lemon Juice Magic
When you add lemon juice (which is acidic, pH ~2.3) to melted butter, several things happen simultaneously:
- The acid denatures the milk proteins in the butter, causing them to unfold and expose both their hydrophobic (fat-loving) and hydrophilic (water-loving) regions more effectively.
- These denatured proteins arrange themselves at the fat-water interface, with their fat-loving ends embedded in the butter and their water-loving ends extending into the lemon juice.
- Mechanical whisking breaks the mixture into millions of tiny droplets, creating a huge surface area for the proteins to stabilize.
- The result is a creamy, stable sauce that coats food beautifully instead of separating into greasy puddles and watery pools.
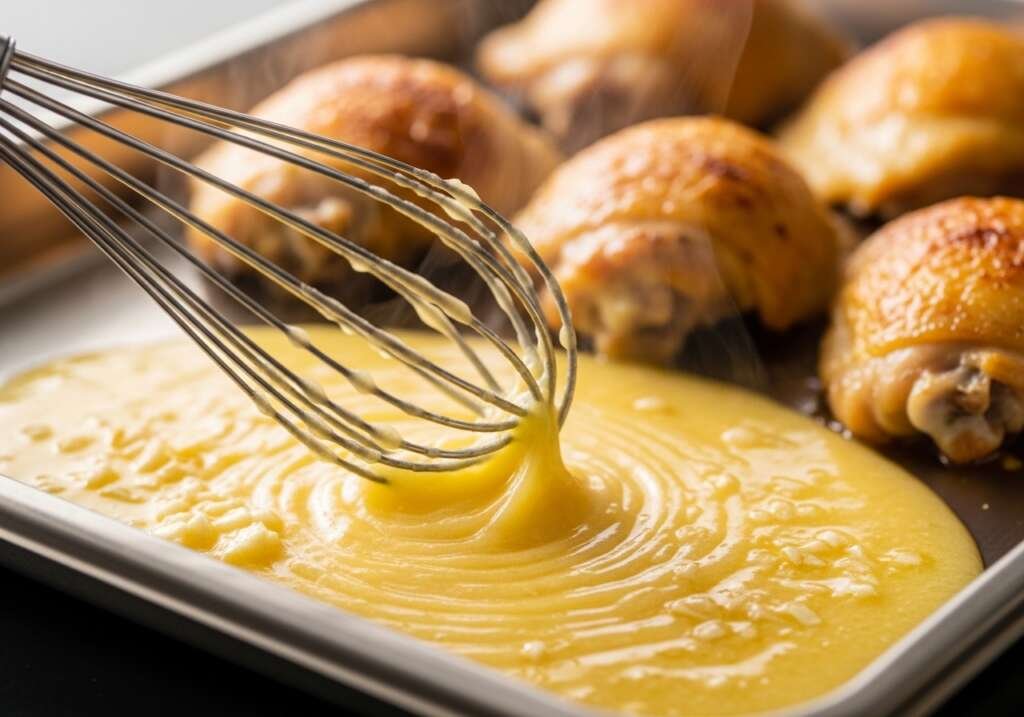
The key technique in this recipe: we add cold butter cubes to the hot pan at the very end of cooking and whisk them vigorously as they melt. The temperature gradient and mechanical action create a beautiful butter emulsion enriched with the fond (the browned bits stuck to the pan), garlic, and lemon juice.
This is a beurre fondu—a foundational French technique that sounds intimidating but takes literally thirty seconds to execute.
🧄 Ingredient Science: Why Fresh Matters
Fresh Garlic vs. Garlic Powder: The Allicin Question
I am often asked whether garlic powder can substitute for fresh garlic. The answer is: chemically, they are completely different ingredients.
Fresh garlic contains an amino acid derivative called alliin stored in the cell cytoplasm, and an enzyme called alliinase stored in separate compartments within the cell. When you crush, mince, or slice garlic, you rupture the cell walls, allowing alliin and alliinase to mix. They react immediately to produce allicin—the pungent, sulfurous compound responsible for fresh garlic’s characteristic sharp aroma and flavor.
Alliin+Alliinase→Allicin+Pyruvate+Ammonia
Allicin is extremely volatile and heat-sensitive. It breaks down rapidly when exposed to air and transforms when heated, producing dozens of different organosulfur compounds that contribute complex savory, nutty, and slightly sweet flavors.
Garlic powder, by contrast, is made from dehydrated garlic that has been ground into powder. During the dehydration process, most of the alliinase enzyme is deactivated by heat, and the allicin that initially forms degrades into stable but less aromatic compounds. Garlic powder delivers a mild, slightly sweet garlic flavor, but it lacks the sharp, bright complexity of fresh garlic.
For this recipe: We use 6 cloves of fresh garlic, sliced thin. Slicing (rather than mincing or crushing) produces moderate allicin release without overwhelming pungency. The garlic slices also toast beautifully in the hot pan, developing nutty, caramelized notes that garlic powder simply cannot replicate.
Asparagus: The Snap Test and Chlorophyll Retention
Asparagus is one of the few vegetables that announces its own freshness through a simple physical test: the snap.
Fresh asparagus has high turgor pressure—the pressure of water inside plant cells pressing against the rigid cell walls. This internal pressure makes fresh asparagus crisp and brittle. When you bend a fresh spear, it snaps cleanly at the natural breaking point where the tender top meets the woody bottom.
As asparagus ages, it loses moisture through evaporation and cell wall degradation caused by natural enzymes. The turgor pressure drops, the cell structure weakens, and the spear becomes limp and bendy instead of crisp and snappy.
Chlorophyll retention is the second indicator of quality. Asparagus gets its bright green color from chlorophyll molecules embedded in chloroplast membranes. When exposed to heat, acids, or prolonged storage, chlorophyll degrades into pheophytin—a dull olive-brown pigment.
To preserve the bright green color during cooking:
- Use high heat for short duration (our recipe uses 425°F for 12-15 minutes)
- Avoid overcooding—cook just until tender-crisp
- Do not cover—trapping steam concentrates plant acids that accelerate chlorophyll breakdown
For this recipe: We add asparagus to the pan 12 minutes into cooking, giving it exactly 12-15 minutes of roasting time—enough to become tender and develop slight char, but not so long that it turns mushy and drab.
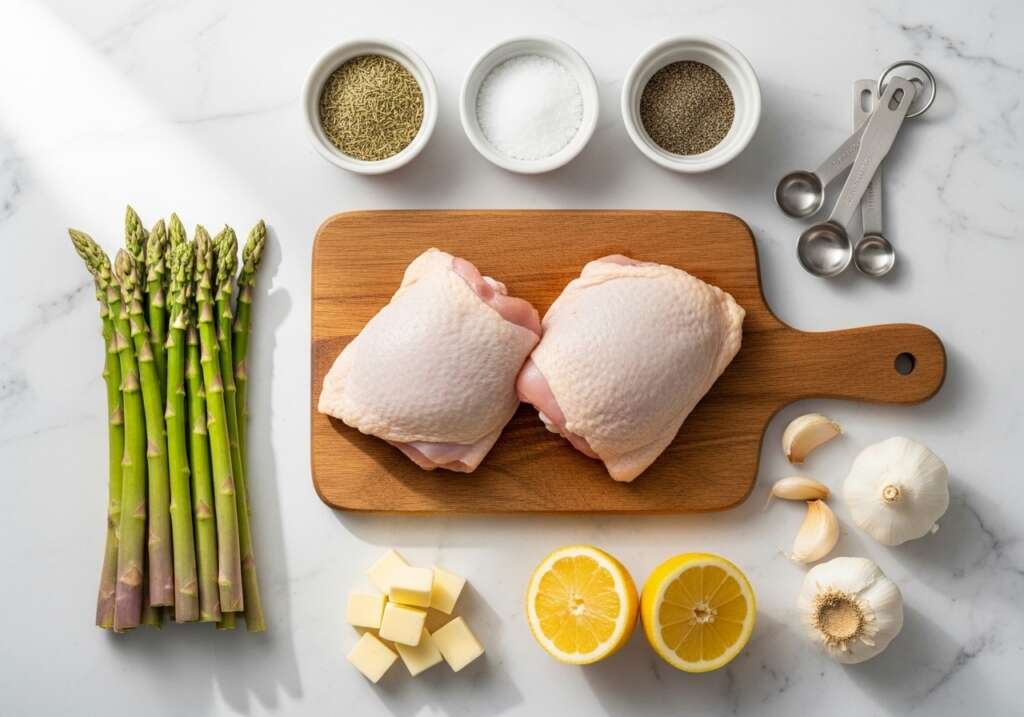
📋 Ingredients (Precision Measurements)
| Ingredient | US Customary | Metric | Functional Role |
|---|---|---|---|
| Boneless, skinless chicken thighs | 1.5 lbs | 680g | Protein base, moisture retention |
| Fresh asparagus, trimmed | 1 lb | 450g | Vegetable fiber, micronutrients |
| Fresh garlic cloves, sliced thin | 6 cloves | 24g | Allicin production, aromatic complexity |
| Unsalted butter, cold, cubed | 4 tbsp | 56g | Emulsion base, fat-soluble flavor carrier |
| Fresh lemon juice | 2 tbsp | 30ml | Acid for emulsion, brightness |
| Lemon zest | 1 tsp | 2g | Aromatic oils, citrus enhancement |
| Extra virgin olive oil | 2 tbsp | 30ml | High-heat cooking fat, phenolic compounds |
| Kosher salt | 1.5 tsp | 7g | Seasoning, moisture retention |
| Black pepper, cracked | ½ tsp | 1g | Piperine heat, aromatic |
| Smoked paprika | 1 tsp | 2g | Color, mild smoke flavor |
| Dried oregano | ½ tsp | 1g | Mediterranean herb notes |
| Red pepper flakes (optional) | ¼ tsp | 0.5g | Capsaicin heat |
| Fresh parsley, chopped (garnish) | 2 tbsp | 8g | Color, fresh finish |
📊 Fresh vs. Frozen Chicken: The Moisture Science
| Parameter | Fresh Chicken Thighs | Frozen Chicken Thighs |
|---|---|---|
| Moisture Content | 74-76% | 70-72% (post-thaw) |
| Cooking Time at 425°F | 22-25 minutes | 28-32 minutes |
| Ice Crystal Damage | None | Moderate (cell wall rupture) |
| Texture Quality | Excellent | Good (slightly stringier) |
| Sear Quality | Superior (dry surface) | Reduced (moisture release) |
| Recommended Thaw Method | N/A | Overnight in refrigerator |
| Price per Pound (avg USA) | $3.50-5.00 | $2.50-3.50 |
| Shelf Life (refrigerated) | 2-3 days | 6-9 months (frozen) |
Scientific Note: When chicken is frozen, water inside the cells forms ice crystals that puncture cell membranes. Upon thawing, this cellular damage allows moisture to escape more readily, resulting in slightly lower moisture retention and less effective browning. For optimal results in this recipe, use fresh chicken thighs whenever possible.
👨🍳 Step-by-Step Instructions with Scientific Pro-Tips
Step 1 — Preheat the Oven and Pan (Critical First Step)
Place a large sheet pan (18×13 inch / 46×33 cm) in your oven. Set the oven to 425°F / 218°C and preheat for 5 full minutes with the pan inside.
Scientific Pro-Tip: This preheating step is non-negotiable. The thermal mass of a heavy sheet pan takes several minutes to reach equilibrium with the oven temperature. Starting with a screaming-hot pan ensures immediate Maillard reaction when the chicken makes contact, rather than gradual, flavor-robbing steam cooking.
Step 2 — Prepare the Chicken
While the oven preheats, pat the chicken thighs completely dry with paper towels. Surface moisture is the enemy of browning—remove every bit.
In a large bowl, toss the chicken with 1 tablespoon olive oil, 1 teaspoon kosher salt, black pepper, smoked paprika, and dried oregano. Use your hands to massage the seasonings into every surface.
Scientific Pro-Tip: Salting chicken 15-30 minutes before cooking (dry brining) allows salt to penetrate the protein matrix, improving moisture retention and flavor distribution. If you have time, salt the chicken first and let it rest at room temperature for 20 minutes before adding the other seasonings.
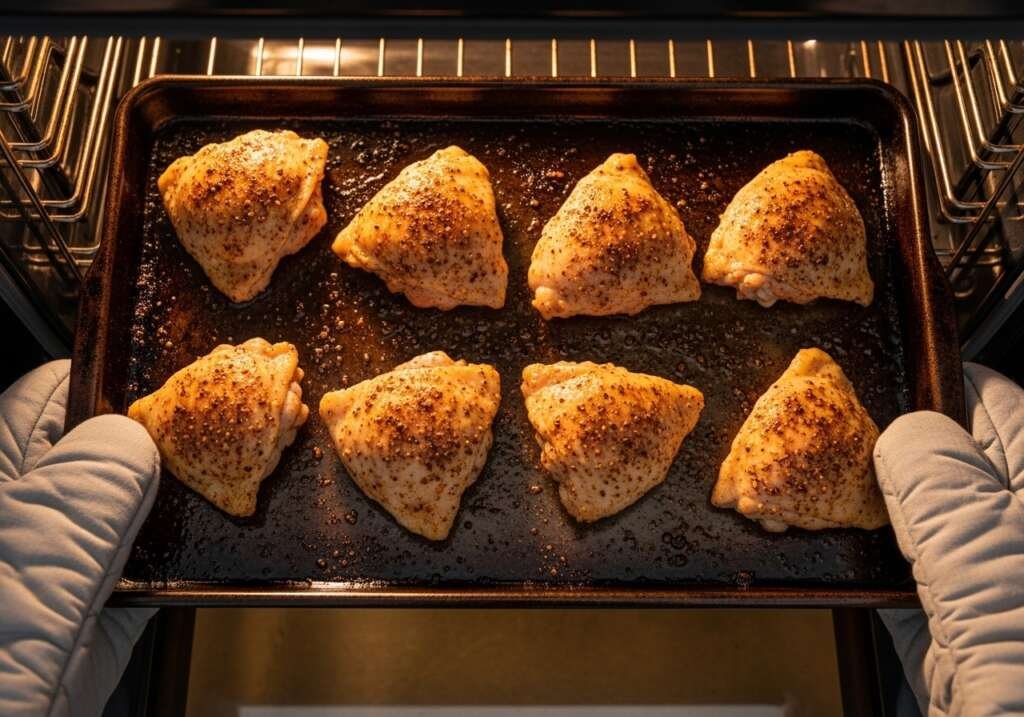
Step 3 — Sear the Chicken
Carefully remove the preheated sheet pan from the oven (it will be extremely hot—use thick oven mitts). Drizzle the remaining 1 tablespoon olive oil across the hot pan surface.
Immediately place the chicken thighs on the pan in a single layer with at least 1 inch / 2.5 cm of space between each piece. You should hear an immediate, aggressive sizzle.
Return the pan to the oven and roast for 12 minutes without opening the door.
Scientific Pro-Tip: Do not crowd the pan. When chicken pieces touch or are placed too close together, they create a localized steam environment that prevents proper browning. The space between pieces allows hot air to circulate and moisture to escape as vapor rather than condensing on adjacent surfaces.
Step 4 — Prepare the Asparagus and Garlic
While the chicken cooks, trim the woody ends from the asparagus (usually the bottom 1-2 inches). The snap test works beautifully: hold a spear at both ends and bend gently—it will naturally snap at the point where tender meets woody.
Slice the garlic cloves thinly (about ⅛ inch / 3mm thick). Thin slices toast quickly and evenly without burning.
Step 5 — Add Asparagus and Garlic
At the 12-minute mark, carefully pull the pan from the oven. The chicken should be developing golden-brown color on the bottom surface.
Scatter the asparagus spears around the chicken (not on top of it—you want them to have direct pan contact for charring). Scatter the sliced garlic across the pan, avoiding placing it directly under the chicken where it might burn.
Drizzle any remaining oil over the asparagus and season lightly with salt.
Return the pan to the oven for another 12-15 minutes, until the chicken reaches an internal temperature of 165°F / 74°C (measured in the thickest part) and the asparagus is tender-crisp with light char marks.
Scientific Pro-Tip: Asparagus thickness determines cooking time. Thin spears (pencil-thick) need 10-12 minutes. Thick spears (thumb-thick) need 15-18 minutes. Adjust accordingly or separate by thickness and add in stages.
Step 6 — Create the Garlic Butter Emulsion
Remove the pan from the oven. Transfer the chicken and asparagus to a serving platter and tent loosely with aluminum foil to keep warm.
Place the hot sheet pan on the stovetop (if it is oven-safe for stovetop use) or transfer the pan drippings to a small saucepan over medium heat. The pan will have beautiful browned bits (fond) stuck to the surface—this is concentrated flavor.
Add the lemon juice and zest to the hot pan and use a wooden spoon to scrape up all the fond. Let it simmer for 30 seconds.
Remove from heat and add the cold butter cubes all at once. Whisk vigorously as the butter melts and emulsifies with the lemon juice and pan drippings. The sauce will transform from separated fat and liquid into a smooth, glossy emulsion.
Taste and adjust seasoning with salt if needed.
Scientific Pro-Tip: Cold butter is critical for emulsion stability. If you add hot, melted butter, you do not generate enough mechanical shear during whisking to break it into the tiny droplets needed for stable emulsion. Cold butter resists melting just long enough for vigorous whisking to create the proper structure.
Step 7 — Finish and Serve
Pour the garlic butter sauce over the chicken and asparagus. Garnish with fresh chopped parsley and optional red pepper flakes for heat.
Serve immediately with cauliflower rice, quinoa, or crusty bread for soaking up the sauce.
The 30-Minute Dinner Science: One-Pan Garlic Butter Chicken & Asparagus
Ingredients
Equipment
Method
- Place large sheet pan (18×13 inch / 46×33 cm) in oven. Preheat oven to 425°F (218°C) with pan inside for 5 full minutes. This preheating is critical for immediate Maillard reaction.
- While oven preheats, pat chicken thighs completely dry with paper towels. Remove all surface moisture.
- In large bowl, toss chicken with 1 tbsp olive oil, 1 tsp kosher salt, black pepper, smoked paprika, and dried oregano. Massage seasonings into meat with hands.
- Carefully remove preheated pan from oven (use thick oven mitts—pan is extremely hot). Drizzle remaining 1 tbsp olive oil across hot pan surface.
- Immediately place chicken thighs on pan in single layer with at least 1 inch (2.5 cm) space between pieces. You should hear aggressive sizzle. Do not crowd.
- Return pan to oven. Roast for 12 minutes without opening door
- While chicken cooks, trim woody ends from asparagus (bottom 1-2 inches). Use snap test: bend spear gently—it will naturally break where tender meets woody.
- Slice garlic cloves thinly (⅛ inch / 3mm thick)
- At 12-minute mark, carefully pull pan from oven. Chicken should be developing golden-brown color on bottom.
- Scatter asparagus spears around chicken (not on top—asparagus needs direct pan contact for charring). Scatter sliced garlic across pan, avoiding placing directly under chicken.
- Season asparagus lightly with remaining ½ tsp salt.
- Return pan to oven for 12-15 minutes, until chicken reaches internal temperature of 165°F (74°C) in thickest part and asparagus is tender-crisp with light char marks.
- Remove pan from oven. Transfer chicken and asparagus to serving platter. Tent loosely with foil to keep warm.
- Place hot sheet pan on stovetop over medium heat (if oven-safe for stovetop) or transfer drippings to small saucepan. Pan will have browned bits (fond) stuck to surface.
- Add lemon juice and zest to hot pan. Use wooden spoon to scrape up all fond. Simmer 30 seconds.
- Remove from heat. Add cold butter cubes all at once. Whisk vigorously as butter melts and emulsifies with lemon juice and drippings. Sauce will transform into smooth, glossy emulsion.
- Taste and adjust seasoning with salt if neede
- Pour garlic butter sauce over chicken and asparagus. Garnish with fresh chopped parsley and optional red pepper flakes.
- Serve immediately with cauliflower rice, quinoa, or crusty bread for soaking up sauce.
Notes
This is the most important step for flavor development. A cold pan causes chicken to steam instead of developing the Maillard reaction browning. Always preheat pan in oven for full 5 minutes. Do Not Crowd the Pan
Leave at least 1 inch (2.5 cm) between chicken pieces. Crowding creates steam environment that prevents browning. Use two pans if necessary. Asparagus Thickness Matters
Thin spears (pencil-thick): 10-12 minutes. Medium spears: 12-15 minutes. Thick spears (thumb-thick): 15-18 minutes. Adjust timing accordingly or separate by thickness and add in stages. Cold Butter for Emulsion
Use cold butter cubes, not melted butter, for the sauce. Cold butter creates proper emulsion when whisked vigorously. Melted butter will separate. Internal Temperature Check
Chicken thighs are safe at 165°F (74°C) but taste best at 170-175°F (77-79°C) when collagen has fully broken down into gelatin. Use instant-read thermometer for accuracy. Make-Ahead Option
Season chicken up to 4 hours ahead and refrigerate. Bring to room temperature 20 minutes before cooking. Trim asparagus and slice garlic up to 1 day ahead; store in airtight containers in refrigerator. Storage
Store chicken and asparagus in separate airtight containers in refrigerator for up to 4 days. Store chicken with 2-3 tbsp of sauce or broth to prevent drying. Reheat gently at 350°F for 10-12 minutes or in skillet over medium-low heat. Substitutions
- Chicken: Can use bone-in thighs (add 8-10 min cooking time) or chicken tenderloins (reduce chicken-only time to 8 min)
- Asparagus: Can substitute green beans (same timing) or broccoli florets (needs 18-20 min total)
- Butter: Can substitute ghee for dairy-free option
💬 Chef Hamid’s Insight
There is a dangerous myth in American food culture that says if you care about health and nutrition, you must sacrifice time, convenience, and pleasure. That cooking “real food” requires elaborate preparation, expensive ingredients, and culinary school training.
This recipe dismantles that myth completely. Thirty minutes. One pan. Six ingredients beyond pantry staples. Zero specialized technique beyond “preheat the pan” and “whisk the butter.” And yet the result delivers complete nutrition, genuine satisfaction, and flavors that rival anything you would order at a casual dining restaurant.
The science is not here to intimidate you. It is here to liberate you. When you understand why the hot pan matters, you stop guessing and start succeeding. When you understand emulsification, you stop buying bottled sauces and start creating your own in seconds.
Mastery is not complexity. Mastery is understanding the few principles that govern everything.
— Chef Hamid | Homely Recipe
🥗 Nutrition Information (Per Serving — 4 Servings Total)
| Nutrient | Amount | % Daily Value |
|---|---|---|
| Calories | 385 kcal | — |
| Protein | 34g | 68% |
| Total Fat | 24g | 31% |
| Saturated Fat | 9g | 45% |
| Monounsaturated Fat | 11g | — |
| Carbohydrates | 8g | 3% |
| Dietary Fiber | 3g | 12% |
| Net Carbs | 5g | — |
| Sugars | 3g | — |
| Sodium | 520mg | 23% |
| Cholesterol | 165mg | 55% |
| Vitamin A | 1,250 IU | 25% |
| Vitamin C | 12mg | 20% |
| Vitamin K | 68mcg | 85% |
| Folate | 128mcg | 32% |
| Iron | 3.2mg | 18% |
Macronutrient Ratio: 35% Protein / 56% Fat / 9% Carbs
Metabolic Notes: This meal aligns beautifully with Mediterranean Diet principles: high protein from lean poultry, healthy fats from olive oil and butter, low glycemic carbohydrates from non-starchy vegetables, and abundant micronutrients from fresh produce.
🌡️ Cooking Temperature & Timing Guide
| Stage | Temperature | Time | Visual/Physical Cue |
|---|---|---|---|
| Oven Preheat (with pan) | 425°F / 218°C | 5 min | Pan visibly hot when oil hits it |
| Chicken Sear (first phase) | 425°F / 218°C | 12 min | Bottom golden-brown, edges beginning to crisp |
| Chicken + Asparagus Roast | 425°F / 218°C | 12-15 min | Chicken internal temp 165°F, asparagus tender-crisp |
| Chicken Final Internal Temp | 165°F / 74°C | — | Use instant-read thermometer in thickest part |
| Chicken Ideal Internal Temp | 170-175°F / 77-79°C | — | Juiciest texture for thighs (dark meat) |
| Sauce Emulsification | Off heat (residual) | 1-2 min | Glossy, smooth, no separation |
❄️ Storage & Reheating Science
| State | Container | Location | Shelf Life | Reheating Method |
|---|---|---|---|---|
| Refrigerated (separated) | Airtight containers (chicken separate from asparagus) | Refrigerator 38°F / 3°C | 4 days | Oven 350°F for 10-12 min |
| Refrigerated (together) | Single container | Refrigerator | 3 days | Skillet over medium heat, 5-7 min |
| Frozen (chicken only) | Freezer bag, air removed | Freezer 0°F / -18°C | 3 months | Thaw overnight in fridge, reheat in oven |
| Frozen (asparagus) | Not recommended | — | — | Asparagus becomes mushy when frozen |
Reheating Science: Chicken becomes rubbery when reheated too quickly or at too high a temperature. The proteins that were denatured during initial cooking undergo further moisture loss and contraction when re-exposed to heat. To prevent this, reheat gently at lower temperatures (350°F or medium stovetop heat) and add 1-2 tablespoons of chicken broth or water to create steam that rehydrates the protein matrix.
❓ FAQ (USA Audience-Specific)
Can I use frozen asparagus for this recipe?
Technically yes, but the results are significantly inferior. Frozen asparagus has been blanched before freezing, which means it is already partially cooked. When you roast it, it becomes mushy rather than developing the tender-crisp texture and char marks you get from fresh asparagus. Additionally, the freezing process ruptures cell walls, causing moisture loss during roasting and soggy texture. If you absolutely must use frozen, thaw and pat completely dry, then reduce roasting time to 6-8 minutes.
Can I substitute chicken breasts for thighs?
You can, but I do not recommend it. Chicken breasts are lean (lower fat content) and cook faster than thighs. By the time the asparagus is perfectly tender, the breast meat will likely be dry and chalky. If you prefer white meat, use chicken breast tenderloins (the small strip muscles) which are thinner and cook in similar time to thighs, or reduce the initial chicken-only roasting time to 8 minutes before adding asparagus.
How do I prevent the garlic from burning?
Garlic burns easily because of its high sugar content and thin slices. To prevent this: (1) add garlic at the same time as asparagus (not during the initial chicken sear), (2) slice it thin but not paper-thin (⅛ inch is ideal), (3) scatter it across the pan rather than concentrating it in one spot, and (4) avoid placing it directly under chicken pieces where it is shielded from air circulation and more likely to scorch.
What if I do not have a sheet pan large enough to fit everything without crowding?
Use two sheet pans. Divide the chicken between them, giving each piece adequate space. You can roast both pans simultaneously in the oven (one on the middle rack, one on the lower rack), but swap their positions halfway through cooking to ensure even heat distribution. Alternatively, cook the chicken on one pan and the asparagus on a second pan, adjusting timing so they finish simultaneously.
Can I meal prep this for the week?
Absolutely. Cook the full recipe, let it cool completely, then portion into individual airtight containers (chicken and asparagus separated to prevent sogginess). Refrigerate for up to 4 days. Make a fresh batch of garlic butter sauce when reheating (takes 90 seconds) rather than storing the sauce, which can separate. Reheat in a 350°F oven for 10-12 minutes or microwave on 70% power in 1-minute intervals.
Is this recipe keto-friendly?
Yes. With only 5g net carbs per serving (8g total carbs minus 3g fiber), this recipe fits comfortably within ketogenic macronutrient targets (typically <20-50g net carbs per day). The high fat content from butter and olive oil and high protein from chicken make it an ideal keto meal. Serve with cauliflower rice instead of regular rice to keep it fully keto-compliant.
What is the best way to store leftovers without the chicken getting rubbery?
Store the chicken in an airtight container with 2-3 tablespoons of the garlic butter sauce or chicken broth. This moisture prevents the exterior from drying out and the protein from contracting excessively. When reheating, bring the chicken to room temperature first (sit on counter for 20 minutes), then reheat gently at 350°F for 10-12 minutes or in a covered skillet over medium-low heat with a splash of additional liquid. Never microwave on full power—use 70% power in 1-minute intervals.
🔗 More From Homely Recipe
These articles pair perfectly with what you just learned:
🥦 [Air Fryer Roasted Broccoli] — Another one-pan vegetable side that uses similar browning science to create restaurant-quality results in under 15 minutes.
🍗 [Air Fryer Whole Roast Chicken] — Master the science of poultry cooking with this complete guide to achieving crispy skin and juicy meat using convection heat principles.
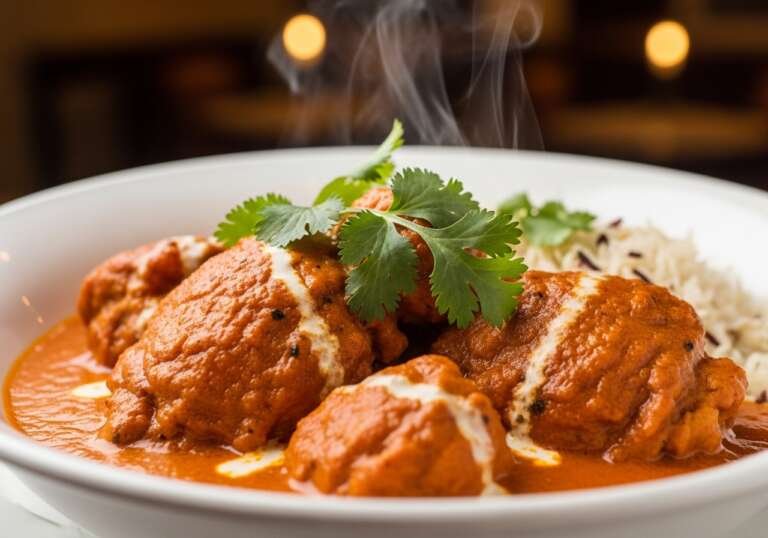
🧈 [The Ultimate 20-Minute Instant Pot Butter Chicken] — If you loved the emulsification science in this recipe, explore how pressure cooking enhances flavor extraction in this Indian classic.
🥔 [Air Fryer Crispy Smashed Potatoes] — The perfect starchy side to pair with this protein-forward chicken dishs.