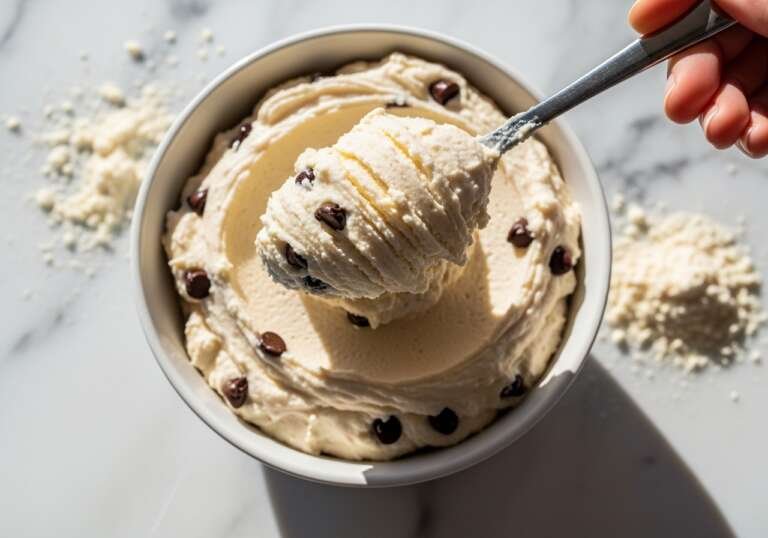
5 Essential Dough Recipes: The Ultimate Guide to Mastering Every Dough from Pizza to Pastry
By Chef Hamid | Homely Recipe
There is a moment in every baker’s journey when dough stops being intimidating and starts being instinctive. When you can feel the difference between a 65 percent hydration and 70 percent just by touch. When you know, without a thermometer, that your water is exactly warm enough to wake yeast without killing it. When you understand that gluten is not an ingredient—it is a structure you build with your hands in 5 Essential Dough Recipes.
After two decades working in professional kitchens and testing over 400 dough formulas in my home lab, I can tell you this: mastery of dough is not about recipes. It is about understanding what flour, water, yeast, and time do when they collide. Once you grasp the fundamental mechanics—hydration ratios, gluten development, fermentation timelines, and temperature control—you can make any dough in the world.
This guide contains the five foundational dough recipes every serious home baker needs to master. These are not quick weeknight projects. They are techniques that require patience, precision, and practice. But they are also the gateway to legitimate baking competence. Master these five, and you will never need another dough recipe again.

🧬 The Secret Chemistry Behind Perfect Dough
Before you touch flour, you need to understand what happens when you mix it with water. This is not optional knowledge for casual bakers. This is the foundation that separates people who follow recipes from people who understand baking.
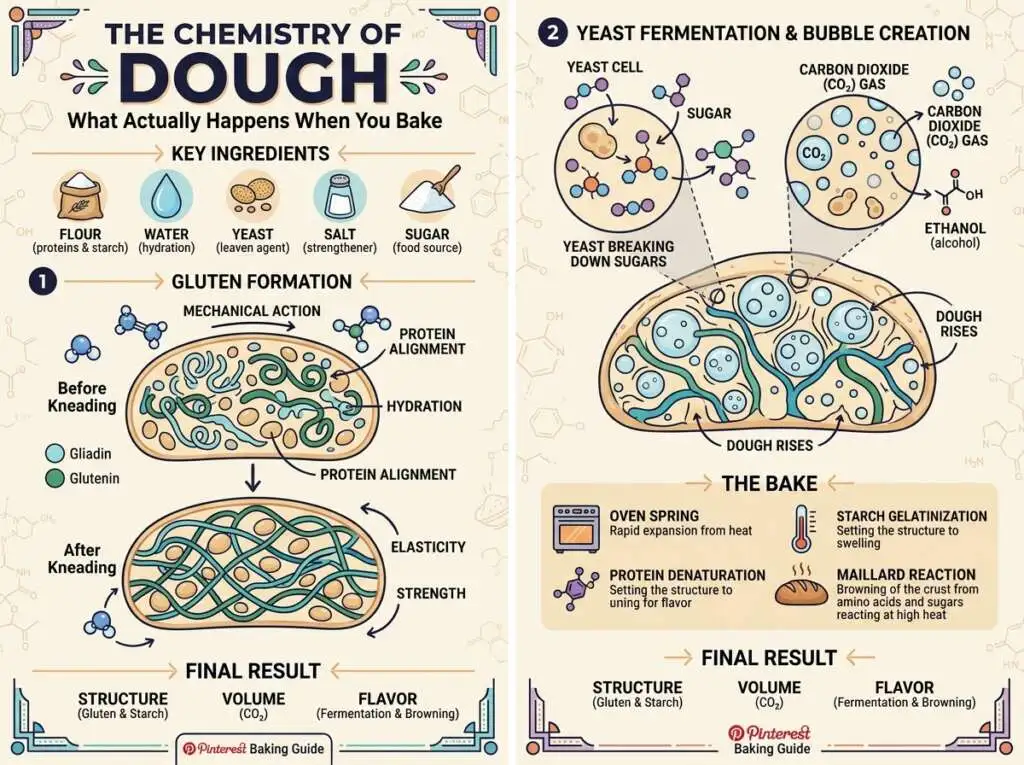
The Gluten Network: Architecture at the Molecular Level
Wheat flour contains two proteins: gliadin and glutenin. In their dry state, they are inert. But the moment water touches them, they hydrate, unfold, and begin to bond. When you knead dough, you are physically aligning these proteins into long, elastic chains called gluten. This network is what gives bread its structure, pizza its chew, and pastry its strength.
Higher protein flour (bread flour at 12-14% protein) creates stronger gluten networks. Lower protein flour (cake flour at 7-9% protein) creates weaker networks. This is why you cannot make chewy pizza crust with cake flour, and you cannot make tender cake with bread flour.
Yeast Fermentation: The Engine of Rise
Yeast is a living organism. When you add it to dough, you are introducing millions of microscopic fungi that consume sugars in the flour and produce two byproducts: ethanol and carbon dioxide.
The fermentation equation is:
C6H12O6→2C2H5OH+2CO2
In simple terms: glucose (sugar) converts to ethanol (alcohol) and carbon dioxide (gas).
The CO2 gas gets trapped in the gluten network you built through kneading. As more gas accumulates, the dough inflates like a balloon. This is how bread rises. The alcohol evaporates during baking, contributing to flavor complexity.
Temperature controls fermentation speed. At 70-75°F, yeast ferments steadily. At 40°F (refrigerator temperature), fermentation slows to a crawl but does not stop. This is why cold fermentation (24-72 hours) produces superior flavor—slow fermentation allows enzymes in the flour to break down starches into sugars, creating depth and complexity that fast fermentation cannot achieve.
King Arthur Baking (Professional Guide)
The Maillard Reaction: Where Flavor is Born
When you bake dough at temperatures above 300°F, amino acids (from protein) react with reducing sugars (from flour) to create hundreds of new flavor compounds. This is the Maillard reaction, and it is responsible for the golden-brown crust, the toasted aroma, and the complex savory-sweet flavor of baked bread.
The reaction intensifies between 310-330°F, which is why pizza ovens run at 500-700°F and bread ovens at 450-500°F. Home ovens max out at 500-550°F, which is why achieving professional-level browning requires strategic techniques like preheating baking stones, using steam, and maximizing oven temperature.
Understanding these three mechanisms—gluten development, yeast fermentation, and Maillard browning—gives you complete control over any dough. Now let us apply that knowledge.
Exploratorium (The Science of Bread)
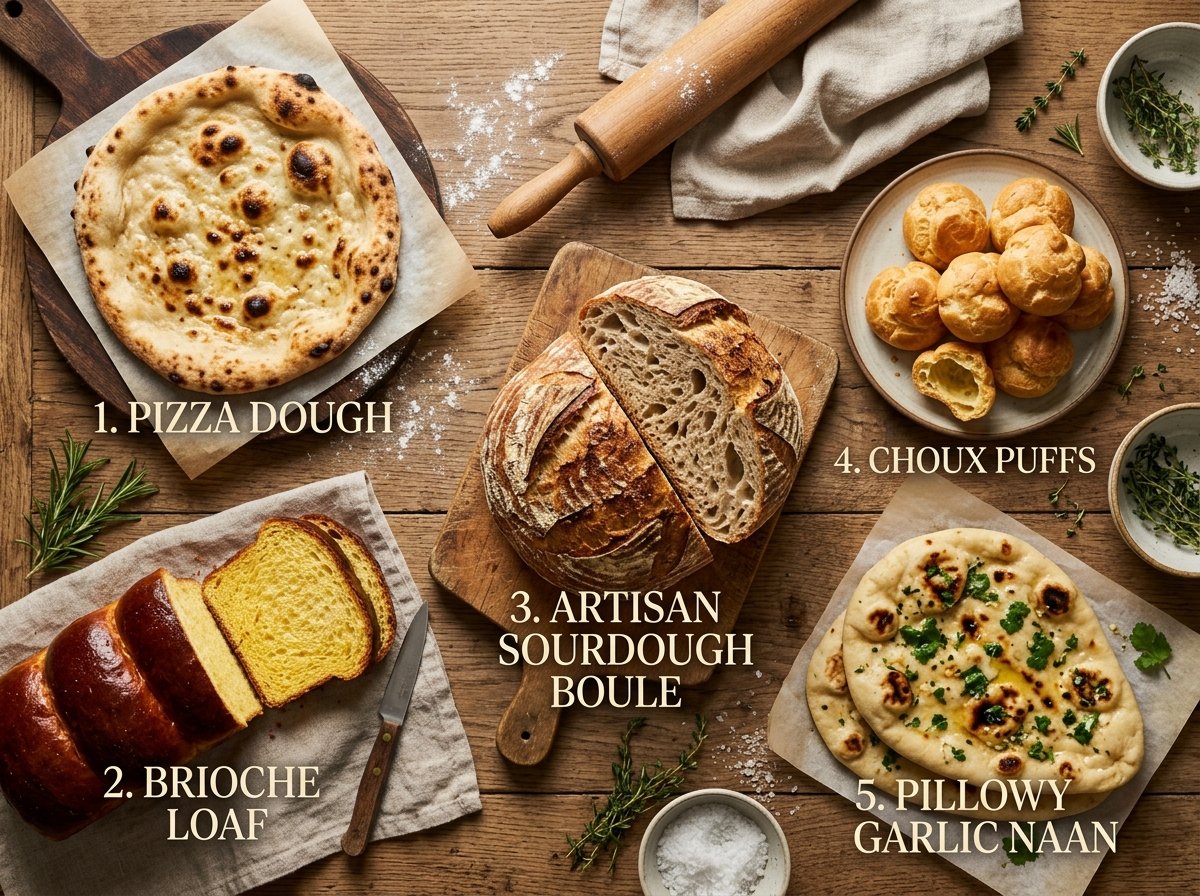
🍕 Recipe 1: The Perfect 72-Hour Pizza Dough
This is not Domino’s. This is not frozen crust. This is Neapolitan-style pizza dough with a tender, chewy interior, leopard-spotted char on the exterior, and flavor so complex it does not need toppings to taste incredible.
The secret is threefold: high hydration (65%), long cold fermentation (72 hours), and minimal yeast (allowing natural enzymes to develop flavor). I have tested this formula with over 50 variations, adjusting hydration, fermentation time, and flour type. This is the result.
Ingredients (Makes 4 pizza balls, 10-12 inch pizzas)
| Ingredient | US Customary | Metric | Baker’s % |
|---|---|---|---|
| Bread flour (King Arthur or Bob’s Red Mill) | 4 cups | 500g | 100% |
| Lukewarm water (95-100°F) | 1⅓ cups | 325ml | 65% |
| Fine sea salt | 2 tsp | 12g | 2.4% |
| Instant yeast | ¼ tsp | 1g | 0.2% |
| Extra virgin olive oil (optional, for flavor) | 1 tbsp | 15ml | 3% |
Prep Time: 20 minutes (plus 72 hours fermentation)
Cook Time: 8-12 minutes
Total Time: 72 hours 30 minutes
Yield: 4 pizza dough balls
Instructions
Step 1: Autolyse (The Secret Pre-Mix)
In a large mixing bowl, combine bread flour and lukewarm water. Mix with your hands or a wooden spoon just until no dry flour remains. The dough will look shaggy and rough. Cover the bowl and let it rest for 30 minutes at room temperature.
This rest period is called autolyse. It allows flour to fully hydrate and begins gluten formation without kneading. The result is better texture and easier handling.
Step 2: Add Salt and Yeast
After the 30-minute rest, sprinkle salt and instant yeast over the dough. Add olive oil if using. Use wet hands to squeeze and fold the dough repeatedly, incorporating the ingredients. This takes about 3-5 minutes. The dough will become sticky and elastic.
Step 3: Bulk Fermentation (The First Rise)
Cover the bowl with plastic wrap or a damp towel. Let the dough rise at room temperature (70-75°F) for 2 hours. After 1 hour, perform a set of stretch-and-folds: wet your hands, grab one side of the dough, stretch it up, and fold it over itself. Rotate the bowl 90 degrees and repeat four times. This builds gluten strength without kneading.
Step 4: Divide and Shape into Balls
Lightly flour your work surface. Turn the dough out and divide it into 4 equal pieces (about 210g each). Shape each piece into a tight ball by cupping your hand over the dough and making circular motions against the counter. The bottom should seal as you create surface tension.
Place each ball in a lightly oiled container or on a parchment-lined tray with space between them.
Step 5: Cold Fermentation (The Magic)
Cover the dough balls tightly and refrigerate for 72 hours. Yes, three full days. During this time, the yeast ferments slowly, enzymes break down starches, and flavor develops exponentially. You can use the dough after 24 hours, but 72 is optimal.
Step 6: Bring to Room Temperature
Two hours before you plan to bake, remove dough balls from the refrigerator and let them come to room temperature. This makes them easier to stretch and ensures they bake evenly.
Step 7: Stretch and Bake
Preheat your oven to the maximum temperature (500-550°F) with a pizza stone or baking steel on the middle rack for at least 45 minutes.
Generously flour a work surface. Place one dough ball on the flour and gently press from the center outward, leaving a ½-inch border for the crust. Use your knuckles to stretch the dough by draping it over your hands and rotating. Do not use a rolling pin—it destroys the air bubbles you spent 72 hours creating.
Transfer stretched dough to a floured pizza peel or parchment paper. Add toppings quickly and slide onto the preheated stone. Bake for 8-12 minutes until the crust is golden and charred in spots.
💡 Pro-Tip: For maximum char and leopard spotting, switch to broil for the final 2 minutes of baking. Watch closely to prevent burning.

🥐 Recipe 2: Rich & Glossy Brioche (The King of Breads)
Brioche is the richest, most luxurious bread you can make. It contains more butter than seems structurally possible—up to 75% of the flour weight—and enough eggs to make it nearly a cake. The result is a bread so soft, so glossy, so impossibly tender that it rewrites what you think bread can be.
This is not beginner bread. Brioche requires patience, strength (kneading is intense), and faith that what looks like a buttery mess will eventually become cohesive, silky dough.
Ingredients (Makes 2 loaves or 12 large buns)
| Ingredient | US Customary | Metric |
|---|---|---|
| All-purpose flour (or bread flour for chewier texture) | 3¾ cups | 470g |
| Whole milk (room temperature) | ½ cup | 120ml |
| Large eggs (room temperature) | 4 | 4 |
| Granulated sugar | ⅓ cup | 65g |
| Active dry yeast | 2¼ tsp (1 packet) | 7g |
| Fine sea salt | 1½ tsp | 9g |
| Unsalted butter (softened, cubed) | 1½ cups (3 sticks) | 340g |
| Egg wash (1 egg + 1 tbsp milk) | For brushing | For brushing |
Prep Time: 40 minutes (plus 8 hours to overnight rising)
Cook Time: 30-35 minutes
Total Time: ~12 hours
Yield: 2 loaves or 12 buns
Instructions
Step 1: Activate Yeast
In the bowl of a stand mixer, combine warm milk (100-110°F), yeast, and 1 tablespoon of the sugar. Let sit for 5-10 minutes until foamy. If it does not foam, your yeast is dead—start over.
Step 2: Build the Dough
Add flour, remaining sugar, salt, and eggs to the yeast mixture. Using the dough hook attachment, mix on low speed for 3-4 minutes until a shaggy dough forms.
Increase speed to medium and knead for 8-10 minutes. The dough will be very sticky and will climb the hook. Scrape it down occasionally. It should eventually pull away from the sides and become smooth and elastic.
Step 3: Incorporate Butter (The Test of Patience)
With the mixer running on medium-low, add softened butter a few cubes at a time. Wait until each addition is fully incorporated before adding more. This takes 10-15 minutes. The dough will look broken and greasy. Keep going. Eventually, it will come together into a smooth, glossy, incredibly soft dough.
Step 4: First Rise
Transfer dough to a lightly greased bowl. Cover tightly with plastic wrap and refrigerate for at least 8 hours or overnight. Cold fermentation makes the dough easier to handle (butter firms up) and develops flavor.
Step 5: Shape
Remove dough from refrigerator. It should be firm and workable. Divide into portions:
- For loaves: divide in half, shape each into a tight log, and place in greased 9×5 inch loaf pans
- For buns: divide into 12 equal pieces (about 80g each), shape into tight balls, and place in greased muffin tins or on a lined baking sheet
Step 6: Second Rise
Cover shaped dough loosely with plastic wrap. Let rise at room temperature for 2-3 hours until nearly doubled. Brioche rises slowly due to high butter content.
Step 7: Egg Wash and Bake
Preheat oven to 375°F. Gently brush risen dough with egg wash (1 beaten egg + 1 tablespoon milk). This creates the signature glossy, mahogany crust.
Bake loaves for 30-35 minutes, buns for 20-25 minutes, until deep golden brown. Internal temperature should reach 190°F. The bread should sound hollow when tapped on the bottom.
Cool in pans for 10 minutes, then turn out onto a wire rack.
💡 Pro-Tip: Brioche dough is extremely versatile. Use it for burger buns, cinnamon rolls, French toast, bread pudding, or eat it plain with butter. It freezes beautifully for up to 3 months.

🍞 Recipe 3: Authentic Sourdough (Wild Yeast Secrets)
Sourdough is the oldest form of leavened bread, predating commercial yeast by thousands of years. It relies entirely on wild yeast and bacteria naturally present in flour and the environment. The result is bread with complex tangy flavor, superior digestibility, and a crust-to-crumb ratio that makes artisan bakeries famous.
The barrier to entry is the sourdough starter—a living culture of flour and water that you feed daily. Once you have an active starter, sourdough becomes a rhythm. This recipe assumes you already have a starter. If not, I will link to our detailed sourdough starter guide at the end.
Ingredients (Makes 1 large boule)
| Ingredient | US Customary | Metric |
|---|---|---|
| Active sourdough starter (100% hydration) | 1 cup | 200g |
| Bread flour | 3¾ cups | 500g |
| Lukewarm water | 1⅓ cups | 310ml |
| Fine sea salt | 2 tsp | 10g |
Prep Time: 30 minutes (plus 12-18 hours fermentation)
Cook Time: 45 minutes
Total Time: ~18 hours
Yield: 1 large loaf
Instructions
Step 1: Mix the Dough (No Kneading)
In a large bowl, combine active sourdough starter and lukewarm water. Stir until mostly dissolved (it does not have to be perfectly smooth).
Add bread flour and mix with your hands or a wooden spoon until no dry flour remains. The dough will be sticky and rough. Cover and let rest for 30 minutes (autolyse).
Step 2: Add Salt and Develop Gluten
Sprinkle salt over the dough. Wet your hands and perform a series of stretch-and-folds: grab one edge of the dough, stretch it up as far as it will go without tearing, and fold it over the center. Rotate the bowl 90 degrees and repeat. Do this 4 times. That is one set.
Cover and let rest for 30 minutes. Repeat stretch-and-folds. Do 4 total sets over 2 hours (every 30 minutes). The dough will transform from shaggy to smooth and elastic.
Step 3: Bulk Fermentation (The Long Wait)
After the final stretch-and-fold, cover the dough and let it ferment at room temperature (68-72°F) for 4-6 hours, or until it has increased in size by about 50% and has a domed, puffy appearance with visible air bubbles on the surface.
In a warmer kitchen, this happens faster. In a cooler kitchen, it takes longer. Watch the dough, not the clock.
Step 4: Shape the Boule
Lightly flour your work surface. Turn the dough out gently (do not deflate it). Shape it into a round by folding the edges toward the center, creating tension on the surface. Flip seam-side down.
Cup your hands around the dough and drag it in a circular motion across the counter. This tightens the surface and creates a taut skin that will help the bread hold its shape during baking.
Step 5: Final Proof (Cold or Warm)
Place the shaped dough seam-side up in a floured banneton (proofing basket) or a bowl lined with a floured kitchen towel. Cover.
Option A (Recommended): Refrigerate overnight (8-12 hours) for a cold proof. This develops flavor and makes scoring easier.
Option B: Let proof at room temperature for 2-4 hours until puffy and jiggly when shaken.
Step 6: Preheat with Dutch Oven
Place a Dutch oven (with lid) in your oven and preheat to 475°F for at least 45 minutes. The Dutch oven traps steam, which is critical for a crispy, blistered crust.
Step 7: Score and Bake
Carefully remove the hot Dutch oven. Turn the proofed dough out onto a piece of parchment paper. Use a sharp blade or bread lame to score the top—one deep slash or a decorative pattern. This controls where the bread expands.
Lift the parchment with the dough and lower it into the Dutch oven. Cover with the lid.
Bake covered for 20 minutes. Remove lid and bake uncovered for 20-25 minutes more until the crust is deep mahogany and the internal temperature reaches 205-210°F.
Cool completely on a wire rack before slicing (at least 1 hour). Cutting hot bread releases steam and makes the interior gummy.
💡 Pro-Tip: Sourdough improves with practice. Your first loaf may be dense. Your tenth will be spectacular. The variables—starter strength, hydration, fermentation time, oven temperature—take time to master.

🥖 Recipe 4: Light & Airy Choux Pastry
Choux pastry is an outlier in the dough world. It is cooked twice—first on the stovetop, then in the oven—and it contains no leavening agents. Instead, it relies on steam pressure and egg proteins to puff into hollow, crispy shells.
Choux is the foundation for éclairs, cream puffs, profiteroles, beignets, and gougères. Once you master the technique, you can fill them with anything: pastry cream, ice cream, whipped cream, savory cheese filling, or even use them as vessels for dishes like our 90-second air fryer lava cake filling.
Ingredients (Makes 12-15 large puffs)
| Ingredient | US Customary | Metric |
|---|---|---|
| Water | 1 cup | 240ml |
| Unsalted butter (cubed) | ½ cup (1 stick) | 113g |
| Granulated sugar | 1 tsp | 4g |
| Fine sea salt | ½ tsp | 3g |
| All-purpose flour | 1 cup | 125g |
| Large eggs (room temperature) | 4 | 4 |
Prep Time: 15 minutes
Cook Time: 35-40 minutes
Total Time: 55 minutes
Yield: 12-15 puffs
Instructions
Step 1: Make the Paste (Panade)
In a medium saucepan, combine water, butter, sugar, and salt. Bring to a full rolling boil over medium-high heat. The butter must be completely melted.
Remove from heat and add all the flour at once. Stir vigorously with a wooden spoon until a thick paste forms and pulls away from the sides of the pan. Return to medium heat and cook, stirring constantly, for 1-2 minutes. This dries the paste and gelatinizes the starches, which is critical for structure.
Transfer paste to the bowl of a stand mixer (or a large bowl if mixing by hand).
Step 2: Incorporate Eggs (Temperature Matters)
Let the paste cool for 3-4 minutes (it should be warm but not scorching—around 140°F). If it is too hot, it will scramble the eggs.
Add eggs one at a time, beating well after each addition. The paste will look broken and slippery after each egg, then come together. After the final egg, the dough should be smooth, glossy, and hold a V-shape when you lift the beater.
Step 3: Pipe and Bake
Preheat oven to 400°F. Line a baking sheet with parchment paper.
Transfer choux paste to a piping bag fitted with a large round tip (or use a zip-top bag with the corner cut off). Pipe 2-inch mounds onto the prepared sheet, spacing them 2 inches apart.
Lightly wet your finger and smooth any peaks (they burn easily).
Bake at 400°F for 15 minutes. Reduce temperature to 350°F (do not open the oven door) and bake for 20-25 minutes more until golden brown and crispy. They should feel light and hollow when picked up.
Step 4: Dry the Interior
Turn off the oven. Poke a small hole in the bottom of each puff with a skewer to release steam. Return to the oven with the door cracked open for 10 minutes. This dries the interior and prevents collapse.
Cool completely before filling.
💡 Pro-Tip: Choux freezes beautifully. Bake, cool, and freeze in zip-top bags for up to 3 months. Crisp in a 350°F oven for 5 minutes before filling.

🫓 Recipe 5: Traditional Soft Garlic Naan (Flatbread)
Naan is a leavened Indian flatbread traditionally baked in a tandoor oven at scorching temperatures (900°F+). Home ovens cannot replicate that, but you can get close using a broiler and a preheated cast iron skillet or baking stone.
The dough is soft, pillowy, and slightly chewy, with charred bubbles and a garlic-butter finish. It is the perfect vehicle for curries, dips, or eaten plain.
Ingredients (Makes 8 naans)
| Ingredient | US Customary | Metric |
|---|---|---|
| All-purpose flour | 3½ cups | 440g |
| Plain yogurt (full-fat) | ¾ cup | 180g |
| Warm water | ½ cup | 120ml |
| Granulated sugar | 2 tsp | 8g |
| Active dry yeast | 2¼ tsp (1 packet) | 7g |
| Fine sea salt | 1 tsp | 6g |
| Baking powder | ½ tsp | 2g |
| Melted ghee or butter (for brushing) | 4 tbsp | 60g |
| Garlic (minced) | 4 cloves | 4 cloves |
| Fresh cilantro (chopped, optional) | 2 tbsp | 5g |
Prep Time: 20 minutes (plus 2 hours rising)
Cook Time: 20 minutes
Total Time: 2 hours 40 minutes
Yield: 8 naans
Instructions
Step 1: Activate Yeast
In a small bowl, combine warm water, sugar, and yeast. Stir and let sit for 5-10 minutes until foamey.
Step 2: Mix Dough
In a large bowl, whisk together flour, salt, and baking powder. Make a well in the center and add the yogurt and yeast mixture. Mix with your hands until a soft, slightly sticky dough forms. Knead on a floured surface for 5-7 minutes until smooth and elastic.
Step 3: First Rise
Place dough in a lightly greased bowl, cover with a damp towel, and let rise in a warm place for 1.5-2 hours until doubled in size.
Step 4: Divide and Shape
Punch down the dough and divide into 8 equal pieces. Roll each piece into a ball, cover, and let rest for 10 minutes.
On a lightly floured surface, roll each ball into an oval or teardrop shape about ¼ inch thick.
Step 5: Cook in Cast Iron
Preheat a cast iron skillet or griddle over high heat. Preheat your broiler to high.
Place one rolled naan in the dry, hot skillet. Cook for 1-2 minutes until bubbles form on the surface and the bottom develops dark spots.
Flip the naan and immediately transfer the skillet to the oven under the broiler. Broil for 1-2 minutes until the top puffs and chars in spots. Watch closely to prevent burning.
Remove and brush immediately with melted ghee or butter mixed with minced garlic and optional cilantro.
Repeat with remaining dough, stacking finished naans under a kitchen towel to keep them soft.
💡 Pro-Tip: For authentic naan flavor, mix 1 tablespoon of plain yogurt into the garlic butter before brushing. The tang mimics tandoor fermentation.

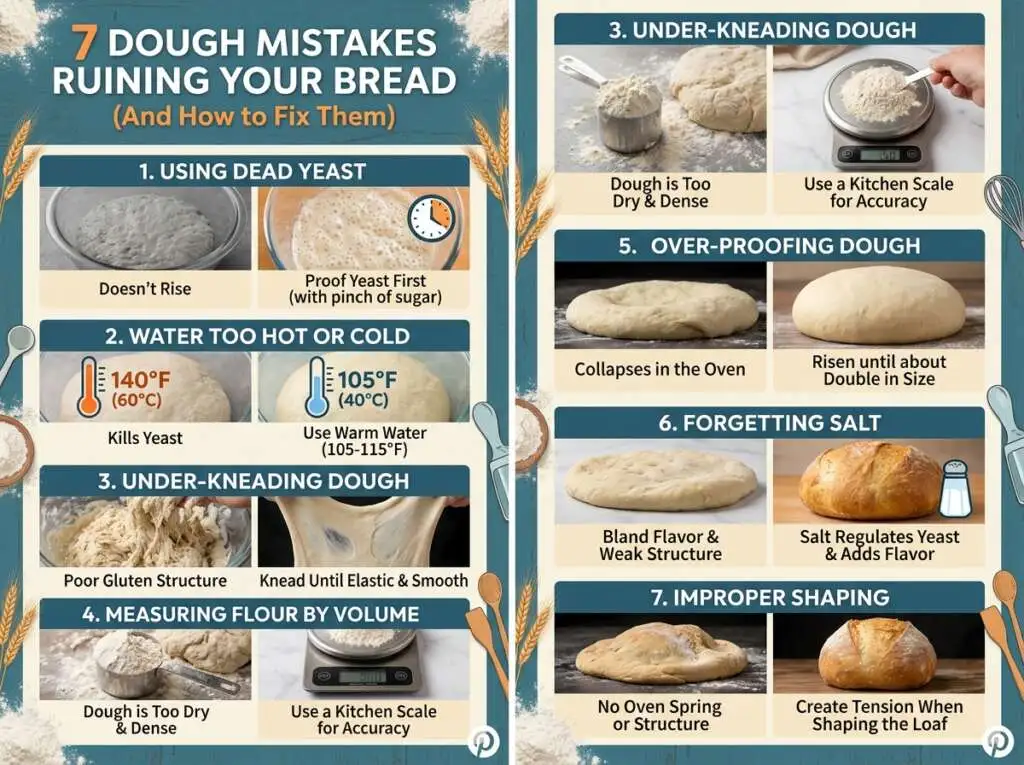
⚠️ Common Dough Mistakes That Ruin Baking
| The Mistake | What Actually Happens | The Fix |
|---|---|---|
| Using water that is too hot (above 120°F) | Kills yeast instantly; dough will not rise | Water should be 95-105°F—warm to the touch but not hot |
| Not measuring flour correctly | Too much flour creates dry, tough dough | Spoon flour into measuring cup and level; or use a scale (1 cup = 125g) |
| Skipping the salt | Dough tastes bland; yeast ferments too fast and uncontrollably | Always add salt; it controls yeast activity and enhances flavor |
| Kneading in a food processor too long | Friction heats dough above 80°F, killing yeast and degrading gluten | Knead by hand or stand mixer; if using food processor, work in short pulses |
| Not letting dough rise long enough | Dense, heavy texture with poor flavor development | Dough should double in size; in cold kitchens, this takes longer |
| Opening the oven door during baking | Temperature drops; bread loses oven spring and does not rise fully | Resist the urge; use oven light to check progress |
.
🌡️ Temperature Guide for Dough Mastery
| Stage | Optimal Temperature | Why It Matters |
|---|---|---|
| Yeast activation water | 95-105°F / 35-40°C | Wakes yeast without killing it; above 120°F is lethal |
| Ideal fermentation (room temp) | 70-75°F / 21-24°C | Steady, controlled rise; too cold slows fermentation, too hot accelerates it |
| Cold fermentation (fridge) | 38-40°F / 3-4°C | Slows yeast, allows enzyme activity for flavor development |
| Dough ready to bake | 75-80°F / 24-27°C | Ensures even oven spring and crust development |
| Bread internal doneness | 190-210°F / 88-99°C | Ensures crumb is fully set; varies by bread type |
| Oven temp for crusty bread | 450-500°F / 232-260°C | High heat creates Maillard browning and crispy crust |

The Perfect 72-Hour Cold-Fermented Pizza Dough
Ingredients
Equipment
Method
- In a large mixing bowl, combine bread flour and lukewarm water. Mix with your hands or a wooden spoon just until no dry flour remains. The dough will look shaggy and rough with no smooth texture. Cover the bowl with plastic wrap or a damp kitchen towel and let it rest at room temperature for 30 minutes. This autolyse period allows flour to fully hydrate and begins gluten formation without any kneading, which results in better texture and easier handling.
- After the 30-minute rest, sprinkle fine sea salt and instant yeast evenly over the surface of the dough. Add olive oil if using. Wet your hands with water to prevent sticking, then squeeze and fold the dough repeatedly, incorporating the salt and yeast thoroughly. Continue this squeezing and folding motion for 3 to 5 minutes. The dough will transform from rough to sticky and noticeably more elastic.
- Cover the bowl tightly with plastic wrap or a damp towel. Let the dough rise at room temperature (70-75°F / 21-24°C) for 2 hours. After the first hour, perform one set of stretch-and-folds to build gluten strength: wet your hands, grab one side of the dough, stretch it upward as far as it will go without tearing, and fold it over the center of the dough mass. Rotate the bowl 90 degrees and repeat this stretch-and-fold motion four times total. Cover and let rest for the remaining hour.
- Lightly flour your work surface. Turn the dough out gently and use a bench scraper or knife to divide it into 4 equal pieces (approximately 210g each for consistent sizing). Shape each piece into a tight, smooth ball by cupping your hand over the dough and making small circular motions against the counter. The friction creates surface tension and the bottom should seal as you work. Place each shaped ball in a lightly oiled individual container or on a parchment-lined tray with at least 3 inches of space between them.
- Cover the dough balls tightly with plastic wrap or fitted lids to prevent drying. Refrigerate for 72 hours (3 full days). During this extended cold fermentation, the small amount of yeast ferments very slowly while enzymes in the flour break down starches into simple sugars, creating exceptional flavor complexity and improved digestibility. You can use the dough after 24 hours minimum, but 72 hours produces optimal results.
- Two hours before you plan to bake pizza, remove the dough balls from the refrigerator and let them sit at room temperature, still covered. This brings the dough to a workable consistency and ensures even baking and proper oven spring.
- Place a pizza stone or baking steel on the middle oven rack. Preheat your oven to its maximum temperature (500-550°F / 260-288°C) for at least 45 minutes. The stone or steel must be thoroughly heated to create the intense bottom heat that produces a crispy, charred crust.
- Generously flour a clean work surface. Place one room-temperature dough ball on the flour and gently press from the center outward with your fingertips, leaving a ½-inch border around the edge for the crust. Pick up the dough and drape it over your knuckles, rotating and gently stretching it by gravity until it reaches 10 to 12 inches in diameter. Do not use a rolling pin, which destroys the air bubbles you spent 72 hours developing.
- Transfer stretched dough to a well-floured pizza peel or a piece of parchment paper for easy transfer. Add your toppings quickly (sauce, cheese, toppings) and immediately slide the pizza onto the preheated stone or steel. Bake for 8 to 12 minutes until the crust is golden with charred spots (leopard spotting) and the cheese is bubbling. For maximum char, switch to broil for the final 1 to 2 minutes, watching closely to prevent burning.
Notes
This dough is 65% hydration, which creates a balance between workability and open crumb structure. Higher hydration creates a more open, airy crust but is stickier to handle. Minimal Yeast is Intentional:
The tiny amount of yeast (0.2% of flour weight) is deliberate. It slows fermentation, allowing time for flavor development without over-proofing. Flour Type Matters:
Bread flour with 12-14% protein is essential for proper gluten development and chew. All-purpose flour will work but produces a softer, less chewy crust. Storage:
Dough balls can be frozen after the cold fermentation. Wrap each ball tightly in plastic wrap and foil, freeze for up to 3 months. Thaw in refrigerator overnight before using. Timing Flexibility:
If you need dough sooner, use ½ teaspoon instant yeast and ferment at room temperature for 6 hours, then refrigerate for 24 hours minimum. Water Temperature:
95-100°F is warm to the touch but not hot. Too hot (above 120°F) kills yeast. Too cold slows activation.
💬 Chef Hamid’s Philosophy on Dough
I have taught hundreds of people to make bread, and the ones who succeed are never the ones with the fanciest equipment or the most expensive ingredients. They are the ones who understand that dough is alive. It breathes. It responds to temperature, humidity, handling. You cannot force dough to behave. You can only create the conditions for it to do what it naturally wants to do: rise, develop flavor, transform into something greater than the sum of its parts. That is why recipes fail people.
Recipes assume every kitchen is 72 degrees, every bag of flour has the same protein content, every baker has the same touch. But once you learn to read dough—to feel when it needs more water, more time, gentler handling—recipes become suggestions, not scripture. That is when you stop being a recipe follower and become a baker.
The lesson: Dough does not obey instructions. It obeys physics, chemistry, and your ability to listen to what it is telling you.
— Chef Hamid, Homely Recipe
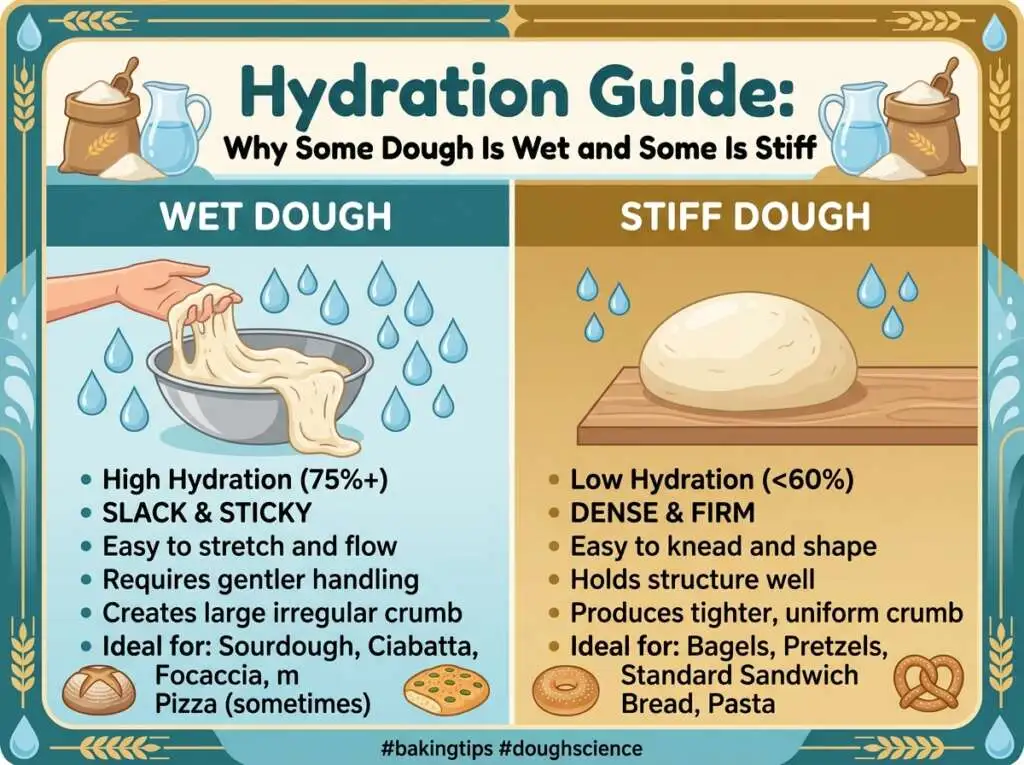
🥖 Pro-Level Mastery: Hydration Ratios Explained
If you have ever wondered why some dough recipes produce chewy, open-crumbed bread and others produce tight, dense loaves, the answer is hydration.
Hydration is the ratio of water to flour, expressed as a percentage.
Formula:
Hydration %=Flour (g)Water (g)×100
Examples:
- 50-55% hydration: Bagel dough, firm pasta dough (very stiff, dense crumb)
- 60-65% hydration: Pizza dough, sandwich bread (moderate chew, closed crumb)
- 70-75% hydration: Artisan sourdough, ciabatta (open crumb, very chewy)
- 80%+ hydration: Focaccia, ultra-wet ciabatta (extremely open, custardy crumb)
Higher hydration doughs are stickier and harder to handle but produce superior texture. Lower hydration doughs are easier to work with but denser.
When you see professional bakers working with dough that looks impossibly wet, they are not making a mistake. They are working at high hydration for maximum crumb development.
🧑🍳 Equipment That Actually Matters
You do not need a $400 stand mixer to make great dough. But certain tools make the process dramatically easier:
Essential:
- Kitchen scale ($15-25): Volumetric measurements are inconsistent. Weight is precise. This is the single most important tool.
- Bench scraper ($8): For dividing dough, cleaning work surfaces, and handling wet dough without adding excess flour.
- Instant-read thermometer ($12-20): For checking water temperature, dough temperature, and internal bread temperature.
Highly Recommended:
- Stand mixer with dough hook ($200-350): Not required, but transforms high-butter doughs like brioche from an arm workout into a 15-minute task.
- Banneton proofing basket ($15-20): Creates the classic spiral pattern on sourdough and helps dough hold shape during final proof.
- Pizza stone or baking steel ($30-80): Retains heat and transfers it efficiently to dough, creating superior crust.
- Dutch oven ($40-80): Traps steam during bread baking, which creates a shatteringly crisp crust.
Nice to Have:
- Dough whisk, lame (bread scoring blade), silicone baking mats, kitchen towels (not terry cloth—lint-free flour sack towels)
❓ Frequently Asked Questions
Can I substitute all-purpose flour for bread flour?
Yes, but the texture will be softer and less chewy. Bread flour has higher protein (12-14%) which creates stronger gluten. For pizza and sourdough, bread flour is strongly preferred. For naan and brioche, all-purpose works fine.
Why did my dough not rise?
Three common causes: (1) Dead yeast—check expiration date and proof in warm water with sugar before using. (2) Water too hot—above 120°F kills yeast. (3) Kitchen too cold—yeast is sluggish below 65°F. Place dough in a warm spot (inside an off oven with the light on works well).
Can I freeze dough?
Yes. Pizza dough, brioche, and naan freeze beautifully after the first rise. Divide, shape into balls, wrap tightly in plastic and foil, and freeze for up to 3 months. Thaw overnight in the refrigerator before using. Choux paste and sourdough do not freeze well unbaked.
How do I know when bread is fully baked?
Use an instant-read thermometer. Lean breads (pizza, baguettes, sourdough) should reach 205-210°F internally. Rich breads (brioche, challah) should reach 190-195°F. The crust should be deep golden brown and the bread should sound hollow when tapped on the bottom.
What is the difference between active dry yeast and instant yeast?
Active dry yeast has larger granules and must be dissolved in warm water before use. Instant yeast (also called rapid-rise or bread machine yeast) has finer granules and can be mixed directly into flour. Instant yeast is slightly more potent. If substituting, use 25% less instant yeast than active dry.
Can I make dough without a stand mixer?
Absolutely. Every dough in this guide can be made by hand. Kneading takes 8-12 minutes and builds arm strength. For high-butter doughs like brioche, hand mixing takes 20-25 minutes but is entirely doable. Use the slap-and-fold technique (pick up dough, slap it on counter, fold it over) for wet doughs.
Why does my sourdough taste bland, not sour?
Sourness comes from lactic acid produced by bacteria in your starter. A young starter (less than 4 weeks old) produces less acid. Cold, long fermentation (12+ hours in fridge) increases sourness. Whole wheat or rye flour in your starter also boosts tang. If you want less sour bread, shorten fermentation and use warmer temperatures.
How do I get a crispy crust on homemade bread?
Steam in the first 10-15 minutes of baking. Methods: (1) Use a Dutch oven with the lid on. (2) Place a metal pan of boiling water on the bottom oven rack. (3) Spray the oven walls with water immediately after loading bread. Also, bake at high temperature (450-500°F) and do not underbake—pale crust is soft crust.

🔗 More Essential Baking Guides from Homely Recipe
If you are ready to expand your baking mastery, these guides will take you further:
🍫 The 90-Second Air Fryer Lava Cake: Thermal Conductivity and the Molten Core — Learn how controlled heat transfer creates a liquid center while fully cooking the exterior, and apply the same principles to understanding baking temperatures in bread.
🌿 Dandelion Recipes and Food Uses: The Botanical Science of Spring’s Wild Gold — Discover wild, foraged ingredients and apply precision techniques to unconventional foods—a mindset that transforms baking as much as cooking.