
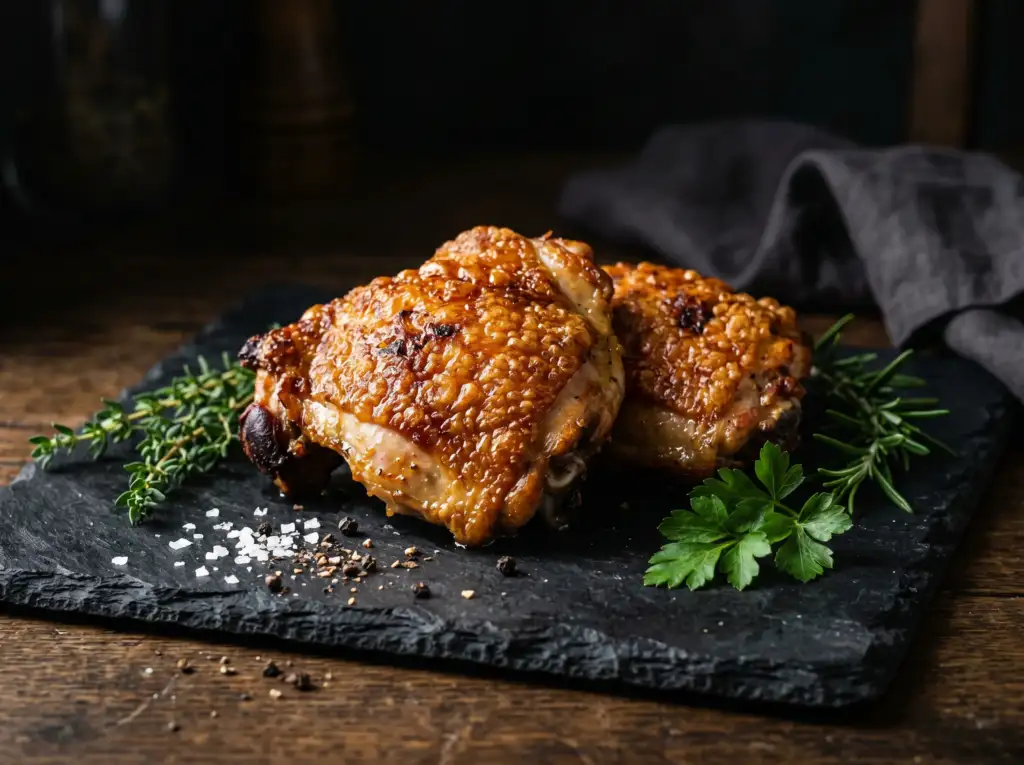
Air Fryer Crispy Chicken Thighs — KFC-Level Skin, Juicy Center, Zero Compromise
By Chef Hamid | Homely Recipe
Let me tell you something about chicken breasts that nobody in the food industry wants to admit.
They are the wrong choice for the air fryer.
Not because they taste bad. Not because they are difficult to cook. But because the air fryer’s greatest strength — aggressive circulating dry heat — is also a breast’s greatest enemy. Chicken breast has almost no internal fat to protect itself during cooking. The moment it hits a degree or two past done, that margin disappears instantly and you are left with something dry, tight, and disappointing regardless of how carefully you timed it.
Chicken thighs are a completely different story.
Bone-in, skin-on thighs carry a thick layer of subcutaneous fat beneath the skin, a generous marbling of intramuscular fat through the meat, and a bone that conducts heat gently and evenly from the center outward. They are built to handle high heat without drying out. In fact, the hotter and drier the cooking environment, the better they perform — which makes them the single most ideal cut of chicken for the air fryer.
I have tested this recipe across more batches than I can easily count, adjusting dry brine timing, temperature settings, starting position, and spice combinations to isolate exactly what produces that KFC-level crispy skin — the kind that shatters audibly when you bite through it — while keeping the meat inside genuinely juicy and full of flavor.
The system I landed on is simple. But every step matters.
🔬 The Science of Skin — Why Dry Brining Changes Everything
Most people understand that patting chicken dry before cooking is a good idea. Fewer understand exactly why — and almost nobody applies the full science of dry brining to get results that go far beyond what simple patting can achieve.
Here is what is actually happening.
Raw chicken skin contains two types of moisture. Surface moisture — the water you can see and feel when you unwrap the package — sits on the outer surface of the skin and evaporates relatively quickly under heat. Bound moisture is locked within the collagen fibers and protein matrix of the skin itself. This deeper moisture is what most home cooks never address — and it is exactly what stands between an okay crispy skin and an extraordinary one.
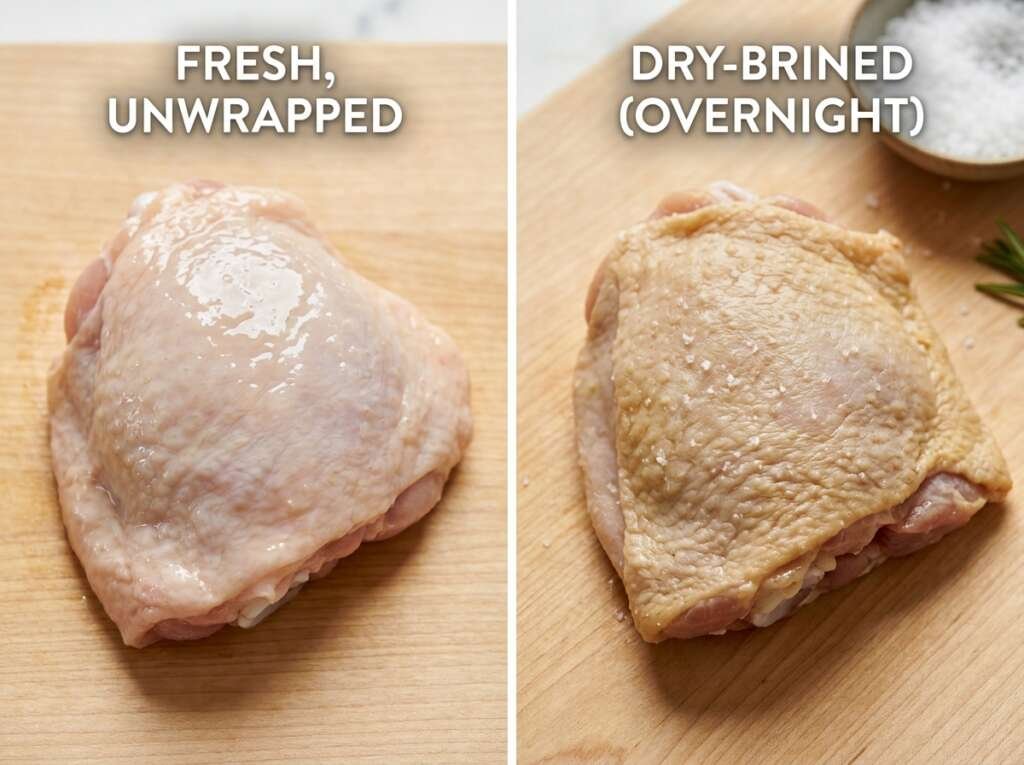
When you apply kosher salt to chicken skin and let it rest uncovered in the refrigerator, the salt draws bound moisture out of the skin through a process called osmosis. In the first thirty minutes, water is pulled to the surface. Over the following hours, that surface moisture evaporates in the refrigerator’s low-humidity environment while the salt simultaneously begins to break down some of the skin’s protein structure, allowing it to dehydrate more deeply and evenly.Salt on Skin+Time→Moisture Drawn Out→Pre-Dehydrated Skin→Maximum Crunch
The result after four to twenty-four hours is skin that is noticeably drier, slightly tacky to the touch, and fundamentally different in structure from untreated skin. When this pre-dehydrated skin hits 400°F / 204°C circulating air, it does not spend the first five minutes fighting through a wall of moisture. It begins crisping almost immediately — and it keeps crisping until it reaches that shatteringly crunchy texture that most people associate only with deep frying.
The bone adds one more advantage worth understanding. Bones are dense and conduct heat slowly. As the air fryer cooks from the outside in, the bone acts as a gentle heat reservoir at the center, releasing warmth gradually into the surrounding meat. This prevents the common problem of overcooked outer meat with an underdone center — a problem that plagues boneless thighs and breasts cooked at high heat.
In simple terms: dry brining removes the moisture that fights against crunch. The bone keeps the meat juicy while the skin gets crispy. The air fryer does the rest.
🛒 What to Buy — Choosing the Right Chicken
Not all bone-in, skin-on thighs are equal at the grocery store — and the choice you make here directly affects the final result.
Size consistency matters more than most people realize. When thighs vary significantly in size — some four ounces, some eight — they finish cooking at different times. The smaller ones overcook and dry out while you wait for the larger ones to reach a safe internal temperature. Look for packages where all thighs are roughly similar in size. Most Kroger, Walmart, and Costco packs label the weight per piece — aim for five to seven ounces / 140 to 200 grams per thigh.
Air-chilled chicken is worth seeking out here just as it is for wings. Water-chilled processing leaves excess moisture trapped in the muscle tissue and skin — moisture that works directly against the dry brine process. Air-chilled birds start drier at the cellular level, which means the dry brine has less work to do and the results are noticeably better. Whole Foods 365, Bell and Evans, and Mary’s Free Range all sell air-chilled chicken thighs at major USA grocery stores.
For the spice rub — smoked paprika is a non-negotiable. Regular sweet paprika lacks the depth and complexity that smoked paprika brings, and it is one of the key flavor compounds that produces that signature KFC-adjacent aroma during cooking. McCormick Smoked Paprika is at every Walmart, Target, and Kroger in the country and is the right choice here.
For oil — use avocado oil or a neutral high-smoke-point oil. The air fryer environment runs hot enough that olive oil can begin to smoke and degrade, producing off flavors. Avocado oil handles the heat comfortably and adds nothing to the flavor — which means the spice rub does all the talking.

Air Fryer Crispy Chicken Thighs (Bone-In, Skin-On)
Ingredients
Equipment
Method
👨🍳 The Method — Built Around the Science
The Dry Brine — Start Here, Always
Unwrap the chicken thighs and pat every surface completely dry with paper towels. Take your time — get the underside, the sides near the bone, every surface you can reach. Any remaining surface moisture competes with the dry brine process from the start.Place the thighs on a wire rack set over a sheet pan. Sprinkle one teaspoon of kosher salt evenly over the skin side of each thigh — do not rub it in aggressively, just distribute it evenly and let it sit on the surface.Slide the rack into the refrigerator completely uncovered. This is the detail most people miss — covering the chicken traps humidity around the skin and prevents the moisture drawn out by the salt from evaporating. The uncovered refrigerator environment is your dehydration chamber.Leave them for a minimum of one hour — though four hours is noticeably better and overnight produces the best results of all. When you pull them out, the skin should look visibly drier and feel slightly tacky rather than slick. That is the dry brine working exactly as it should.
Build the Spice Rub
Combine the smoked paprika, garlic powder, onion powder, dried oregano, cayenne, black pepper, and brown sugar in a small bowl and mix until evenly combined. The small amount of brown sugar is not there for sweetness — it accelerates Maillard browning on the skin surface, helping the deep caramel color develop faster without requiring additional cook time.Remove the dry-brined thighs from the refrigerator 15 minutes before cooking to temper slightly. Drizzle the avocado oil over all surfaces and rub it evenly into the skin and underside. Apply the spice rub generously — top, bottom, and around the sides near the bone. Press it lightly into the skin so it adheres rather than sitting loosely on the surface.Do not add any additional salt at this stage. The dry brine has already seasoned the meat from the inside out. Extra surface salt now will pull more moisture out during the brief tempering period and potentially make the skin slightly wet again before cooking begins.Preheat — Non-Negotiable
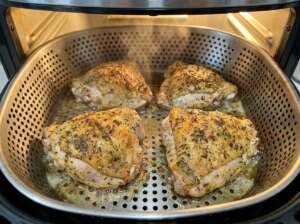
Set your air fryer to 400°F / 204°C and preheat with the empty basket for a full 5 minutes. A cold basket reduces the surface temperature the moment chicken touches it — and that temperature drop is exactly the window in which moisture escapes as steam rather than being sealed out by an immediate crust. Five minutes of preheating costs nothing and protects the entire result.The Cook — Starting Skin-Side Down
This is the step that surprises most people — and the one that makes the biggest difference in the final texture of the skin.Place the seasoned thighs skin-side DOWN in the preheated basket. The logic here is counterintuitive but straightforward. Skin-side down means the skin is in direct contact with the hot basket surface — which is the hottest point in the entire air fryer. This direct contact rapidly renders the subcutaneous fat layer beneath the skin, driving it outward toward the skin surface where the circulating air above then fries it into a crispy layer.Starting skin-side up would mean the skin faces the heating element — hot, but not as hot as direct metal contact — while the fat has nothing to drive it toward the crisping surface.Cook skin-side down at 400°F / 204°C for 12 minutes. Do not open the basket. Do not check on them. Let the heat do the work.The Flip and the Finish
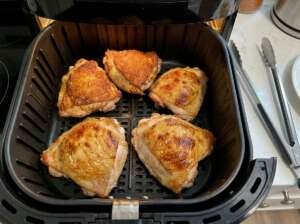
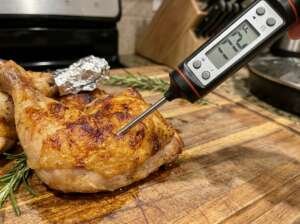
At the 12-minute mark, open the basket and flip each thigh carefully to skin-side UP using tongs. The underside should be deeply golden and already showing a developed crust. The skin side facing up will now cook for the second stage facing the heating element directly.Cook skin-side up at 400°F / 204°C for 12 to 15 more minutes depending on the size of your thighs. At the 10-minute mark of this second stage, begin checking the internal temperature with an instant-read thermometer.Total cook time: 24 to 27 minutes.The Internal Temperature Guide — Safety First
This is not optional information. It is the difference between safe chicken and a food safety risk.The USDA minimum safe internal temperature for chicken is 165°F / 74°C — measured at the thickest part of the thigh, away from the bone. Bone conducts heat unevenly and gives artificially high readings. Always insert your thermometer into the thickest area of the meat itself.At 165°F the chicken is safe. At 170 to 175°F / 77 to 79°C, the thigh meat reaches a secondary texture sweet spot — the collagen in the thigh has had enough time to convert to gelatin, making the meat noticeably more tender and juicy rather than simply cooked through. This is why chicken thighs tolerate and actually benefit from cooking slightly beyond the minimum safe temperature — unlike breasts, which dry out rapidly past 165°F.Pull the thighs at 170 to 175°F for the best combination of safety, juiciness, and texture.Rest for 3 minutes before serving. Resting allows the internal juices to redistribute through the meat rather than running out the moment you cut into it.Finish with a pinch of flaky sea salt over the hot skin and a scatter of fresh parsley. Serve with lemon wedges alongside.- Final Show


Notes
– Minimum 1 hour dry brine, overnight produces the best results.
– Always start skin-side DOWN for the first cooking stage.
– Never overcrowd the basket — cook in batches if needed.
– Target internal temperature is 170 to 175°F for maximum juiciness.
– USDA minimum safe internal temperature for chicken is 165°F.
– Always measure temperature away from the bone.
– Reheat leftovers in air fryer at 375°F for 5 to 6 minutes only.
– For boneless skinless thighs cook at 380°F for 18 to 20 minutes.
– Air-chilled chicken produces noticeably crispier results.
💡 Chef Hamid’s Insight — Why the Thigh Is the Most Honest Cut of Chicken
The chicken breast has better marketing. It is everywhere — in every diet plan, every meal prep guide, every “healthy eating” conversation. But in the kitchen, where results matter more than reputation, the thigh wins every single time. It has more fat, more collagen, more flavor, and far more forgiveness. You can pull it at 165°F or 175°F and it will still be juicy. You can dry brine it, spice rub it, and blast it with heat and it will reward every single one of those decisions with a better result. The thigh does not punish mistakes the way a breast does. It rewards effort with something genuinely delicious. In cooking, I have always believed that the ingredients most people overlook are the ones most worth understanding. The humble chicken thigh is proof of that every single time. — Chef Hamid, Homely Recipe
📊 Good to Know Before You Eat
Nutrition (Per Serving — One Bone-In Thigh, Skin-On)
| Nutrient | Amount |
|---|---|
| Calories | 320 kcal |
| Total Fat | 22g |
| Saturated Fat | 6g |
| Trans Fat | 0g |
| Cholesterol | 130mg |
| Sodium | 620mg |
| Total Carbohydrates | 3g |
| Dietary Fiber | 0g |
| Total Sugars | 1g |
| Protein | 28g |
| Potassium | 340mg |
| Iron | 1.4mg |
Values are estimates based on USDA FoodData Central standards. Actual values vary by exact thigh size and oil amount.
🌡️ Internal Temperature Guide
| Stage | Temperature | What It Means |
|---|---|---|
| USDA Minimum Safe Temp | 165°F / 74°C | Safe to eat — non-negotiable minimum |
| Chef Hamid Target | 170–175°F / 77–79°C | Collagen converts to gelatin — maximum juiciness |
| Over-cooked warning | Above 185°F / 85°C | Meat begins to dry and tighten |
| Fat rendering begins | 130°F / 54°C internal | Subcutaneous fat starts migrating to skin |
| Skin crisping zone | 375–400°F / 190–204°C surface | Maillard reaction fully active |
| Bacterial danger zone | 40–140°F / 4–60°C | Never hold raw chicken in this range |
📦 Storage and Reheating
| Item | Fridge | Freezer | Best Reheat Method |
|---|---|---|---|
| Cooked thighs — whole | 3–4 days | Up to 3 months | Air fryer 375°F / 190°C for 5–6 min |
| Cooked thighs — shredded | 3–4 days | Up to 3 months | Skillet with splash of broth, medium heat |
| Raw dry-brined thighs | 24 hours max | Not recommended | Cook fresh |
Always reheat in the air fryer — never the microwave. The microwave introduces steam that reverses the skin crunch in under two minutes. Five minutes in the air fryer restores approximately 90% of the original crispiness.
❓ Questions People Actually Ask
Can I use frozen chicken thighs? Not directly from frozen — the ice on the surface converts to steam immediately and completely prevents the skin from crisping. Thaw completely in the refrigerator overnight first. Once fully thawed, pat dry and proceed with the dry brine. The overnight thaw in the fridge actually doubles as the beginning of the dry brine period if you leave them uncovered on a rack — a convenient shortcut when you are planning ahead.
Can I skip the dry brine if I am short on time? You can — but manage your expectations. Without the dry brine, the skin will be crispy but not shatteringly so. If you have even one hour, use it. Pat the skin completely dry, apply the salt, and refrigerate uncovered for sixty minutes minimum. One hour of dry brining produces noticeably better results than zero.
My skin is crispy on one side but soft on the other. What went wrong? Almost always an overcrowding issue. When thighs sit close together, the skin on adjacent sides traps steam between them rather than crisping. Make sure there is at least half an inch of space between every thigh in the basket. Cook in two batches if needed — the second batch will keep warm in a 200°F / 93°C oven while the first finishes.
How do I store and reheat leftovers without losing the crunch? Store thighs on a wire rack in the refrigerator rather than stacking them in a container — stacking traps humidity between the pieces and softens the skin overnight. Reheat in the air fryer at 375°F / 190°C for five to six minutes from cold. The skin will regain most of its crunch.
Can I use boneless skinless thighs with this method? Yes — but the dry brine and skin-side-down starting technique do not apply. For boneless skinless, dry brine with salt for 30 minutes, apply the spice rub with oil, and cook at 380°F / 193°C for 18 to 20 minutes flipping once at the halfway mark. Check internal temperature at 165°F / 74°C. The result will be juicy and flavorful but will not have the crispy skin element.
🔗 Keep Exploring on Homely Recipe
- 🥔 Air Fryer Crispy Smashed Potatoes — The perfect side dish for these thighs
- 🍗 Air Fryer Crispy Chicken Wings — The overnight dry brine method applied to wings
- 🐟 7-Minute Air Fryer Miso Glazed Salmon — The two-stage glaze method
- 🍔 Ultimate Smash Burger Science — Maillard reaction mastery at the griddle