Graduation Sheet Cake Ideas – Secrets, Pro-Tips & Perfect Recipes for 50+ Guests (2026)
By Chef Hamid | homelyrecipe.com | Updated: 2026 | Prep: 25 min | Bake: 40 min | Total: 65 min + overnight rest
It’s that season again. Caps are flying, proud parents are crying, and somewhere — in a kitchen exactly like yours — someone is panicking about how to feed 60 people a slice of beautiful, moist, celebration-worthy cake without it turning into a dry, crumbly disaster by the time the last guest sits down. If that sounds familiar, you’ve landed in exactly the right place.
Graduation sheet cake ideas are trending hard heading into 2026, and the bar has genuinely never been higher. Gone are the days of generic grocery-store slabs with fluorescent frosting. Today’s graduation parties demand cakes that are Instagram-worthy, crowd-feeding, flavor-forward, and — most critically — still fresh and moist the next day, because graduation parties run long, and nobody eats cake in the first hour anyway.
I’m Chef Hamid, and I’ve spent years engineering recipes for large-format baking. In this guide, I’m handing you everything: the Class of 2026 decorating trends you need to know, a professional portion-control system that works for 50+ guests, three killer flavor profiles, and my signature 48-hour make-ahead vanilla sheet cake that will absolutely be the talk of the party. Let’s get into it.
🔗 Looking for an individual dessert option alongside your sheet cake? Check out our guide to the Perfect Chocolate Lava Cake → — an elegant plated option for the head table or VIP guests.
<a name=”why-sheet-cake”></a>
1. Why Sheet Cake Is the Ultimate Graduation Party Move
Let’s be real. A towering 4-layer celebration cake is gorgeous in photos. It is a logistical nightmare when you have 65 people standing around a backyard in June, someone’s 3-year-old nephew is about to grab the bottom tier, and you need to serve dessert to 12 people simultaneously.
Sheet cake wins every single time for large-format events. Here’s why:
| Factor | Layer Cake | Sheet Cake |
|---|---|---|
| Serves 50+ easily | ❌ Requires multiple cakes | ✅ One 13×18″ half-sheet |
| Transport | ❌ Fragile, requires special boxes | ✅ Flat, stable, easy |
| Slicing speed | ❌ Slow — requires skilled cutting | ✅ Grid method: 60 seconds |
| Cost per serving | ❌ Higher (more structure, labor) | ✅ Significantly lower |
| Make-ahead friendly | ⚠️ Possible but risky | ✅ Designed for it |
| Decorating flexibility | ⚠️ Limited surface area | ✅ Enormous canvas |
A properly made, professionally decorated graduation sheet cake is a statement piece AND a practical workhorse. That’s a rare combination in the baking world, and it’s why experienced caterers, event bakers, and home entertainers all gravitate toward it for milestone celebrations.
The numbers tell the story clearly:
- A 9×13-inch quarter sheet comfortably serves 18–24 guests
- A 13×18-inch half sheet comfortably serves 40–54 guests
- An 18×26-inch full sheet comfortably serves 80–96 guests
For most graduation parties (typically 30–70 guests), a half-sheet pan is your sweet spot.
<a name=”decorating-trends”></a>
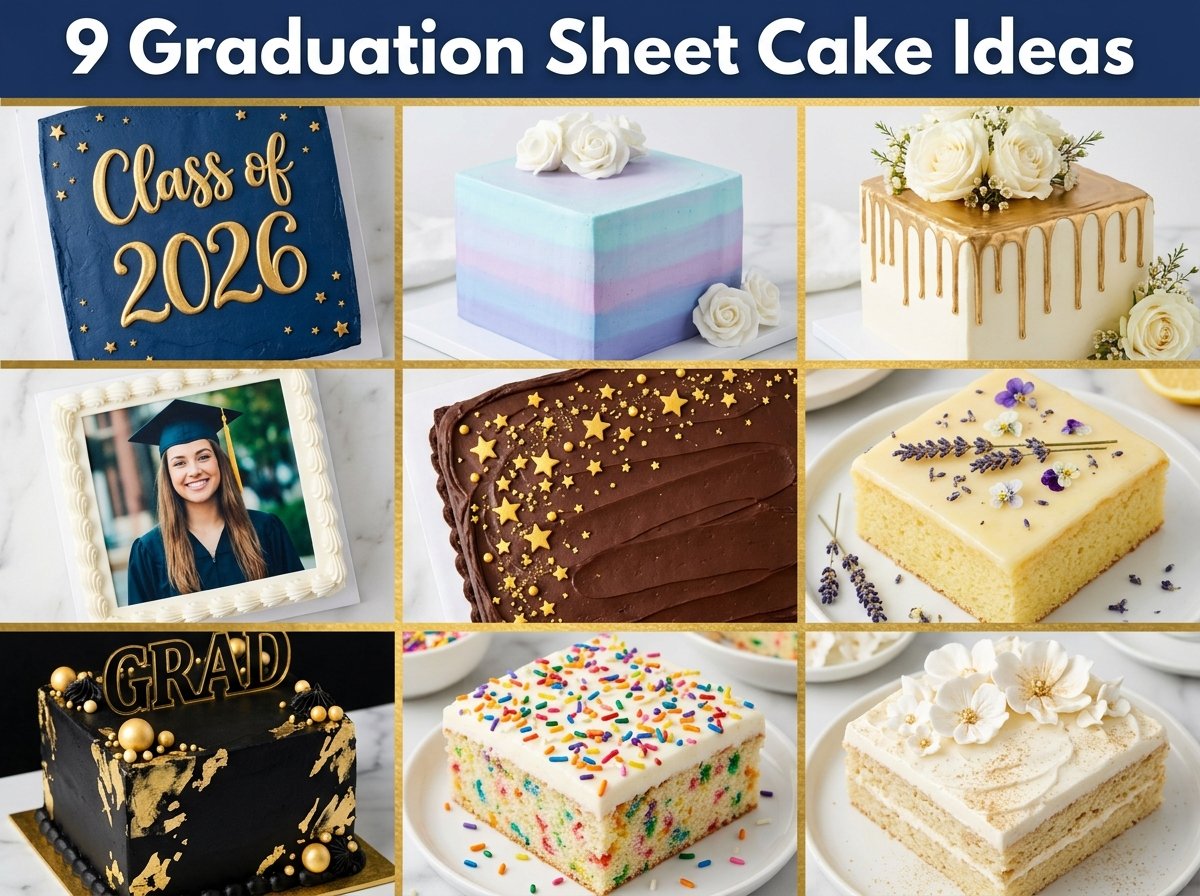
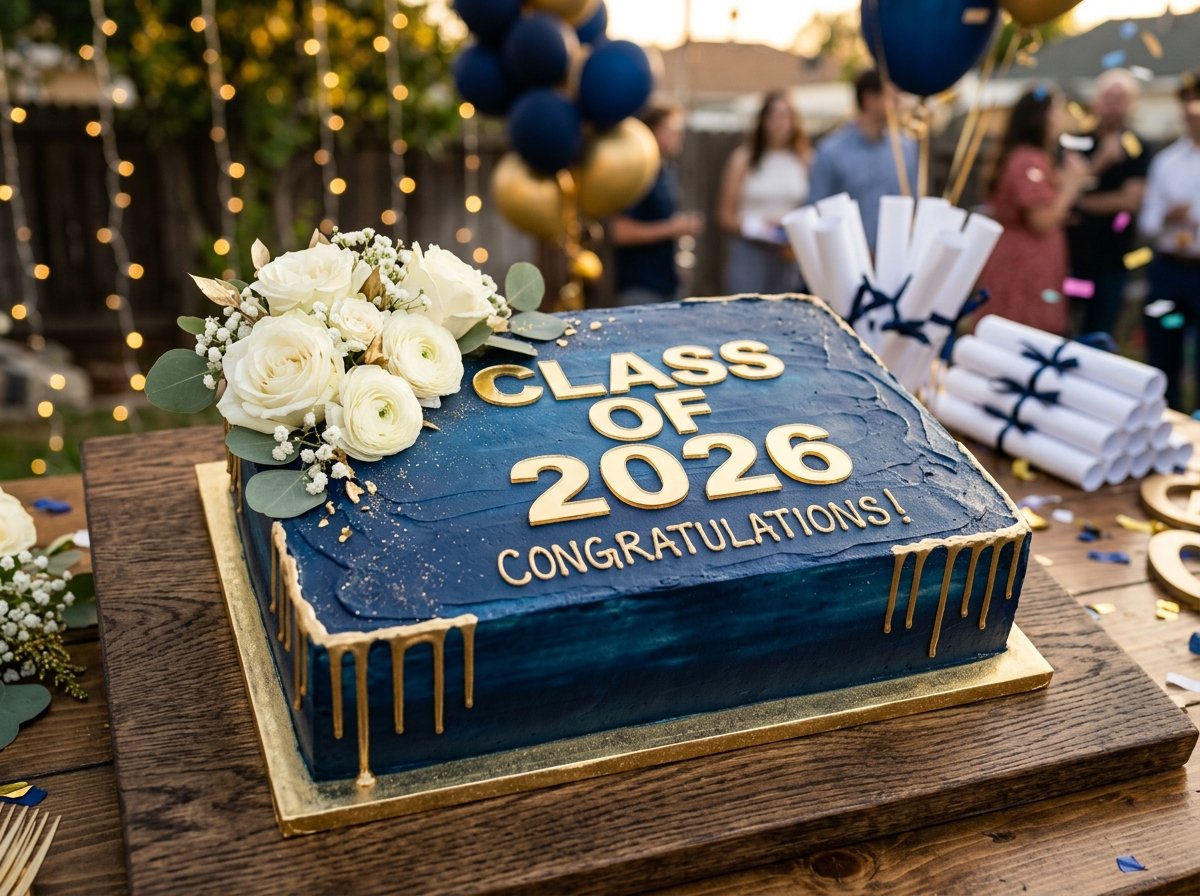
2. Class of 2026 Decorating Trends You Need to Know
The 2026 graduation aesthetic is a specific, defined visual language — and knowing it is the difference between a cake that gets photographed and shared 50 times versus one that gets eaten politely and forgotten.
Here are the top trends dominating graduation cake decorating heading into 2026:
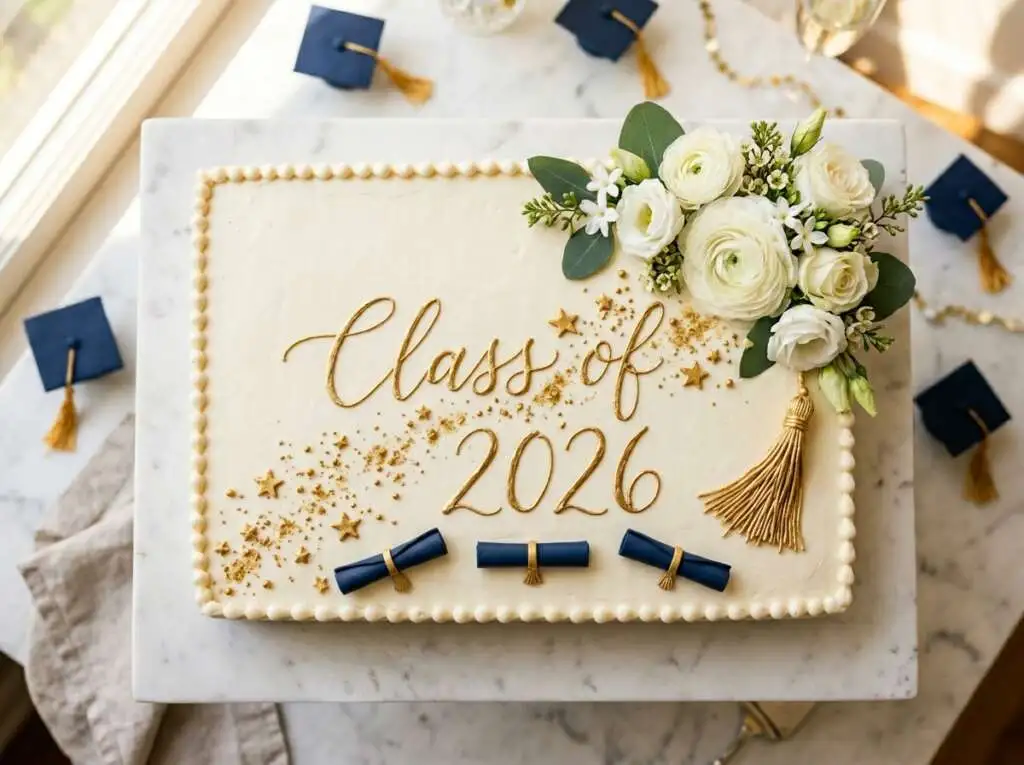
Trend #1: Maximalist Typography as the Hero
Forget small “Congratulations” text in a corner. In 2026, the typography IS the decoration. Large-scale, hand-lettered-style “Class of 2026” spanning most of the cake surface, in metallic gold, chrome, or deep jewel tones. Script fonts are giving way to bold block letters with serif details.
Pro-Tip from Chef Hamid: Use a food-safe projector (or a printed template and toothpick transfer method) to sketch your lettering before committing with a piping bag. Nothing derails a beautiful cake like a lopsided “G.”
Trend #2: School Colors Done Elegantly
School spirit is timeless, but the 2026 execution is more sophisticated. Instead of flat blocks of red and blue, we’re seeing:
- Ombre buttercream fading from one school color to another
- Watercolor effect using diluted gel food coloring over a white base
- Color-blocked panels with crisp, straight edges separated by thin gold fondant strips
- Accent flowers (either fresh or sugar-sculpted) in complementary tones that reference school colors without being literal
Trend #3: Architectural Toppers with Minimal Board Decoration
A single, sculptural topper — an edible diploma, a mini mortarboard in fondant, a golden “2026” made from isomalt or molded chocolate — placed on a bed of clean, uncluttered smooth buttercream. The negative space makes the topper the undeniable focal point.
Trend #4: Edible Photo Panels
Printing a candid senior portrait, a photo collage from 4 years, or even a “Senior Superlative” image on an edible photo sheet and applying it to the frosted surface. These have become dramatically more popular as edible printing quality has improved. The key is using wafer paper (not frosting sheets) for a matte, less plastic-looking result.
Trend #5: Textured Buttercream Backgrounds
The naked cake trend is fading. 2026 graduates want textured, artistic buttercream applications:
- Palette knife swirls — impressionistic, painterly
- Raked combed texture — clean horizontal lines
- Rustic stipple — dabbed with a spoon for a stucco effect
- Geometric pressed texture — using a textured rolling pin on chilled fondant panels
Trend #6: Metallic Drips & Painted Accents
Mirror-glaze drips along the sides in gold, rose gold, or silver. Or, simpler and more forgiving: a luster dust wash applied with a wide brush over set buttercream for a subtle metallic sheen that photographs beautifully.

<a name=”chefs-secret”></a>
3. The Chef’s Secret to 48-Hour Freshness
This is where most baking guides stop being helpful and start being vague. Not here.
Here’s the problem every home baker faces with sheet cake: you bake it the night before (or even two nights before), and by the time guests eat it, the crumb is dry, the texture is tight, and the magic is gone. Professional bakers solve this with a principle I call Moisture Architecture — building moisture retention into the recipe’s fundamental chemistry, not just adding more liquid.
What Actually Causes a Dry Sheet Cake
The villain is starch retrogradation. When flour’s starch granules are heated in the presence of water (baking), they gelatinize and absorb liquid, creating the soft, tender crumb you love fresh from the oven. As the cake cools and time passes, those starch molecules recrystallize and push water back out of the crumb structure — creating a dense, dry, stale texture. This process accelerates in the refrigerator.
The second villain is protein network tightening. Gluten proteins (glutenin and gliadin) form elastic networks during mixing and baking. Over time, without adequate lubrication from fat and sugar, these networks contract, further compressing the crumb.
The Sucrose-Protein Interaction Secret
Here is the key interaction that professional bakers exploit — and that most home baking guides never explain:
Sucrose — ordinary table sugar — with the molecular formula:
C12H22O11
Anchor Text: “how sugar stabilizes moisture in baked goods”
Link: King Arthur Baking – The Science of Sugar
is hygroscopic. Its hydroxyl (-OH) groups form hydrogen bonds with water molecules, actively drawing and holding moisture from the surrounding environment. But more critically for shelf life, sucrose also interacts directly with the protein network in the baked crumb.
The mechanism works as follows:
Sucrose (aq)+Protein(glutenin/gliadin)→Sucrose-Protein Hydration Complex
In this hydration complex, the sucrose molecules insert themselves between protein chains, acting as a plasticizer — they maintain the flexibility and spacing of the gluten network, preventing the tight recrystallization that creates a dry, tough crumb. Think of sucrose as a molecular spacer, keeping the protein architecture open and soft.
The practical implication:
A sheet cake with optimized sucrose concentration, combined with a humectant fat (oil) and a fermented dairy product (sour cream), will maintain its fresh-baked texture for 48–72 hours at room temperature when properly wrapped.
This is why my 48-hour recipe below uses:
- A combination of granulated AND brown sugar — brown sugar’s molasses adds additional hygroscopic compounds (specifically polyols and organic acids)
- Vegetable oil + butter — oil is 100% fat and coats starch granules without adding competing water; butter provides flavor
- Full-fat sour cream — lactic acid from fermentation tenderizes gluten and adds moisture compounds that are particularly resistant to evaporation
This is not magic. It is measurable, reproducible moisture architecture. And it works.
<a name=”equipment”></a>
4. Essential Equipment for Large-Format Sheet Cake
Getting the right tools before you start is non-negotiable for feeding a crowd.
The Pan — Your Most Critical Decision
| Pan Size | Dimensions | Guests Served | Batter Volume Needed |
|---|---|---|---|
| Quarter Sheet | 9″ × 13″ × 2″ | 18–24 | ~6 cups |
| Half Sheet | 13″ × 18″ × 2″ | 40–54 | ~10–12 cups |
| Full Sheet | 18″ × 26″ × 2″ | 80–96 | ~18–20 cups |
Chef Hamid’s Pan Recommendation: Nordic Ware’s commercial-grade aluminum half-sheet pans (the same ones used by professional bakeries) distribute heat more evenly than dark non-stick pans and resist warping. Light-colored aluminum = more even bake, less over-browning on the bottom.
Complete Equipment List
Essential:
- Half-sheet pan (13″ × 18″ × 2″), light-colored aluminum
- Parchment paper (cut to fit, with a slight overhang for easy removal)
- Stand mixer with paddle attachment (or hand mixer — a bowl scraper is critical)
- Digital kitchen scale (for precision — this is non-negotiable for large batches)
- Instant-read thermometer (target internal temperature: 205–210°F for sheet cake)
- Long offset spatula (for frosting — a 10″ or 12″ blade)
- Bench scraper (for smooth sides and sharp edges)
- Ruler and toothpicks (for portion marking before slicing)
- Large serrated knife (for clean cuts)
Nice to Have:
- Cake turntable (even for sheet cake — makes textured buttercream much easier)
- Piping bags + tips (Wilton 1M, 2D, and a round #2 for detail work)
- Luster dust + a wide soft brush
- Edible gold leaf tweezers
<a name=”flavor-variations”></a>
5. Flavor Variations – Vanilla, Lemon & Almond
One base recipe. Three very different graduation experiences. Here’s how to modify the master recipe for each:
Variation 1: Classic Vanilla Bean
The Profile: Clean, crowd-pleasing, universally loved. Works with any color scheme and any school demographic.
The Hack: Use vanilla bean paste (not extract) for superior vanilla flavor with visible bean specks. Add 1 tablespoon of instant vanilla pudding mix to the dry ingredients — the modified starch in pudding mix extends moisture retention for an additional 12 hours.
Pairing: Vanilla bean Swiss meringue buttercream. Optional: fill with fresh strawberry preserves between a split layer.
For the Crowd: The safe choice for a mixed-age group including children and elderly guests.
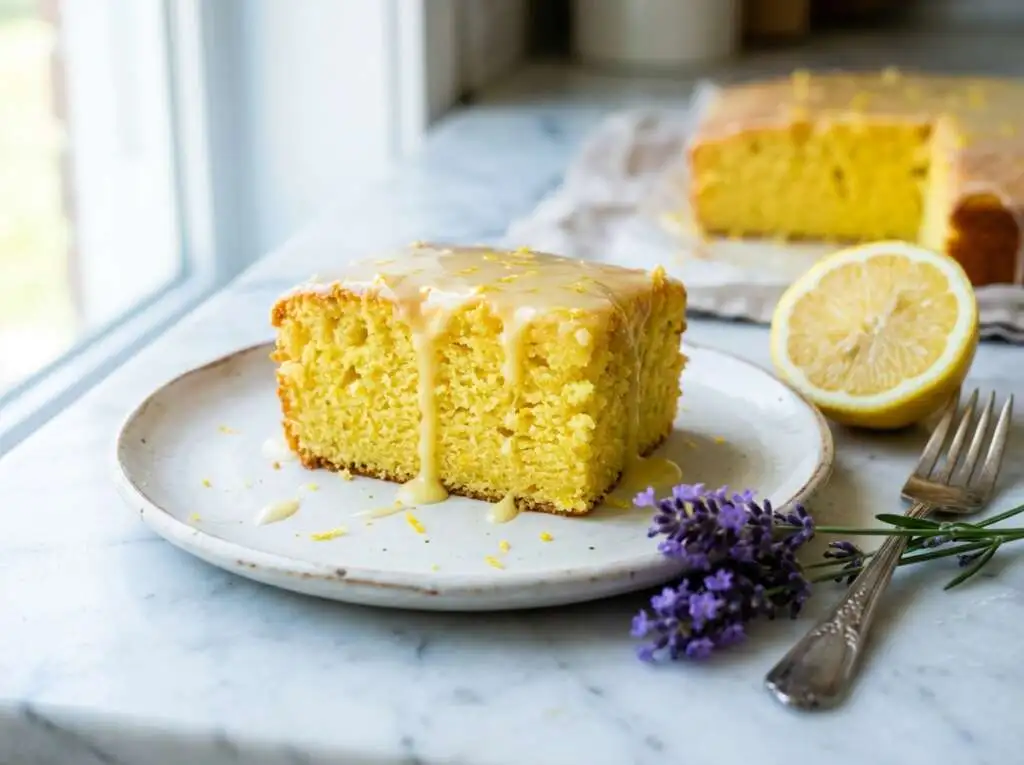
Variation 2: Bright Lemon Burst
The Profile: Zingy, sophisticated, refreshing — particularly excellent for June/July outdoor graduation parties where a rich chocolate or heavy vanilla can feel too indulgent in the heat.
Modifications to the Base Recipe:
- Add zest of 3 large lemons to the sugar and cream together (this releases the lemon oils directly into the fat, maximizing flavor)
- Replace ¼ cup of the buttermilk/sour cream with fresh lemon juice (this also activates the baking soda more aggressively — expect excellent rise)
- Add 1 teaspoon of lemon extract alongside the vanilla
Lemon Glaze Option: Instead of buttercream, use a lemon poured glaze (confectioners’ sugar + lemon juice + lemon zest) while the cake is still slightly warm. It soaks into the crumb for an intensely moist, lemon-curd-like experience.
Pairing: Lemon cream cheese frosting, edible lavender flowers for decoration, pastel yellow or white color scheme.
Variation 3: Toasted Almond Elegance
The Profile: Sophisticated, nutty, and subtly complex. This is the flavor that makes adults at the party stop mid-conversation to ask “what IS this?” It’s the under-appreciated masterpiece of the sheet cake world.
Modifications to the Base Recipe:
- Replace ½ teaspoon of vanilla extract with 1 teaspoon pure almond extract (almond extract is intensely concentrated — do NOT be tempted to use more; it becomes medicinal)
- Add 1 cup of blanched almond flour as a partial flour substitution (replace 1 cup of all-purpose flour with almond flour) — this dramatically tenderizes the crumb and adds a subtle marzipan quality
- Toast ½ cup of sliced almonds at 325°F for 8 minutes and press decoratively into the frosted top before serving
Pairing: Brown butter cream cheese frosting (the nuttiness of browned butter echoes the almond). Decorate with white edible flowers and gold luster dust for an elegant, understated finish.
Important Note: Always note if your cake contains almond — this is an allergen. Place a small card on the serving table identifying the flavor.
<a name=”portion-control”></a>
6. Portion Control Hacks – Slicing for 50+ Guests
This is where home bakers lose the most points. You can bake the most beautiful cake in the world and completely undermine it by cutting portionss that are either too small (sad guests) or too large (you run out 20 servings early).
Anchor Text: “USDA guidelines for cooling baked goods safely”
Link: USDA Food Safety and Inspection Service
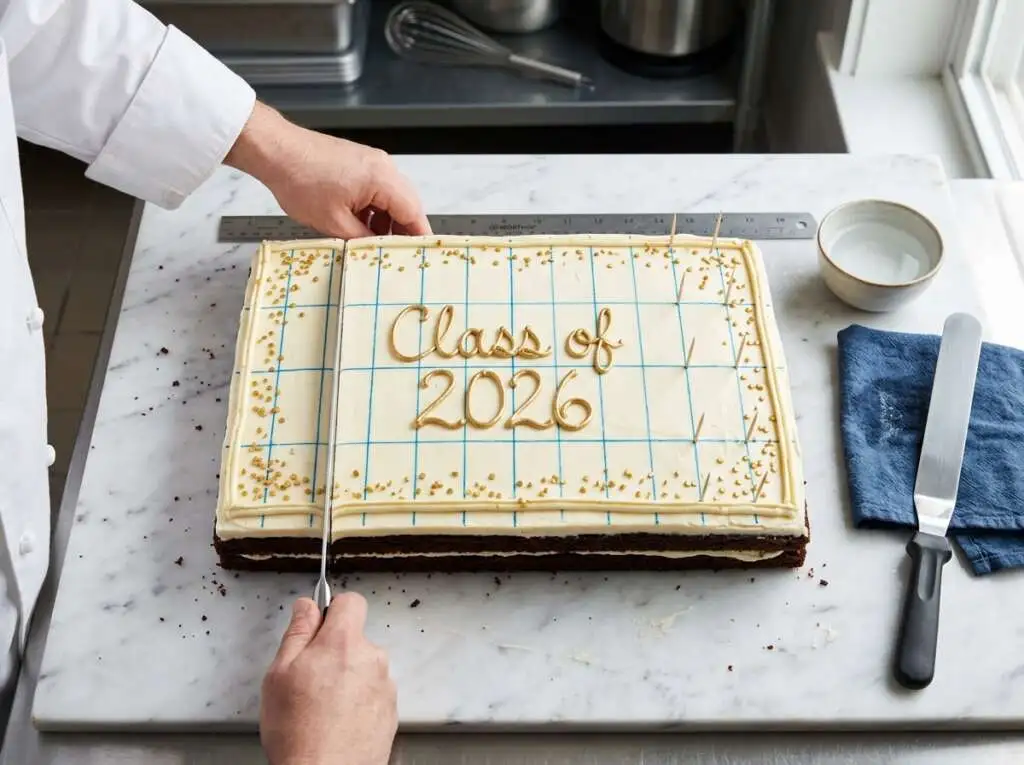
The Grid Method — Professional Bakery Standard
For a 13″ × 18″ half-sheet cake cut to feed 48 people:
textCuts along 13" dimension: 6 cuts = 7 columns
Cuts along 18" dimension: 6 cuts = 7 rows
Total pieces: 49 (approximately 2" × 2.5" each)
Step-by-Step Grid Cutting Protocol:
- Chill the cake for 20 minutes in the refrigerator before cutting. A cold cake cuts cleanly; a room-temperature cake compresses and drags.
- Mark before you cut. Using a ruler and toothpicks, mark your grid lines along the frosting surface before committing to any cuts. This is the single most important tip.
- Use the right knife. A long, thin-bladed chef’s knife (not serrated, not short) gives you straight, confident cuts. Wipe the blade with a warm damp cloth between every single cut.
- Cut straight down — don’t saw. One confident vertical press per cut.
- Use a wide spatula for serving pieces. Attempting to lift a cut piece of sheet cake with a regular fork will result in a pile of crumbs.
Serving Size Chart
| Pan Size | Cut Pattern | Pieces | Serving Size |
|---|---|---|---|
| 9″×13″ Quarter Sheet | 3×6 grid | 18 | 3″×2.2″ |
| 9″×13″ Quarter Sheet | 4×6 grid | 24 | 2.25″×2.2″ |
| 13″×18″ Half Sheet | 6×7 grid | 42 | 2.1″×2.6″ |
| 13″×18″ Half Sheet | 7×7 grid | 49 | 1.85″×2.6″ |
| 18″×26″ Full Sheet | 8×12 grid | 96 | 2.25″×2.2″ |
The “1.5x Rule” for Graduation Parties
For graduation parties specifically, I recommend applying what I call the 1.5x Rule: plan for 1.5 servings per guest. Why?
- Graduation parties typically run 3–5 hours
- Cake is usually served mid-party (not immediately)
- Late arrivals are common
- Teenagers and young adults at graduation parties eat significantly more than the average event guest
- You want leftovers (they photograph beautifully and are a gift to the graduate)
So for 50 guests: plan for 75 servings. That means a full-sheet pan or two half-sheet pans.
<a name=”frosting-tips”></a>
7. Frosting & Finishing Pro-Tips
Choosing Your Frosting
| Frosting Type | Stability (Heat) | Ease | Flavor | Best For |
|---|---|---|---|---|
| American Buttercream | ⚠️ Medium | ✅ Easy | Sweet, rich | AC parties, quick decoration |
| Swiss Meringue Buttercream | ✅ Good | ⚠️ Moderate | Silky, less sweet | Elegant finishes |
| Cream Cheese Frosting | ❌ Poor | ✅ Easy | Tangy, rich | Lemon/Almond variations |
| Whipped Cream | ❌ Very Poor | ✅ Easy | Light, delicate | Last-minute, indoor only |
| Ermine (Cooked Flour) | ✅ Excellent | ⚠️ Moderate | Smooth, not sweet | Make-ahead, stable |
For outdoor June/July graduation parties: American or Swiss Meringue buttercream with a stabilizer (add 1 tablespoon of cornstarch to American buttercream, or a small amount of shortening to SMBC) is your most heat-resistant option.
The Crumb Coat Secret
Never skip the crumb coat. Apply a thin, seal-all layer of frosting over the entire cake surface. Refrigerate for 20 minutes until the crumb coat is firm to the touch. Then apply your final decoration layer. Without a crumb coat, every drag of your spatula picks up cake crumbs and destroys your clean, professional surface.
Smooth vs. Textured — Choosing Your Aesthetic
For smooth, mirror-like buttercream:
- Apply final coat generously
- Chill for 5 minutes
- Dip a long straight spatula in hot water, dry, and pull across the surface in one clean motion
- Repeat until smooth
For the trending palette-knife texture:
- Apply final coat generously
- Using a small offset palette knife, press flat to the surface and flick the wrist upward to create peaks and swoops
- Work in a random, loose pattern for an impressionistic effect
- This style hides imperfections — it’s actually easier than smooth while looking more dramatic
Ultimate 48-Hour Make-Ahead Graduation Sheet Cake (Vanilla Bean)
Ingredients
Equipment
Method
- Position two oven racks in the upper-middle and lower-middle positions. Preheat your oven to 325°F (163°C). Allow the oven to preheat for a full 25 minutes. NOTE: A properly preheated oven is critical for a full-sheet cake — cold spots cause uneven domes and sunken centers.
- Grease your 13″×18″×2″ half-sheet pan generously with butter or non-stick spray. Line with parchment paper, pressing it into the corners, and allow a 1″ overhang on both long sides for easy removal. Grease the parchment.
- In a large bowl, whisk together the all-purpose flour, baking powder, baking soda, fine sea salt, cornstarch, and dry vanilla pudding mix. Whisk for 45 seconds to ensure even distribution. Sifting is optional but recommended for the most tender crumb. Set aside.
- In the bowl of a stand mixer fitted with the paddle attachment, combine softened butter, granulated sugar, and brown sugar. Beat on medium speed for exactly 5 minutes, scraping the bowl down twice. The mixture should be pale, fluffy, and noticeably increased in volume. This is the single most important step — inadequate creaming = dense cake.
- With the mixer on medium-low, drizzle in the vegetable oil in a slow, steady stream. Beat for 1 additional minute. The oil integrates into the butter-sugar matrix and will provide extended moisture.
- Add eggs one at a time, beating for 20 seconds after each addition and scraping the bowl down thoroughly after every third egg. Do not rush this step — proper egg incorporation creates the emulsion that holds this large-format batter together.
- Add vanilla bean paste (or extract) and almond extract if using. Mix on low for 10 seconds.
- In a separate bowl or measuring pitcher, whisk together the full-fat sour cream and whole buttermilk until smooth. This is your liquid blend.
- With the mixer on LOW speed, add the flour mixture in 4 additions alternating with the sour cream-buttermilk blend in 3 additions (flour–liquid–flour–liquid–flour–liquid–flour). Begin and end with flour. After each addition, mix only until just combined — approximately 8–10 seconds per addition. Finish the last addition by hand with a rubber spatula, folding until no dry streaks remain. NOTE: DO NOT OVERMIX. Overmixing after the flour is added = tough cake.
- Using a rubber spatula, give the batter one final gentle fold from the bottom of the bowl. The batter will be thick, smooth, and ribbon-like.
- Pour batter into the prepared half-sheet pan. Using a large offset spatula, spread the batter evenly into all corners, paying special attention to the edges. The batter should be perfectly level. PRO TIP: Lift the pan 3 inches and drop gently on the counter twice to release any large air bubbles.
- Place on the center rack of the oven. Bake at 325°F for 35–42 minutes. Begin checking at 33 minutes. The cake is done when: (a) the center springs back when lightly pressed, (b) the edges are pulling slightly away from the pan, and (c) an instant-read thermometer inserted into the thickest center point reads 205–210°F (96–99°C).
- CRITICAL — Do NOT open the oven door for the first 30 minutes of baking. Any temperature drop during this window causes irreversible dome collapse in a large-format cake.
- Remove from the oven and place on a wire rack. Cool in the pan for exactly 20 minutes. Then, using the parchment overhang, gently lift the cake out of the pan and place directly on the wire rack. Cool to complete room temperature — this takes approximately 1.5–2 hours for a half-sheet cake. Do not frost until completely cool.
- 48-HOUR MAKE-AHEAD STEP: Once completely cool, wrap the entire cake tightly in two layers of plastic wrap, then one layer of aluminum foil. Store at room temperature (65–72°F) for up to 48 hours, or freeze (wrapped in the same manner plus a freezer bag) for up to 3 months.
- Combine egg whites and granulated sugar in the heatproof bowl of your stand mixer. Set over a saucepan of barely simmering water (double boiler setup). Whisk constantly until the sugar fully dissolves and the mixture reaches 160°F on an instant-read thermometer (approximately 4–7 minutes). Rub between your fingers — no grittiness should remain.
- Transfer the bowl to the stand mixer fitted with the whisk attachment. Whip on medium-high speed until the meringue forms stiff, glossy peaks and the outside of the bowl is completely cool to the touch — approximately 10–12 minutes. The meringue must be cool before adding butter.
- Switch to the paddle attachment. With the mixer on medium speed, add the room-temperature butter cubes one at a time, waiting for each cube to incorporate before adding the next. The buttercream may look curdled around the halfway point — this is completely normal. Continue adding butter and mixing. It will come together.
- Once all butter is incorporated, add vanilla bean paste, salt, and dry pudding mix. Mix on medium-high for 2 minutes until silky, smooth, and spreadable. If the buttercream is too soft, refrigerate for 15 minutes and re-mix. If too stiff, warm briefly over the double boiler for 10 seconds at a time and re-mix.
- CRUMB COAT: Using a large offset spatula, apply a thin, even layer of buttercream over the entire surface of the cooled cake. Refrigerate (uncovered) for 20 minutes until the crumb coat is firm.
- FINAL COAT: Apply the remaining buttercream generously. If achieving a smooth finish, use the hot spatula technique (dip in hot water, dry, drag across the surface). If achieving a textured finish, use a palette knife to create artistic swoops and peaks.
- COLOR AND DECORATION: Divide a small portion of remaining buttercream and tint with gel food coloring to match school colors. Pipe borders, designs, or text as desired. Apply any luster dust, edible toppers, or photo panels.
Notes
NOTES:
- ALTITUDE ADJUSTMENT (Above 3,500 ft): Reduce baking powder by ¼ teaspoon, increase buttermilk by 2 tablespoons, and increase oven temperature by 15°F.
- ALLERGY NOTICE: This recipe contains gluten, dairy, and eggs. For almond variation, it contains tree nuts. Always label your cake at gatherings.
- FLAVOR VARIATIONS: See the Flavor Variations section for Lemon Burst and Toasted Almond modifications.
- DOUBLE BATCH: To serve 96+ guests, make two separate batches rather than doubling in one bowl. Most home stand mixers cannot safely handle a doubled batch of this recipe.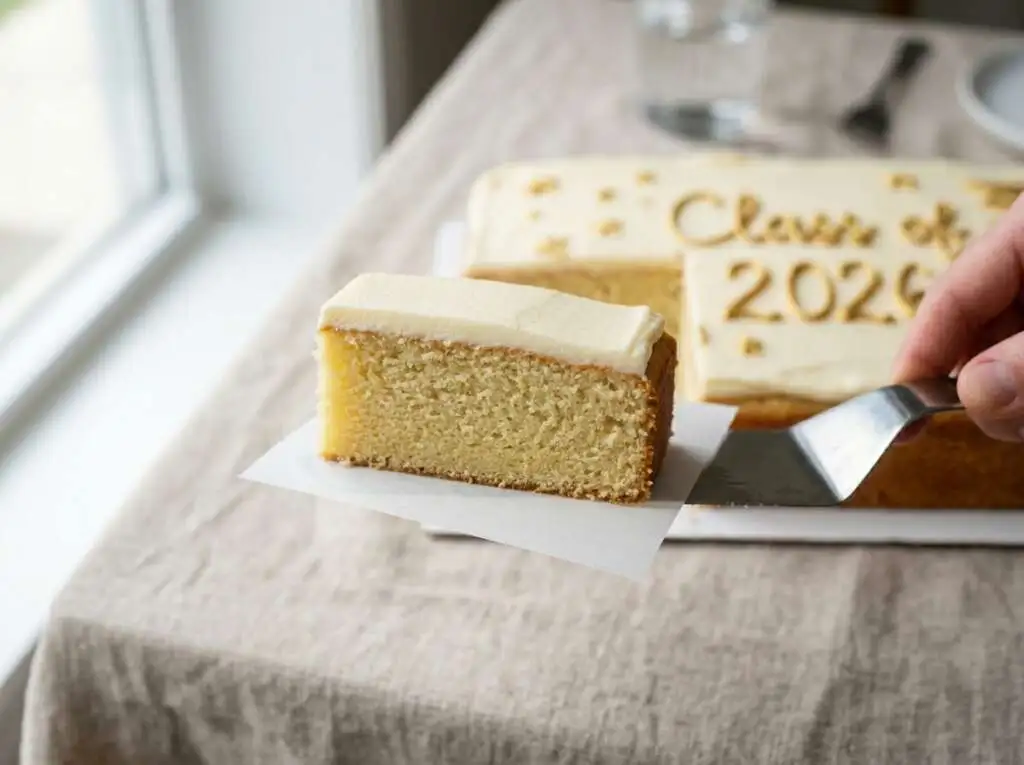
<a name=”troubleshooting”></a>
9. Troubleshooting Common Sheet Cake Disasters
| Problem | Root Cause | Chef Hamid’s Fix |
|---|---|---|
| Sunken center | Oven opened too early / underbaked | Never open the oven before 30 minutes; use thermometer (205°F) |
| Dry crumb | Over-baking / under-ripe leaveners | Pull at 205°F internal; replace baking powder annually |
| Domed top (hard to frost) | Oven too hot / uneven heat | Use baking strips on the pan edges; reduce temperature 10°F |
| Cracks in the top | Too much baking soda / oven too hot | Measure leaveners precisely; verify oven temp with thermometer |
| Buttercream melting | Too much heat / butter too warm | Chill the cake; re-mix buttercream; work in AC environment |
| Cake sticks to pan | Insufficient greasing / cooling too fast | Use parchment sling; cool 20 min before removing |
| Dense, gummy texture | Overmixing after flour added | Fold gently; mix on low; count your strokes |
| Uneven bake | Oven hot spots | Rotate pan at 20-minute mark; use oven thermometer |
| Frosting tears the cake | Crumb coat skipped | Always crumb coat; chill before final layer |
| Bland flavor | Under-ripe vanilla / insufficient salt | Use vanilla bean paste; don’t reduce salt |
<a name=”storage-transport”></a>
10. Storage & Transport Hacks
Storage at Room Temperature (1–3 Days)
The 48-hour make-ahead design of this recipe means room temperature storage (properly wrapped) is your best option for preserving texture. Wrap the frosted cake loosely with a cake dome or plastic wrap tent (don’t press wrap against the frosting). The sucrose-protein moisture architecture maintains freshness without refrigeration.
Refrigerator Storage (Up to 5 Days)
If the party doesn’t happen or leftovers remain, refrigerate covered. Bring to room temperature for 45 minutes before serving — cold buttercream is hard, and cold cake crumb is artificially firm. The starch retrogradation effect is present but the high-sugar formula slows it significantly.
Freezing (Up to 3 Months)
The unfrosted cake freezes perfectly. Wrap in double plastic wrap + foil + freezer bag. Thaw overnight at room temperature before frosting. Do not freeze a frosted decorated sheet cake — the decoration will be compromised upon thawing.
Transport Like a Pro
- Chill the decorated cake for 30 minutes before loading — a cold buttercream surface is far more stable during transport.
- Use a half-sheet cake box (available on Amazon or restaurant supply stores for $2–4 each). These are designed for this exact purpose.
- Place the cake box on a non-slip mat (a yoga mat cut to size works perfectly) in the trunk or cargo area.
- Drive the final 10 minutes of any trip at 15 mph max. Every corner taken at speed is a corner where your “Class of 2026” inscription becomes a blur.
- Carry the box flat — never tip it, even slightly.
<a name=”faq”></a>
11. Frequently Asked Questions
Q: How far in advance can I make this graduation sheet cake?
A: The unfrosted cake can be baked up to 48 hours ahead and stored at room temperature (wrapped tightly), or up to 3 months ahead if frozen. Frost no earlier than the morning of the party (or the night before for a next-day event). This is the make-ahead system designed into this recipe.
Q: Can I use box cake mix for a sheet cake this size?
A: You can, but you’d need approximately 3–4 standard box mixes for a half-sheet pan, and you lose all the moisture-architecture advantages. The from-scratch recipe here takes only 15 extra minutes compared to a doctored box mix and produces a dramatically superior result. That said, if time is the constraint — a box mix with added oil, sour cream, and an extra egg is a reasonable emergency plan.
Q: What’s the best way to write “Class of 2026” on the cake?
A: Three professional methods: (1) Piped buttercream using a small round tip (#2 or #3) after chilling the crumb coat — practice on parchment first. (2) A melted chocolate transfer — pipe text in melted chocolate on parchment, freeze until set, then carefully peel and place on the frosted cake. (3) Edible image printing — take your design to a local cake supply store or order online, print on wafer paper, and apply to the surface.
Q: My buttercream looks curdled and broken — is it ruined?
A: No. This is one of the most common Swiss meringue buttercream panics, and it always resolves. If it looks curdled and soupy: it’s probably too warm — refrigerate for 15 minutes and re-whip. If it looks curdled and chunky: the butter was too cold — warm the outside of the bowl briefly with a hair dryer or warm towel while mixing. In both cases, keep mixing. It will smooth out within 2–5 minutes.
Q: Can I add a filling layer to a sheet cake?
A: Yes! For a sheet cake, the elegant solution is to bake TWO sheet cakes and layer them. Spread a thin layer of jam, lemon curd, pastry cream, or fresh fruit preserves on the bottom cake, then place the second cake on top before frosting. For a single-layer sheet cake, you can also inject filling using a piping bag fitted with a long bismarck tip, creating pockets of filling within the crumb.
Q: How do I match my buttercream exactly to school colors?
A: Use gel food coloring (NOT liquid food coloring, which changes the buttercream’s consistency). Gel colorings from brands like AmeriColor or Chefmaster are highly concentrated — start with a toothpick-tip amount, mix thoroughly, and let the color develop for 2 minutes before adding more. Colors deepen as they sit. For very deep colors (maroon, navy, black): use a chocolate buttercream base instead of white to reduce the amount of coloring needed and prevent the buttercream from becoming bitter from over-coloring.