Classic Strawberry Shortcake Secrets: The Ultimate Guide to Tender Biscuits and Juicy Berries
By Chef Hamid | Homely Recipe
The first time I made strawberry shortcakes, I was sixteen years old, working my first summer job at a bakery in Portland. The head baker, Marie—a woman who’d been making desserts since before I was born—handed me the recipe card and walked away with a simple instruction: “Don’t touch it more than you have to.”
Jump to RecipeI didn’t listen.
I creamed that butter into the flour like I was making cookie dough. I kneaded it. I rolled it out three times to get the “perfect” thickness. What emerged from the oven twenty minutes later looked like golden dinner rolls, sure—but when I bit down, I might as well have been eating a hockey puck. Dense. Chewy. Completely wrong.
Marie picked one up, broke it in half, and shook her head. “You loved it to death,” she said. “Shortcake doesn’t want your love. It wants you to leave it alone.”
That lesson—the discipline of restraint, the power of doing less rather than more—has shaped every strawberry shortcake I’ve made in the twenty years since. This isn’t a fussy French pastry that requires precision and technique. This is American baking at its most forgiving and most unforgiving all at once: simple ingredients, simple method, but zero tolerance for overthinking.
This guide will teach you everything I’ve learned about making strawberry shortcake that delivers on the promise: tender, flaky biscuits that shatter under a fork, strawberries that taste like summer concentrated into syrup, and cream so light it practically floats.
Let’s start with what most people get wrong.
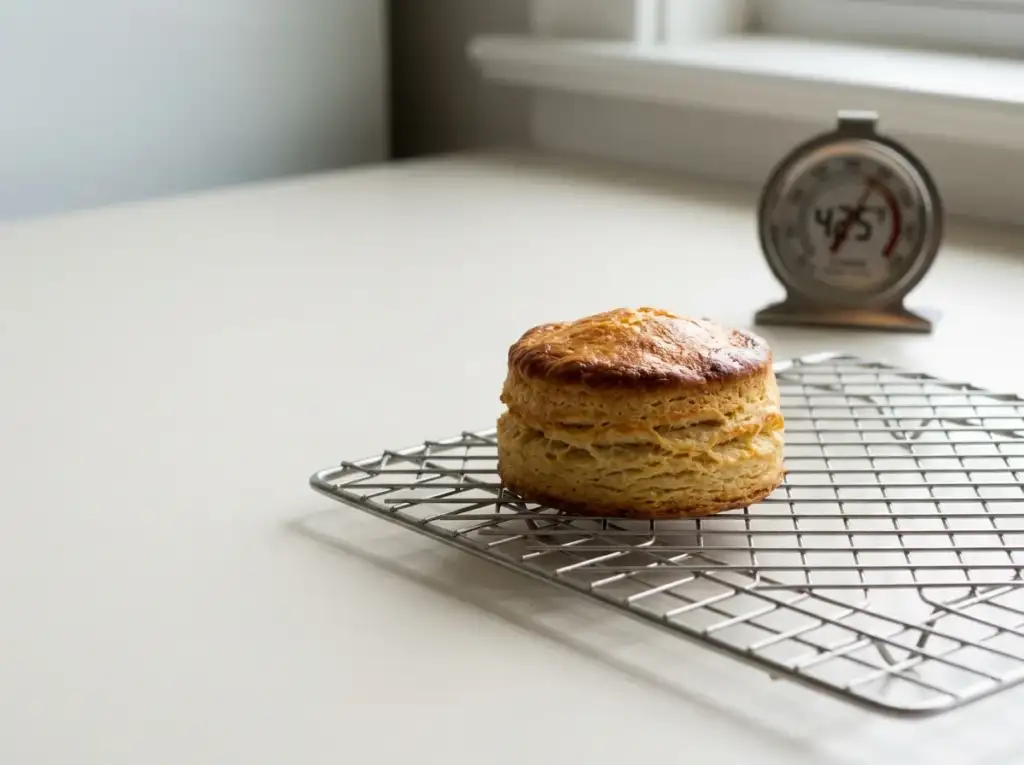
The Flakiness Factor: Why Cold Butter Is Non-Negotiable
Here’s what Marie didn’t tell me that day, but what I figured out through dozens of failed batches: the texture of a shortcake biscuit is determined entirely by the temperature and distribution of fat.
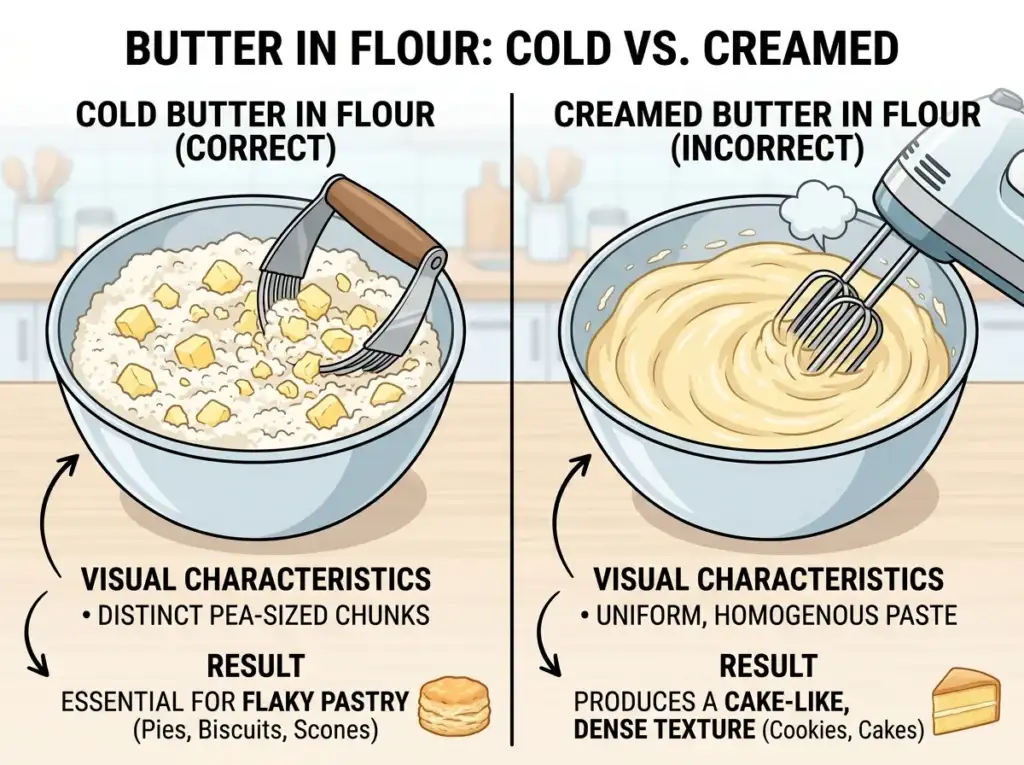
When you work cold butter into flour—not cream it, not melt it, not soften it, but keep it genuinely cold and cut it into pea-sized pieces—you create a matrix of flour-coated butter pockets throughout the dough. When that dough hits a 425°F oven, the water content in the butter (butter is roughly 15-18% water) instantly converts to steam.
That steam has nowhere to go but up, and as it forces its way through the dough, it creates thin layers—what bakers call lamination. This is the same principle behind croissants and puff pastry, just less refined and more rustic.
If your butter is too warm, it melts into the flour before it has a chance to create steam. The result is a dense, bread-like texture—exactly what I made on that first attempt.
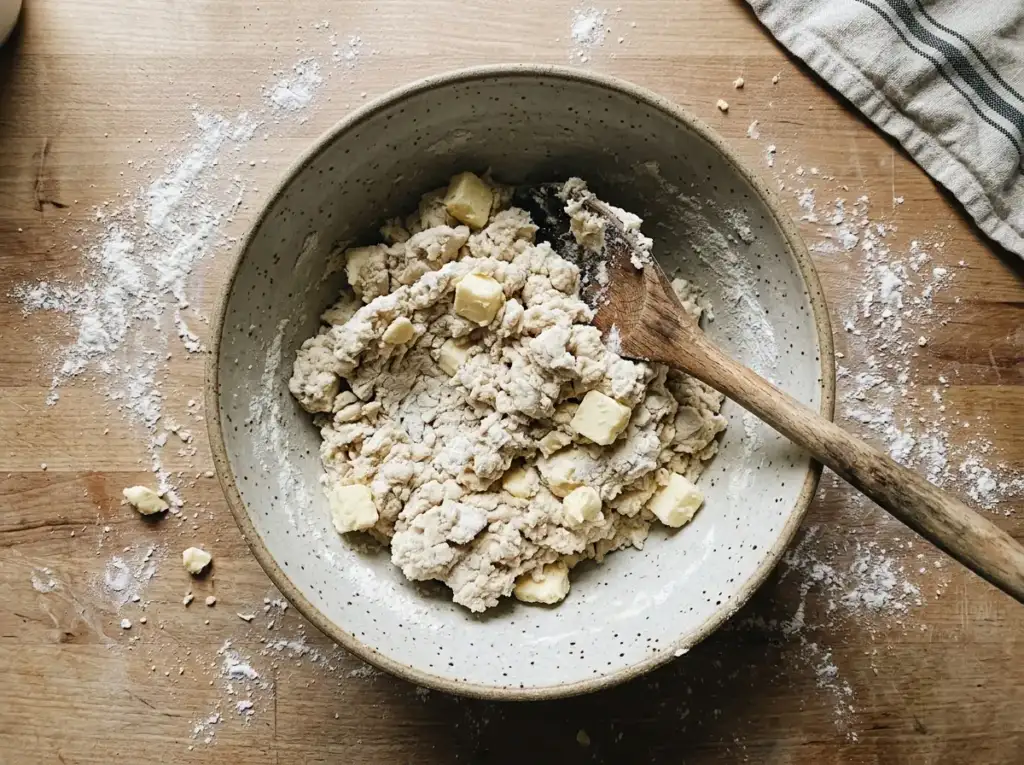
The practical technique: Use butter straight from the refrigerator. Cut it into ½-inch cubes. Work it into the flour using a pastry cutter, two forks, or your fingertips (but work quickly—your hands are warm). Stop when you see pea-sized and some slightly larger butter chunks. It should look shaggy and uneven. That’s correct.
Some bakers freeze their butter and grate it on a box grater directly into the flour. This works beautifully because the butter stays colder longer and distributes more evenly. I do this when I’m teaching classes because it’s nearly foolproof.
The mistake I see constantly: Home bakers using “softened” butter because that’s what they’re used to for cookies and cakes. Shortcakes are biscuits, not cakes. The rules are different.
The Chemistry of Rise: When Baking Powder Meets Heat
The leavening in a classic shortcake comes from baking powder, sometimes boosted with a small amount of baking soda if you’re using buttermilk instead of regular milk or cream.
When baking powder (which is a combination of an acid—typically cream of tartar or sodium aluminum sulfate—and a base—baking soda) gets wet and then heated, it undergoes a chemical reaction that produces carbon dioxide gas. That gas gets trapped in the dough structure and causes the biscuit to rise.
If you’re using buttermilk (which I recommend for the subtle tang it adds), you’re introducing additional acid. Adding a small amount of baking soda creates this reaction:
C4H6O5+2NaHCO3→Na2C4H4O5+2H2O+2CO2
That’s tartaric acid (from the buttermilk or cream of tartar in baking powder) reacting with sodium bicarbonate (baking soda) to produce sodium tartrate, water, and—most importantly—carbon dioxide gas.
What this means in your kitchen: The dough starts rising the moment liquid touches the leavening agents. That’s why you cannot let mixed biscuit dough sit around. You mix, you shape, you bake. Immediately. Every minute you wait is rise you’re losing before the dough even hits the oven.
Temperature matters here, too. A hot oven (425°F) causes rapid gas expansion and quick setting of the dough structure. A cooler oven allows the dough to spread before it sets, resulting in flatter, denser biscuits.
According to culinary research from the Culinary Institute of America, the ideal baking temperature for biscuits is between 425°F and 450°F for this exact reason—rapid rise and set before the structure can collapse.
[INSERT PINTEREST IMAGE HERE: Style – Negative Space | Description: Single perfect shortcake biscuit split in half, visible layers and steam pockets, soft focus background, emphasis on internal texture]
The Textural Magic: What “Just Combined” Actually Means
This is where I see experienced bakers make mistakes almost as often as beginners.
The instruction “mix until just combined” is vague and unhelpful if you don’t know what you’re looking for. Here’s what it actually means:
When you add your cold liquid (buttermilk, cream, or milk) to your flour-butter mixture, you want to stir it with a wooden spoon or silicone spatula just until no dry flour remains visible. The dough will look shaggy, rough, and uneven. There will be lumps. There will be visible butter pieces. It will not look smooth.
This is correct.
If you keep mixing to achieve smoothness, you’re developing gluten—the protein network that forms when flour and water are agitated together. Gluten is wonderful in bread, where you want structure and chew. It’s the enemy in biscuits, where you want tenderness and flakiness.
My rule: 8-12 gentle folds with a spatula. That’s it. I literally count. If I can still see a few dry flour pockets the size of a pea, I stop anyway and press the dough together on the counter. Those dry spots will hydrate during the resting and baking process.
The hand test: When you turn the dough out onto your work surface, it should hold together when gently pressed but still feel slightly dry and crumbly. If it’s wet and sticky, you’ve overworked it or added too much liquid. If it won’t hold together at all, add another tablespoon of cold liquid.
I learned this the hard way during my second year of pastry school. I was making biscuits for a Southern cooking exam, and I mixed the dough until it looked “right” to my French-pastry-trained eyes—smooth and cohesive. The instructor took one look and said, “You just made pie dough. Start over.”
She was right. Those biscuits came out tough and dense. The ones I made the second time—barely mixed, rough and shaggy—were perfect.
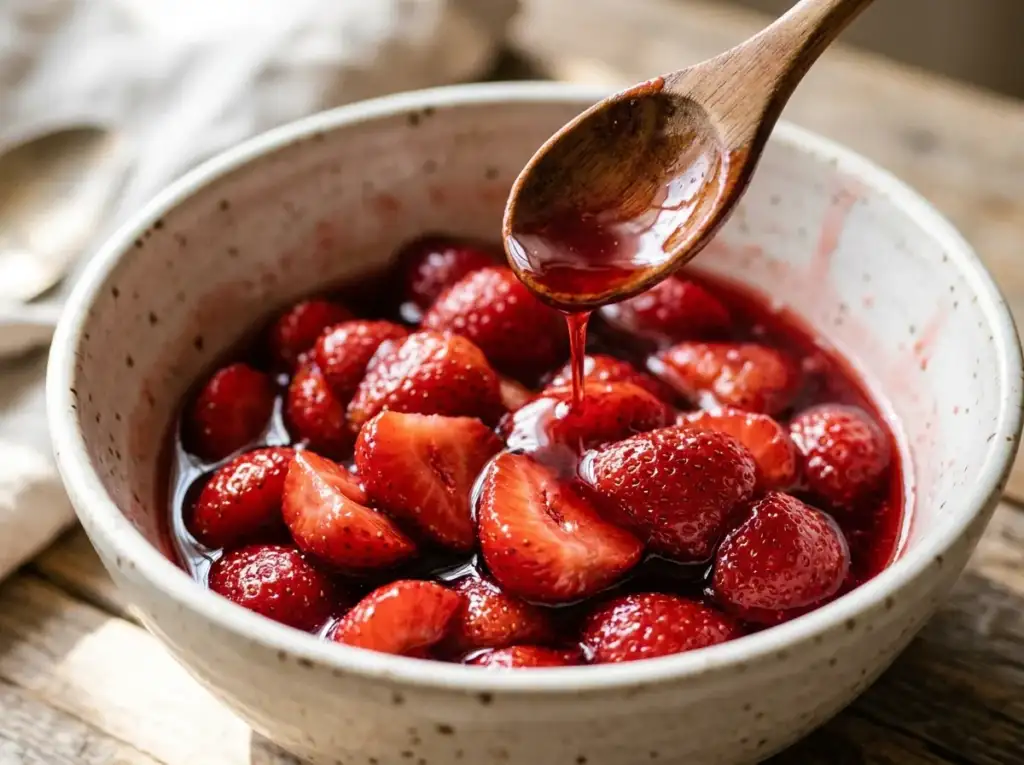
The Maceration Method: Turning Strawberries Into Liquid Gold
The strawberries in a classic shortcake aren’t just sliced and piled on. They’re macerated—a process that draws out their natural juices through osmosis to create a sweet, syrupy sauce that soaks into the biscuit and mingles with the cream.
Here’s how it works: When you toss sliced strawberries with granulated sugar, the sugar on the surface begins to dissolve in the minimal moisture present on the berry’s cut surfaces. This creates a high-sugar solution surrounding each berry.
Because cell membranes are semi-permeable, water inside the strawberry cells (where the sugar concentration is lower) moves outward through the membrane toward the high-sugar environment outside (where the water concentration is lower). This is osmosis—the movement of water from low-solute to high-solute concentration across a membrane.
The result: the strawberries release their juices, which mix with the dissolving sugar to create a sweet, intensely flavored syrup. The berries themselves soften slightly and become even more flavorful because their natural sugars concentrate as water leaves.
The practical technique: Hull and slice your strawberries. Toss them with granulated sugar—I use about 2-3 tablespoons per pound of berries, but this depends on the sweetness of your fruit. Let them sit at room temperature for at least 30 minutes, ideally 1-2 hours. Stir them occasionally.
You’ll know they’re ready when there’s a visible pool of ruby-red syrup at the bottom of the bowl and the berries look glossy and slightly softened but not mushy.
The additions: I add a tiny pinch of salt (which enhances sweetness perception) and a teaspoon of vanilla extract. Some people add lemon juice or balsamic vinegar for complexity. I tried balsamic once after reading about it in a food magazine—it was interesting, but it pulled the dessert in a savory direction that didn’t feel right for a summer shortcake. Your kitchen, your call.
According to Harvard Health’s article on fruit preparation, this maceration process also softens fruit cell walls, making the nutrients slightly more bioavailable—though honestly, we’re not eating strawberry shortcake for the health benefits.
The Cream Situation: Stabilization Without Compromise
Let me be controversial for a moment: I don’t stabilize my whipped cream with gelatin or cream cheese or mascarpone.
I know that’s heresy in some baking circles, and I understand the logic—stabilized cream holds its shape for hours, doesn’t weep, photographs beautifully. But it also changes the texture. Real whipped cream should be so light it almost dissolves on your tongue. The moment you add a stabilizer, you get something firmer, richer, more mousse-like.
For a strawberry shortcake that you’re serving immediately (which is how this dessert is meant to be eaten), fresh whipped cream is perfect as-is.
My technique:
- Use heavy cream with at least 36% milkfat (sometimes labeled “heavy whipping cream”)
- Chill the cream, the bowl, and the whisk attachment or beaters for 15 minutes before whipping
- Add 1-2 tablespoons of powdered sugar per cup of cream (powdered sugar contains cornstarch, which provides very subtle stabilization without changing texture)
- Add ½ teaspoon vanilla extract
- Whip on medium-high speed until soft peaks form—the cream should hold a shape but still look billowy and soft, not stiff and dry
The stop point: When you lift the whisk, the cream should form peaks that curl over at the tip. If the peaks stand straight up, you’ve gone slightly too far (though it’s still usable). If you keep going, you’ll make butter.
I learned to whip cream by hand with a balloon whisk when I worked at a small French bakery in college. The baker insisted that hand-whipping gave you more control and prevented over-whipping. He was right, but it’s also exhausting. An electric mixer on medium speed is fine—just watch it closely in the final minute.
For advance prep: If you must make whipped cream ahead, under-whip it slightly (to very soft peaks), refrigerate it, and give it a few final whisks by hand right before serving. It takes 30 seconds and the texture is noticeably better than cream whipped hours ahead.

The Temperature Trick: Why 425°F Is the Magic Number
I’ve tested shortcakes at 375°F, 400°F, 425°F, and 450°F. The winner, consistently, is 425°F.
Here’s why:
Below 425°F: The butter doesn’t steam aggressively enough to create dramatic layering. The biscuits rise, sure, but they’re denser and more bread-like. The exterior doesn’t develop that golden-brown crust before the interior fully cooks, so you get pale, soft biscuits that lack textural contrast.
At 425°F: The butter hits its vaporization point almost immediately. Steam pockets form rapidly. The exterior sets and browns quickly while the interior stays moist and tender. You get height, flakiness, and a beautiful golden crust. This is the sweet spot.
At 450°F: The exterior browns too fast—you can get burnt edges before the center is fully cooked, especially if your biscuits are thicker than 1 inch. Some recipes call for this temperature, and it can work if you’re very careful about timing, but there’s less margin for error.
The even-heating requirement: A too-hot oven with uneven heat distribution is worse than a slightly cooler oven that’s consistent. If you suspect your oven runs hot or has hot spots (most home ovens do), get an oven thermometer. They cost $8 and they’ll save you from countless baking failures.
I also rotate my baking sheet 180 degrees halfway through the baking time (around the 8-minute mark for a 15-16 minute total bake). This ensures even browning even if your oven has temperature variations.
USDA food safety note: While biscuits don’t have the same safety concerns as meat, the USDA does recommend that any baked goods containing eggs or dairy be baked to an internal temperature of at least 160°F. At 425°F for 15-16 minutes, your biscuits will easily exceed this.
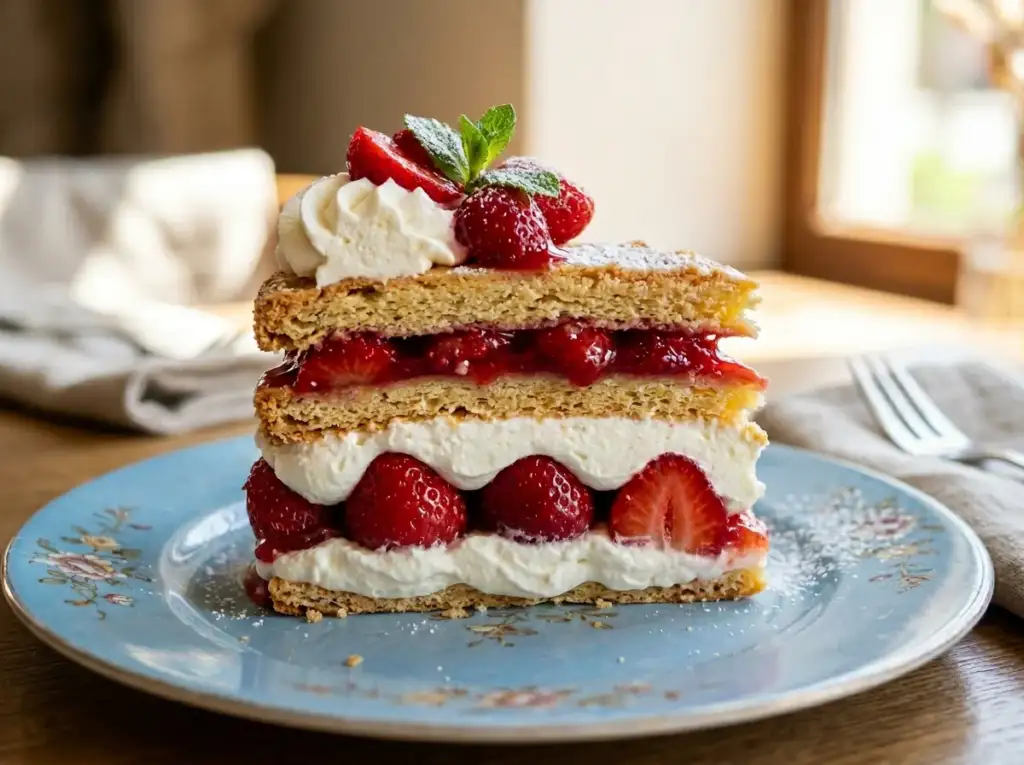
The Assembly Strategy: Order of Operations Matters
This seems straightforward, but I’ve seen people mess up the assembly in ways that compromise the dessert.
Wrong order:
- Whipped cream directly on the bottom biscuit half, then strawberries on top
Why it’s wrong: The weight and moisture of the strawberries compress the cream. The syrup pools on top of the cream instead of soaking into the biscuit. You lose the textural interplay.
Correct order:
- Split the biscuit horizontally (use a serrated knife and a gentle sawing motion)
- Place the bottom half on the plate
- Spoon macerated strawberries with plenty of syrup onto the bottom biscuit (the syrup soaks in—this is good)
- Add a generous dollop of whipped cream on top of the strawberries
- Place the top biscuit half gently on the cream
- Add more strawberries and syrup on top
- Finish with another dollop of whipped cream
The optional crown: I like to place a single perfect strawberry, hull still attached, on the very top whipped cream. It looks beautiful and signals “this is the best berry—save it for the last bite.”
Timing: Assemble each shortcake individually right before serving. If you assemble them all and let them sit, the biscuits get soggy from the syrup, the cream starts to weep, and the whole thing looks sad within 20 minutes.
If you’re serving a crowd, set up an assembly station: biscuits on a platter, bowl of macerated berries, bowl of whipped cream, spoons for each. Let people build their own. This is casual American summer dessert—don’t overthink the presentation.
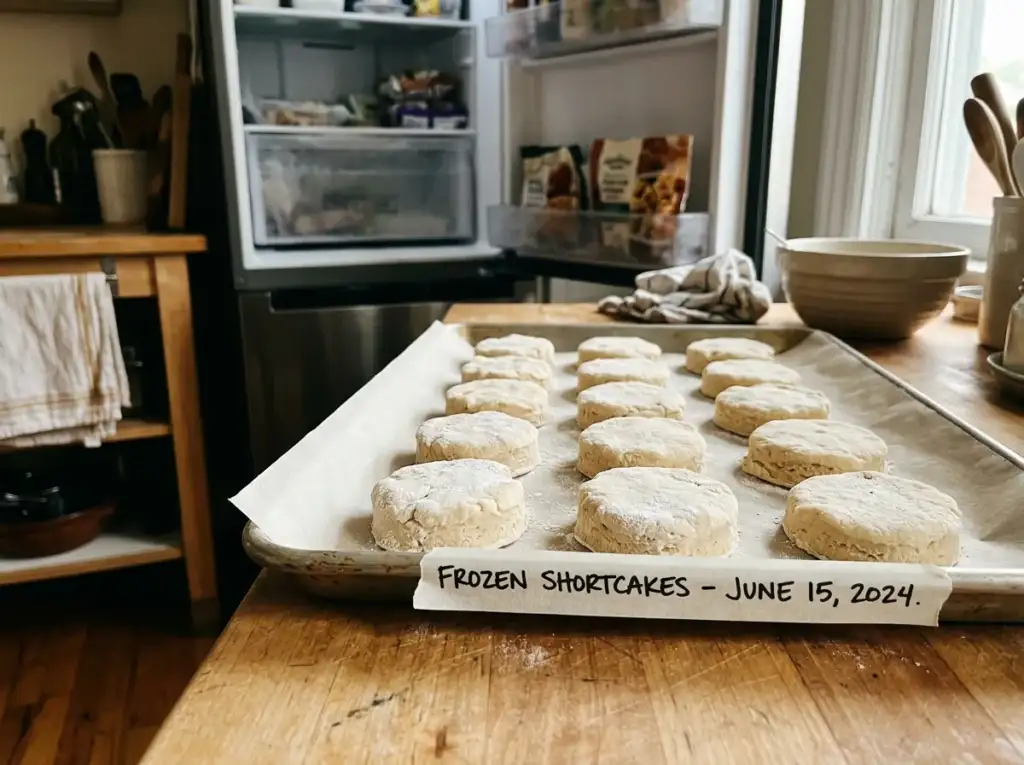
The Make-Ahead Blueprint: What Works and What Doesn’t
Real talk: Strawberry shortcake is best eaten fresh. But I understand you might be making this for a dinner party or a family gathering, and you want to prep ahead. Here’s what you can do without sacrificing quality:
Up to 2 days ahead:
- Make the biscuit dough, cut it into rounds, place them on a parchment-lined baking sheet, and freeze them solid
- Once frozen, transfer to a freezer bag
- Bake from frozen, adding 3-4 minutes to the baking time
Up to 4 hours ahead:
- Bake the biscuits, let them cool completely, store them loosely covered at room temperature (don’t seal them airtight or they’ll lose crispness)
- Macerate the strawberries and refrigerate them
- Measure out the cream, sugar, and vanilla for whipping, but don’t whip it yet
Just before serving (10 minutes or less):
- Whip the cream
- Assemble individual shortcakes
What definitely doesn’t work:
- Assembling the shortcakes more than 15 minutes ahead—they get soggy and sad
- Whipping the cream hours in advance unless you stabilize it (and as I said, I don’t love that texture)
- Using day-old biscuits (they’re fine, but they lose that fresh-from-the-oven magic)
I’ve done the make-ahead dance dozens of times for catering events and teaching classes. The frozen-dough-to-fresh-baked-biscuits method is a game-changer. You get that just-baked aroma and texture without the stress of making dough while your guests are arriving.
The Common Pitfalls (And How I’ve Failed at Each One)
Let me share the mistakes I’ve made—some of them multiple times—so you can skip the learning curve:
Mistake 1: Using all-purpose flour with high protein content
Not all all-purpose flour is created equal. King Arthur AP flour has 11.7% protein. Gold Medal has 10.5%. That difference matters. Higher protein = more potential gluten development = tougher biscuits.
For the most tender shortcakes, use a lower-protein AP flour, or better yet, use half AP and half cake flour (which has very low protein). I started doing this after a baking instructor told me, and the texture improvement was immediately noticeable.
Mistake 2: Overhandling the dough when shaping
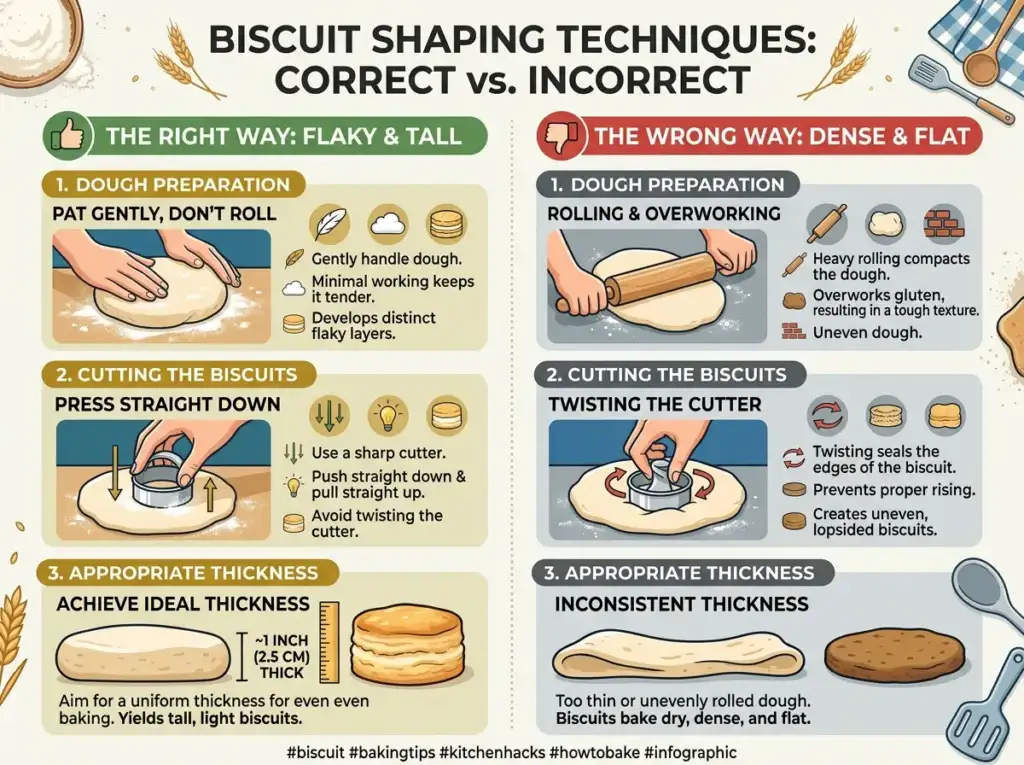
I used to roll out biscuit dough with a rolling pin like I was making pie crust. Wrong. Pat the dough gently into a roughly 1-inch-thick round using your hands. If you must use a rolling pin, do it gently and minimally. The more you work the dough, the more gluten develops.
Mistake 3: Twisting the biscuit cutter
When you cut out biscuits, press the cutter straight down and pull it straight up. Don’t twist. Twisting seals the edges and prevents the biscuit from rising properly. This was a revelation when a Southern baker corrected me during a workshop in Charleston.
Mistake 4: Using old baking powder
Baking powder loses potency over time. If yours has been sitting in the cabinet for a year, test it: drop a teaspoon into hot water. If it bubbles vigorously, it’s still good. If it just sits there, buy new. I once made an entire batch of flat biscuits before realizing my baking powder was dead.
Mistake 5: Undermacerating the berries
Early in my career, I thought 15 minutes was enough. It’s not. The berries need at least 30 minutes, preferably an hour, to release enough juice to create that syrupy coating. Patience pays off.
Mistake 6: Making giant biscuits
I know bigger seems better, but giant shortcakes (3+ inches in diameter) have structural problems. The ratio of crust to interior gets off. They’re hard to eat gracefully. Stick to 2-2.5 inches for perfect proportions.
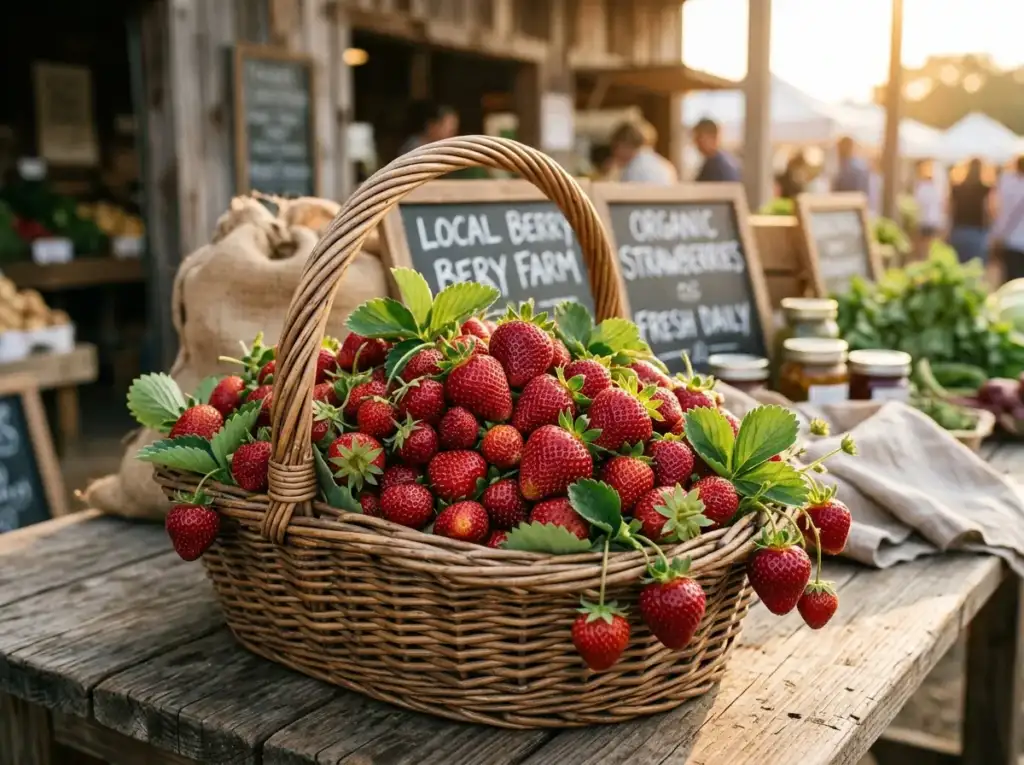
The Strawberry Selection Strategy: When Seasonal Matters
I’m going to say something that might be obvious but needs to be said: Don’t make strawberry shortcake in January.
Unless you live somewhere with year-round strawberry seasons, winter berries are a pale, flavorless imitation of what strawberries should be. They’re bred for shelf life and shipping durability, not flavor. They look pretty, sure, but they taste like crunchy water with a vague strawberry suggestion.
Peak strawberry season in most of the United States: Late May through early July.
That’s when local berries show up at farmers’ markets—smaller, irregularly shaped, deeply red throughout (not white in the center), intensely aromatic. These are the berries that make this dessert sings.
What to look for:
- Deep red color all the way through (cut one open to check)
- Strong strawberry aroma (you should smell them before you see them)
- Slightly soft texture (not rock-hard)
- Leaves that are fresh and green, not dried or brown
- Local origin if possible
The organic question: I buy organic strawberries when they’re available and affordable because strawberries are consistently on the Environmental Working Group’s “Dirty Dozen” list of produce with high pesticide residue. But I’m not going to tell you that organic berries taste better—they don’t, necessarily. They’re just grown with fewer synthetic pesticides.
Storage: Don’t wash berries until you’re ready to use them. Moisture accelerates mold growth. Store them in a single layer in the refrigerator, loosely covered. Use within 2-3 days of purchase.
I once made strawberry shortcake for a summer party using beautiful local berries from a farm stand outside Portland. The difference between those and supermarket berries was so dramatic that multiple guests asked me what I’d done to make the strawberries taste so good. I hadn’t done anything—I’d just used fruit at the peak of its season.
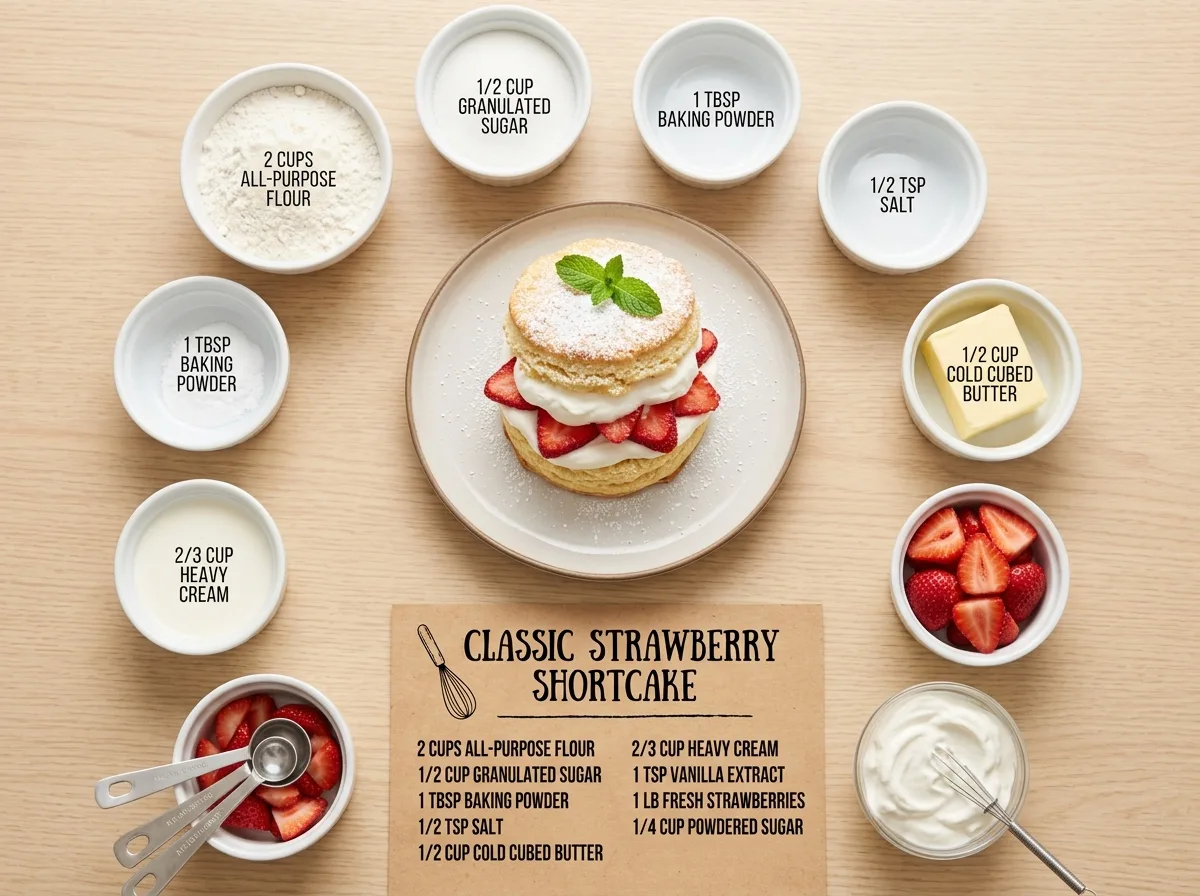
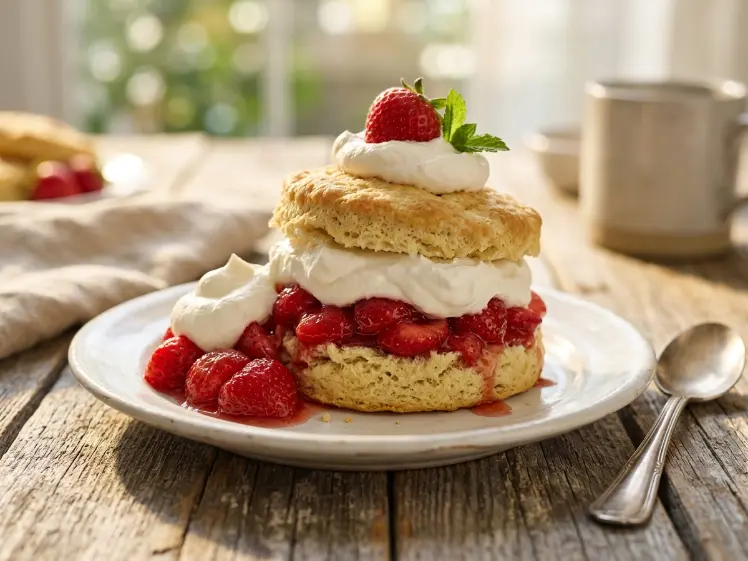
The Ultimate Classic Strawberry Shortcake
Ingredients
Method
- Hull and slice strawberries about ¼-inch thick. Place in a large bowl.
- Add granulated sugar, pinch of salt, and vanilla extract. Toss gently to combine.
- Let sit at room temperature for at least 1 hour, stirring occasionally. You want a visible pool of syrup at the bottom of the bowl. Refrigerate if making more than 2 hours ahead.
- Position rack in center of oven and preheat to 425°F (220°C). Line a baking sheet with parchment paper.
- In a large bowl, whisk together flour, sugar, baking powder, baking soda, and salt.
- Add cold butter cubes. Using a pastry cutter, two forks, or your fingertips, work butter into flour until mixture resembles coarse crumbs with pea-sized and some larger butter pieces still visible. Work quickly to keep butter cold.
- In a small bowl or measuring cup, combine 1 cup cold buttermilk and vanilla extract.
- Make a well in the center of the flour mixture. Pour in buttermilk mixture all at once. Using a wooden spoon or silicone spatula, fold gently 8-12 times until no dry flour remains. Dough will look shaggy and rough. Do NOT overmix.
- Turn dough out onto a lightly floured surface. Gently pat (do not roll) into a round about 1 inch thick.
- Using a 2½-inch round cutter dipped in flour, cut straight down without twisting. Press scraps together gently (don’t knead) and cut more rounds. You should get 8 biscuits.
- Place biscuits on prepared baking sheet, spacing them about 2 inches apart. Brush tops with remaining 2 tablespoons buttermilk. Sprinkle with coarse sugar.
- Bake for 15-17 minutes, rotating pan halfway through, until tops are deep golden brown. A toothpick inserted in center should come out clean.
- Transfer to a wire rack and let cool for at least 10 minutes before splitting. (They’re delicious warm but easier to handle when slightly cooled.)
- Place a metal bowl and whisk attachment (or beaters) in freezer for 15 minutes before whipping.
- Add heavy cream, powdered sugar, and vanilla to chilled bowl. Beat on medium-high speed until soft peaks form, about 2-3 minutes. Peaks should curl over at the tip when you lift the whisk. Do not overbeat.
- Using a serrated knife, split each biscuit in half horizontally.
- Place bottom half on a plate. Spoon generous portion of macerated strawberries with syrup onto biscuit.
- Add a large dollop of whipped cream on top of strawberries.
- Place top biscuit half gently on cream.
- Top with more strawberries and syrup, then another dollop of cream.
- Serve immediately.
Notes
- Biscuit dough can be cut and frozen up to 2 months. Bake from frozen, adding 3-4 minutes to baking time.
- Biscuits can be baked 4 hours ahead, stored loosely covered at room temperature.
- Strawberries can be macerated up to 4 hours ahead, refrigerated.
- Whip cream just before serving for best texture.
If you don’t have buttermilk, add 1 tablespoon lemon juice or white vinegar to 1 cup of regular milk. Let sit 5 minutes before using. Texture Tip:
For the flakiest biscuits, handle the dough as little as possible and keep butter cold. If your kitchen is very warm, chill the flour mixture and buttermilk for 15 minutes before mixing. Storage:
Leftover assembled shortcakes don’t keep well (biscuits get soggy). Store components separately:
- Biscuits: room temperature, 2 days
- Macerated berries: refrigerated, 2 days
- Whipped cream: refrigerated, up to 6 hours (re-whip briefly before using)
- Calories: 485
- Total Fat: 26g
- Saturated Fat: 16g
- Cholesterol: 95mg
- Sodium: 380mg
- Total Carbohydrates: 58g
- Dietary Fiber: 3g
- Sugars: 28g
- Protein: 7g
The Final Word: Why This Dessert Endures
Strawberry shortcake isn’t trendy. It doesn’t have layers of mousse or mirror glazes or gold leaf. It’s not going to win any avant-garde pastry competitions.
But it endures because it does one thing perfectly: it captures the taste of summer in its most uncomplicated, joyful form.
I’ve made versions with fancy additions—rosewater in the cream, balsamic reduction drizzled over the berries, herbs folded into the biscuit dough. Some of them were interesting. None of them were better than the original.
The classic formula works because each component has a clear job: the biscuit provides structure and a buttery, tender base. The strawberries deliver bright, fruity acidity and sweetness. The cream adds richness and a cool, light contrast.
When you nail the technique—cold butter, minimal mixing, proper maceration, fresh cream—the dessert becomes more than the sum of its parts. It becomes what food should be: simple ingredients treated with respect and skill, resulting in something that makes people close their eyes and smile.
That’s the goal. That’s always been the goal.
If you want to dive deeper into biscuit technique, check out our guide to mastering dough basics, and if you’re ready to tackle another egg-based dessert that requires precise timing, try our chocolate molten lava cake secrets.
Now go make some shortcakes. Summer’s waiting.
❓ Frequently Asked Questions About Strawberry Shortcake
Q: Can I make strawberry shortcake with store-bought biscuits or pound cake?
Technically, yes—you can assemble strawberries and cream on anything. But here’s the truth: store-bought biscuits are usually dense and lack the flaky layering that makes homemade shortcakes special. Pound cake is a different dessert entirely (it’s delicious, but it’s not shortcake—it’s too rich and sweet).
I’ve served shortcake to hundreds of people over the years, and the homemade biscuit is what makes people close their eyes and smile. If you’re truly short on time, buy good-quality frozen biscuit dough (like Pillsbury Grands) and bake it fresh. It’s not the same, but it’s closer than pre-baked store biscuits.
Q: My biscuits came out flat and didn’t rise. What went wrong?
Four common causes:
- Old baking powder — Test it by dropping a teaspoon in hot water. If it doesn’t fizz vigorously, it’s dead. Replace it.
- Overmixing the dough — Gluten development prevents proper rise. Mix only until just combined (8-12 folds maximum).
- Warm butter — If your butter melted into the flour instead of staying in distinct pieces, you lose the steam pockets that create rise.
- Oven too cool — At temperatures below 400°F, the rise is slow and the structure spreads before it sets. Use 425°F and preheat fully.
I’ve made every one of these mistakes. The baking powder one got me twice before I learned to date my cans with a Sharpie when I open them.
Q: Can I use frozen strawberries?
You can, but the texture won’t be the same. Frozen strawberries release a lot of water when thawed because freezing ruptures the cell walls. You’ll get a watery, soupy mixture rather than the thick syrup you want.
If you must use frozen (say, it’s winter and you’re craving this desperately), thaw them completely, drain off about half the liquid, then macerate with just 1-2 tablespoons of sugar instead of 3-4. The flavor will be acceptable but the texture will be softer and less fresh-tasting.
Honestly? Wait for strawberry season. This dessert is worth waiting for.
Q: How do I keep whipped cream from deflating or weeping?
Deflating happens from overwhipping (you’ve broken the fat structure and it’s starting to turn into butter) or using cream with too low a fat content. Use heavy cream (36%+ milkfat) and stop at soft peaks.
Weeping (liquid separating and pooling at the bottom) happens when cream sits too long. The powdered sugar in my recipe helps slightly because the cornstarch it contains provides minimal stabilization, but fresh-whipped cream is always best.
If you absolutely must make cream ahead, under-whip it to very soft peaks, refrigerate, and give it a few final whisks by hand right before serving. Takes 30 seconds and solves the problem.
Q: What’s the difference between shortcake and biscuits?
This is a great question. Shortcakes are biscuits, but enriched with a bit more sugar and fat. The “short” in shortcake refers to the crumbly, tender texture created by the high fat-to-flour ratio—the same principle behind shortbread cookies.
Traditional biscuits for breakfast might have 4-6 tablespoons of butter per 2 cups of flour. Shortcakes typically have 6-8 tablespoons. They’re also slightly sweeter (¼ cup sugar vs. 1-2 tablespoons for savory biscuits).
The technique is identical, but the ratio shifts to create something that works better as a dessert base.
Q: Can I make this dairy-free or vegan?
The biscuits: Yes, with some adjustments. Replace butter with cold coconut oil (the kind that’s solid at room temperature) or vegan butter (Earth Balance works well). Replace buttermilk with a plant-based milk (almond, oat, soy) mixed with 1 tablespoon lemon juice or vinegar.
The texture won’t be quite as rich, but I’ve tested this for students with dairy restrictions and it works. The key is keeping the fat very cold.
The cream: Coconut cream (the thick part from a can of full-fat coconut milk, chilled overnight) whips reasonably well. It won’t be as light and fluffy as dairy cream, and it will have a coconut flavor, but it’s the best plant-based alternative I’ve found.
Full transparency: vegan strawberry shortcake is good, but it’s not the same. If you’re making this for someone with allergies, it’s absolutely worth doing. If you’re just experimenting, know that dairy delivers a specific magic here that’s hard to replicate.
Q: Why did my biscuits turn out tough and dense?
This is almost always overmixing. When you agitate flour and liquid together, you develop gluten—the protein network that makes bread chewy. That’s great for bread, terrible for biscuits.
Mix only until no dry flour remains. The dough should look shaggy and rough, not smooth. Count your folds (8-12 maximum) and stop even if it doesn’t look “done.”
The other possibility is using high-protein flour. King Arthur all-purpose flour has 11.7% protein, which is borderline too high for tender biscuits. Try Gold Medal (10.5%) or use half AP flour and half cake flour.
Q: Can I add other fruits to this recipe?
Absolutely. I’ve made beautiful shortcakes with:
- Peaches (macerate with a tiny bit of bourbon and brown sugar instead of white sugar)
- Blueberries (mix with strawberries for color and flavor contrast)
- Blackberries (very tart—use extra sugar)
- Raspberries (delicate—macerate for only 20-30 minutes or they’ll fall apart)
- Mixed berries (my favorite summer blend: strawberries, blueberries, and raspberries)
The maceration technique works for any soft fruit. Avoid apples or pears—they’re too firm and won’t release enough juice.
Q: What should I do with leftover biscuits?
First of all, there are rarely leftover biscuits in my house. But if you have some:
- Breakfast sandwiches — Split, toast, fill with scrambled eggs and cheese
- Biscuits and gravy — The classic Southern breakfast
- Strawberry jam and butter — Simple and perfect with morning coffee
- Freeze them — Wrap individually in plastic wrap, then foil. Freeze up to 2 months. Thaw at room temperature and warm in a 300°F oven for 5 minutes
Leftover macerated strawberries are incredible over vanilla ice cream, stiirred into yogurt, or spooned over pancakes.
For More Recipes
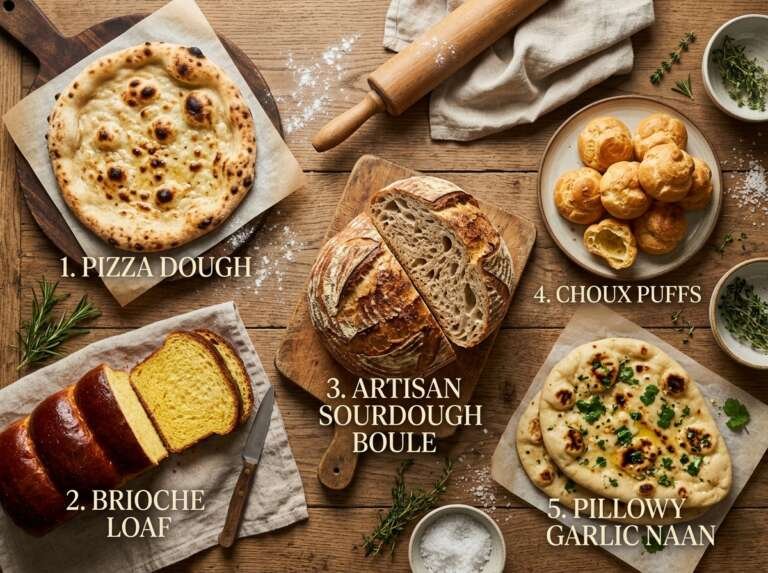
[5 Essential Dough Recipes]: The Ultimate Guide to Mastering Every Dough from Pizza to Pastry
[Graduation Sheet Cake Ideas] – Secrets, Pro-Tips & Perfect Recipes for 50+ Guests (2026)