5 Cast Iron Ribeye Steak Secrets Every Home Cook Needs to Know
by Chef Hamid | Homely Recipe
The definitive steakhouse-level guide to achieving a restaurant-quality ribeye in your own kitchen — no fancy equipment, no culinary degree required.
There’s a moment in every serious home cook’s life when they decide to spend real money on a real ribeye. I’m talking about a 1.5-inch, beautifully marbled, USDA Prime cut that cost them $28 at the butcher counter. They bring it home like it’s precious cargo. They’re excited. They’re confident. They’ve watched cooking videos. They’ve got this.
I was that cook. And I absolutely ruined it.
The first premium ribeye I ever attempted at home was a disaster of the highest order. I was 24, working doubles at a mid-level chain restaurant, convinced that because I’d seen the line cooks handle steaks every night, I understood what was happening. I pulled my beautiful piece of beef out of the fridge literally five minutes before cooking — still ice-cold through the center — dropped it into a pan that hadn’t even finished preheating, and immediately pressed it flat with a spatula because I’d heard that “helped it cook evenly.”
It didn’t sizzle properly. It steamed. It turned gray. It curled up at the edges. By the time the interior hit a safe temperature, the outside was overcooked leather, and the inside was somehow both overdone and oddly cool in the very center of Cast Iron Ribeye Steak.
I sliced into it at the table, looked at the sad grayish-brown cross-section, and felt genuine grief. That was $28 I didn’t really have.
I want to save you from that exact heartbreak. Because here’s what I know now — after 20+ years behind professional grills and cast iron pans, after cooking thousands of steaks in professional kitchens and refining those techniques for home setups — the difference between a steakhouse ribeye and a disappointing one isn’t talent. It isn’t equipment. It isn’t even the quality of the meat, though that helps. It’s knowledge. Specifically, five pieces of knowledge that most home cooks simply never get told.
These aren’t tricks. They’re not shortcuts. They’re the actual methods that professional kitchens have used for decades, translated clearly so you can execute them in your home kitchen tonight. Let’s get into it.
What Makes a Cast Iron Pan the Right Tool for This Job
Before we get to the five secrets, let’s talk about the pan itself, because this choice matters enormously and it’s not arbitrary.
Cast iron holds heat differently than stainless steel or non-stick pans. Stainless steel is responsive — it heats fast, cools fast, and reacts quickly to changes. That’s great for sauces and delicate proteins. For a ribeye, it’s a liability. When you lay a cold (or even room-temperature) steak onto a stainless steel pan, the temperature of that pan drops significantly and immediately. You lose your sear window. The meat sits there cooling the pan rather than cooking aggressively against it.
Cast iron, once properly preheated, holds its temperature with remarkable stubbornness. It has what professional cooks call thermal mass — a stored reservoir of heat that doesn’t collapse the moment you introduce a cold variable. That thermal mass is what creates the aggressive, immediate Maillard reaction we’re chasing. It’s what gives you that deeply caramelized, almost crackling crust that tastes like the best part of every steakhouse meal you’ve ever had.
A Lodge 12-inch cast iron skillet costs around $30. It will outlive you if you treat it reasonably. There’s genuinely no better tool for this job at any price point.
Secret 1: The 45-Minute Dry-Brining Ritual
Most people season their steak right before cooking. Pinch of salt, pinch of pepper, into the pan. And that’s exactly why most home-cooked steaks taste underseasoned and slightly watery.
Dry-brining is the first real secret, and it requires patience you probably don’t think you have, but do.
Here’s what you do: At least 45 minutes before you cook — ideally the night before, but 45 minutes is the minimum threshold — pull your ribeye out and season it generously with kosher salt on all surfaces. Both flat faces, the edges, every surface you can reach. Use more salt than feels comfortable. We’re talking about 3/4 to 1 teaspoon of kosher salt per pound of meat, spread evenly. Then set it on a wire rack over a plate or sheet pan and leave it uncovered.
What happens in those 45 minutes (and beyond) is genuinely fascinating, and it happens in two stages.
In the first 10 to 15 minutes, the salt draws moisture to the surface of the meat through osmosis. You’ll see small beads of liquid forming — that’s the moisture migrating outward. If you cooked the steak right now, you’d be steaming it with its own liquid, and you’d get a gray exterior. This is actually why many people who try to salt “in advance” make things worse — they salt for 10 minutes and cook immediately, hitting the worst possible window.
But here’s where patience pays off. By minute 40 to 45, something changes. That surface moisture has been reabsorbed back into the muscle fibers, dragging the salt with it. The salt has now begun dissolving and denaturing some of the outer proteins, creating a surface that is drier, more concentrated in flavor, and structurally primed for intense browning. The muscle fibers have slightly loosened, which means they’ll hold their moisture better during the heat of cooking. The net result is a steak that’s seasoned all the way through its outer layer, not just on the surface, and that’s drier on the outside than a freshly-seasoned steak — which, as you’re about to learn, is critical.
If you can dry-brine overnight in the fridge, uncovered on that wire rack, the results are even more dramatic. The cold, dry refrigerator air pulls additional moisture from the surface, creating a surface that’s almost tacky to the touch — pellicle-like — and this surface will take on color and crust in a way that genuinely rivals professional steakhouse results.
The 45-minute minimum is non-negotiable if you want anything better than mediocre. The overnight version is what separates the truly exceptional from merely good.
[INSERT PINTEREST IMAGE HERE: Style – Curiosity — Close-up of kosher salt crystals falling onto a raw, marbled ribeye on a wire rack, the salt crystals sharp and glistening against the deep red meat, text overlay reads “Why 45 Minutes Changes Everything”]
Secret 2: Thermal Equilibrium — Bringing the Meat to Temperature Before the Pan
This is the secret that most home cooks intellectually know but emotionally resist. Taking your steak out of the refrigerator and letting it sit for 30 to 45 minutes before cooking feels wasteful of time. It feels like nothing is happening. But something is happening, and it’s critical.
A 1.5-inch ribeye pulled straight from the refrigerator has a center temperature of around 38°F to 40°F. Your target for a perfect medium-rare is 130°F to 135°F at the center. When you throw an ice-cold steak into a screaming hot pan, the exterior of that steak has to travel through a massive temperature gradient to pull the center up to your target temperature. What happens? The outer inch of meat overcooks — turns gray, tightens, loses moisture — while you’re waiting for the cold center to come up.
By letting the steak rest at room temperature for 30 to 45 minutes before cooking, you’re raising that center temperature to roughly 55°F to 65°F. That’s a much smaller temperature differential for the heat to overcome. The result is that you can sear the exterior aggressively for a shorter window of time, and the center reaches your target temperature while the exterior is still in perfect shape. You get more uniform doneness from edge to center — what restaurant cooks call a “wall-to-wall” color when you slice it.
Is it going to reach room temperature all the way through? No — physics doesn’t work quite that cooperatively in 45 minutes. But you’ll close enough of the gap to make a dramatic, visible difference in your finished steak.
[USDA Food Safety Note: The USDA recommends cooking whole muscle beef cuts to a minimum internal temperature of 145°F, followed by a 3-minute rest. Medium-rare at 130-135°F is widely practiced in professional kitchens and embraced by many consumers, but always cook to your personal comfort level and health requirements. Reference the USDA safe minimum internal temperature chart at usda.gov for complete guidance.]
Pull the steak out. Let it breathe. Use that time to prep your aromatics, get your pan heating, and mentally prepare for the next three secrets.
Secret 3: The Cast Iron Pre-Heat Rule — Building Massive Thermal Mass
This is where most home cooks fail, even when they know everything else. They get impatient with the preheat. The pan looks hot. They add the steak. It doesn’t sizzle the way it should, and the whole operation quietly goes sideways.
Here’s the rule: preheat your cast iron skillet over medium-high heat for a minimum of 4 to 5 minutes. Not 2 minutes. Not “until it looks hot.” Four to five minutes, minimum, and I’d argue that 6 minutes is better.
How do you know when it’s truly ready? Drop a few drops of water onto the surface. If they sizzle and evaporate relatively slowly, you’re not there yet. When the pan is properly hot, those water droplets will dance and skitter across the surface in tight little beads before vanishing — this is called the Leidenfrost effect, and it tells you the surface temperature is above 212°F and approaching the territory where serious browning happens.
Another method: hold your palm about 3 to 4 inches above the surface. At proper preheat temperature, you should be able to hold it there for only 2 to 3 seconds before the heat becomes genuinely uncomfortable.
During the last minute of preheating, add your fat. For this application, I use a neutral high-smoke-point oil — avocado oil or refined grapeseed oil work beautifully — not butter. Butter will burn during the initial sear. We’re adding the butter later, during basting. Add just enough oil to create a thin, shimmering film across the surface. The oil should shimmer and just barely start to smoke.
Then, and only then, lay your steak in the pan.
That sound — that aggressive, almost violent sizzle-roar — is what you’re after. If your steak hits the pan and makes a polite little hiss, your pan isn’t ready. Pull it out (don’t cook it), let the pan recover heat, and try again.

One more thing about this step: don’t touch the steak once it’s down. Don’t adjust it. Don’t peek. Don’t try to unstick it. A properly preheated pan with adequate oil will release the steak naturally when a proper crust has formed — usually 2.5 to 3.5 minutes for a 1.5-inch cut. If you try to move it and it resists, the crust isn’t ready yet. Let it be.
Secret 4: The Crust Matrix — How the Brown Magic Actually Happens
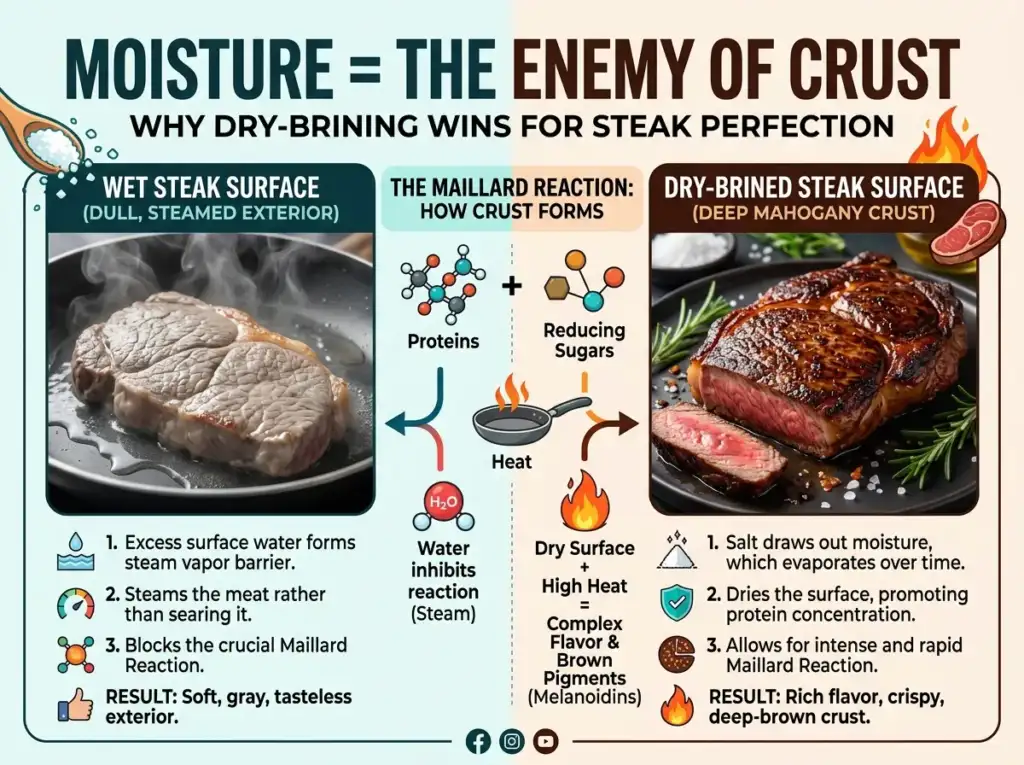
Let’s pause on the sear itself, because understanding what’s happening on the surface of your meat is what will make you obsessive about protecting it — and rightfully so.
That gorgeous, deeply caramelized, umami-packed crust that defines a great steak isn’t just “browning.” It’s the result of the Maillard reaction — a complex cascade of chemical interactions that happens when amino acids from the meat’s proteins encounter reducing sugars on the surface at temperatures above approximately 280°F (140°C). The reaction produces hundreds of new flavor compounds, aromatic molecules, and the characteristic brown pigments called melanoidins.
Amino Acid+Reducing SugarΔMelanoidins
Those melanoidins aren’t just responsible for the color — they carry the majority of the flavor complexity that makes a seared steak taste like a seared steak. That depth. That savory, almost smoky, intensely meaty character that you can’t get any other way.
Here’s why surface moisture is the single greatest enemy of this reaction: water evaporates at 212°F. The Maillard reaction needs 280°F or higher at the surface of the meat. Every drop of moisture on the surface of your steak is a barrier — the heat energy pouring off your cast iron has to first convert that liquid water into steam before it can get the surface temperature high enough to trigger browning. While that’s happening, you’re essentially steaming your steak’s exterior in a thin cloud of its own moisture. It turns gray. It toughens. And by the time the moisture is gone and browning can begin, you’ve already overcooked the outer layer.
This is why the 45-minute dry brine matters. This is why patting the steak bone-dry with paper towels immediately before it goes into the pan matters. This is why we don’t cover the pan during searing. Every choice we make in this process is designed to protect the conditions that let the Maillard reaction happen fast, hard, and thoroughly.
A bone-dry steak surface is not optional. It is the entire ballgame.
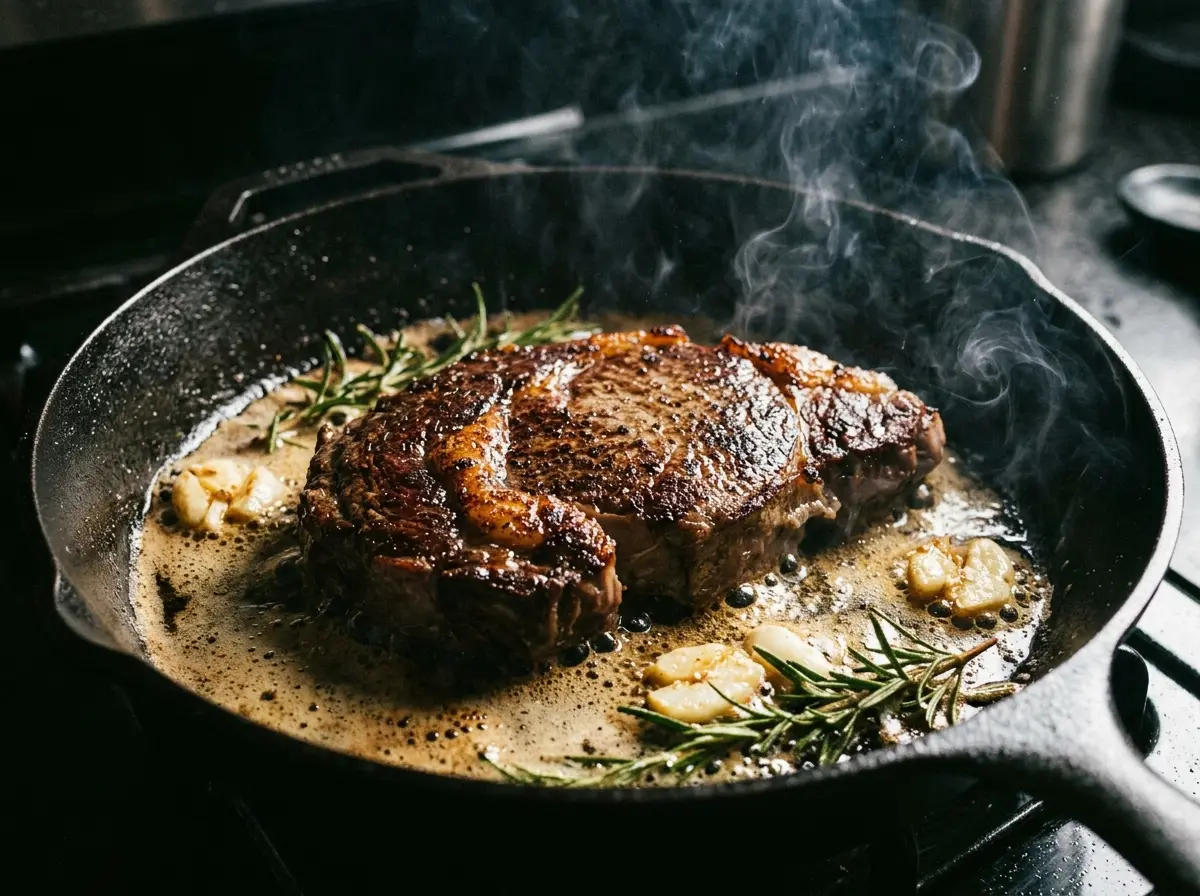
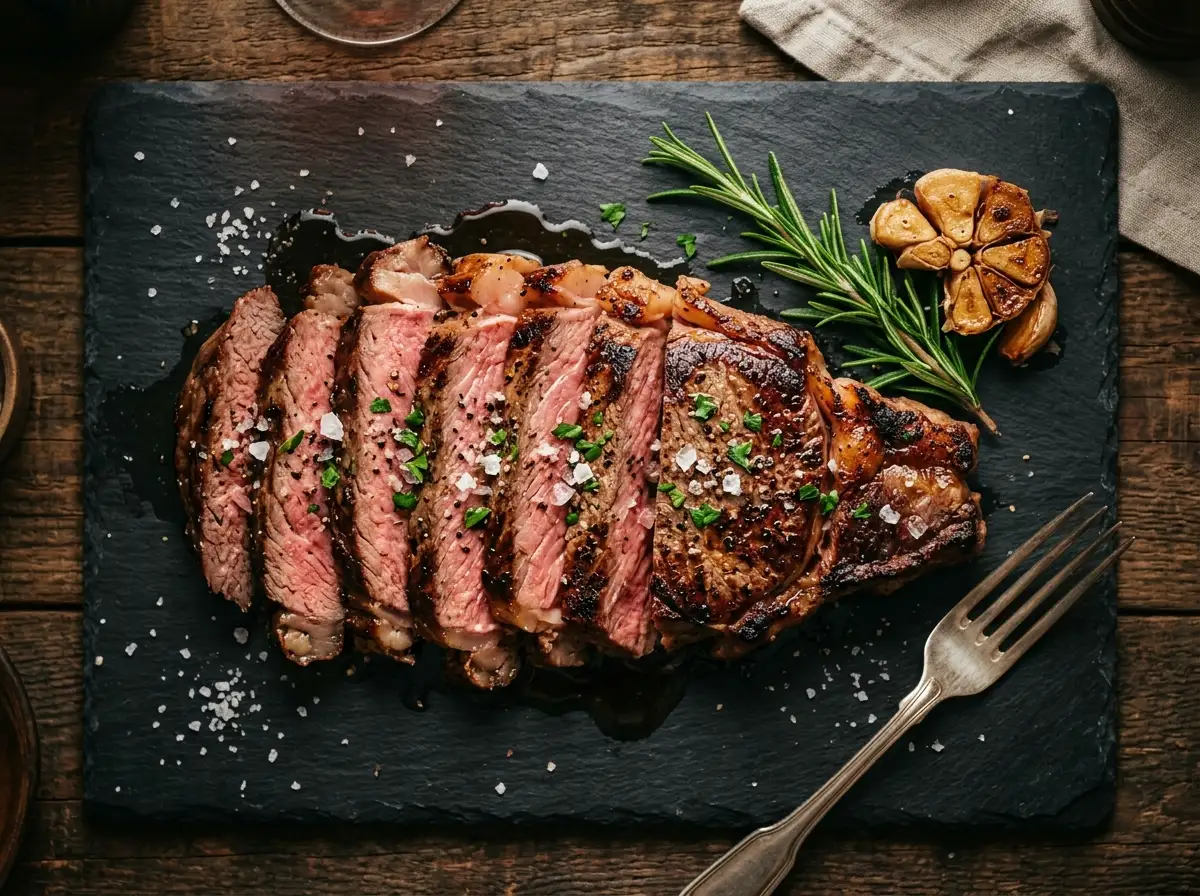
Sear the first side for 2.5 to 3.5 minutes without touching. Flip once — just once — and sear the second side for another 2 to 3 minutes. Use tongs to briefly sear the edges of the steak too, especially if it has a fat cap. That fat cap, when pressed briefly against the hot iron, renders and crisps into something extraordinary.
Secret 5 (Part 1): The Butter-Basting Symphony — The Arrosé Technique
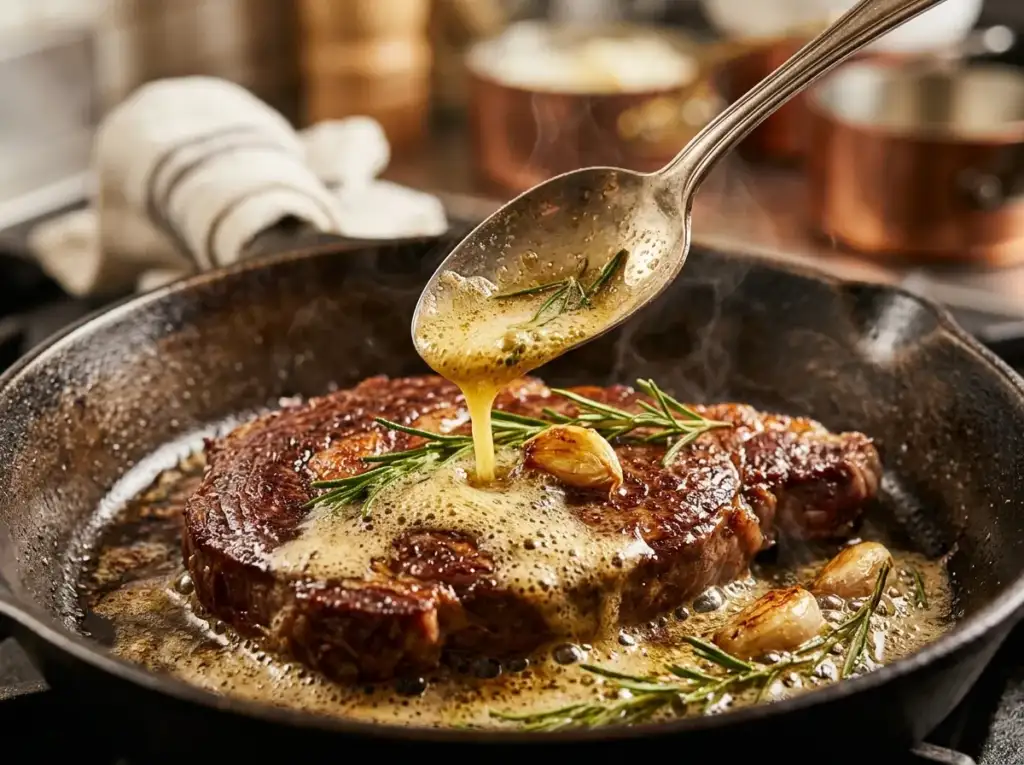
After both flat sides are seared and the edges are done, this is where cooking a ribeye at home crosses from good into unforgettable. This is the technique that separates cooks who’ve worked in professional kitchens from everyone else: arrosage, or butter-basting.
Reduce your heat to medium. Add 2 to 3 tablespoons of unsalted butter to the pan. Add 3 to 4 smashed (not minced) garlic cloves and 2 to 3 fresh rosemary sprigs. The butter will melt quickly against the hot iron, and it will foam — that foam is the water content of the butter flashing off as steam, and it’s your signal that the butter is hot enough.
Now tilt the pan slightly away from you (use an oven mitt — the handle is hot) so the butter pools at the far edge. With a large spoon, begin continuously spooning that foaming, aromatic, garlic-and-rosemary-infused butter over the top surface of the steak. Over and over. Constantly. Don’t stop. This is arrosé.
The basting accomplishes several things simultaneously. The hot butter continues cooking the top surface of the steak even while you’re technically “only” cooking the bottom. It bastes the meat in the rendered fat drippings and oil already in the pan, which carry deep beefy flavor. The garlic and rosemary infuse into the butter and transfer directly onto the surface of the meat with every spoon. And the continuous application of hot fat accelerates the Maillard reaction on the top surface.
Keep basting for 1.5 to 2 minutes. Watch your butter — you want it foamy and nut-brown, fragrant and rich. If it starts to look dark or smell bitter, pull it off the heat immediately. Browned butter is magnificent. Burned butter is a tragedy.
Check the internal temperature with an instant-read thermometer. Insert it horizontally into the side of the steak, pushing to the center. For medium-rare, you’re looking for 125°F to 128°F before resting (carryover cooking will bring it up another 5°F during the rest).
Remove the steak from the pan. Resist every instinct you have to cut it.
Secret 5 (Part 2): The Sacred Rest — Why Patience Is the Final Ingredient
Every cook has heard “let your steak rest.” Most of them follow this advice for about 90 seconds before giving in. Ninety seconds is not resting. Ninety seconds is just making your steak slightly less scalding.
Here’s what’s actually happening inside that steak during the rest, and why cutting it too early is the single most heartbreaking mistake you can make after executing everything else perfectly.
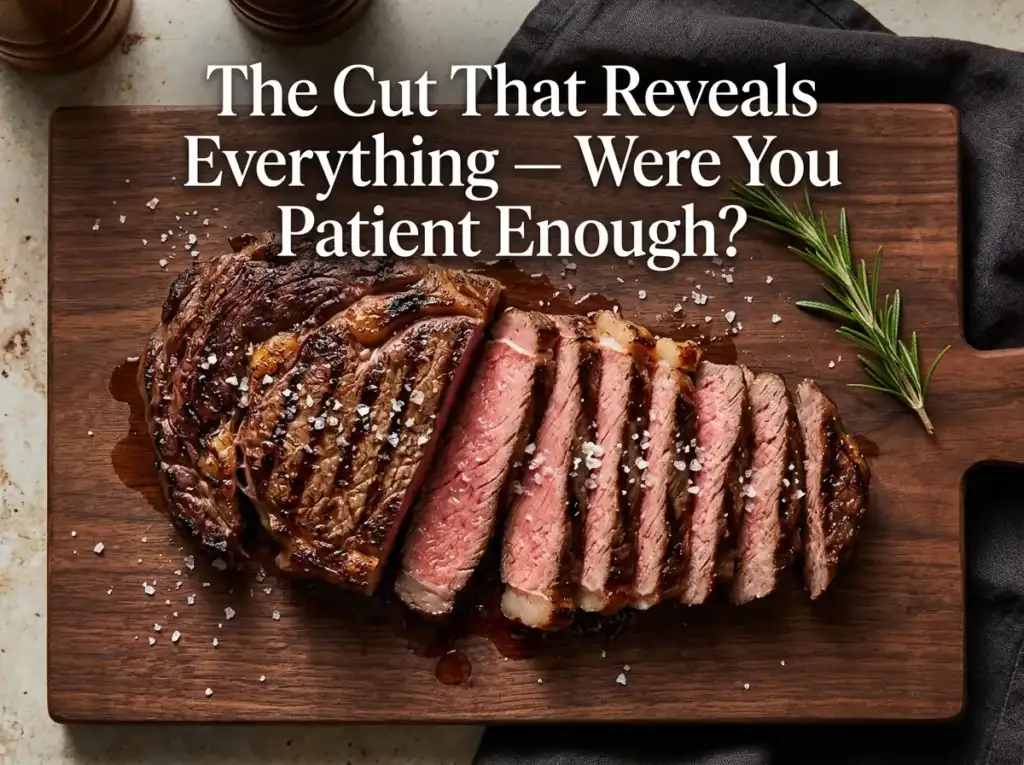
During cooking, the heat from the cast iron and the hot air in the pan drives the muscle fibers to contract. This contraction pushes the interior moisture — the juices — toward the center of the steak, away from the heat. If you cut the steak right off the pan, those muscle fibers are still fully contracted, the center is still under pressure, and all that juice rushes out immediately onto your cutting board. You see it happen — that puddle of pink juice spreading across the board. That’s not a good thing. Those are the juices that were supposed to be inside your steak.
Resting allows the muscle fibers to slowly relax. As they relax, the pressure equalizes, and the juices redistribute back out toward the edges of the steak, permeating the entire cross-section. When you cut a properly rested steak, the juices stay in the meat. You see them only when you take a bite, and they run down your chin, not onto the cutting board.
Rest time rule: rest your ribeye for a minimum of 5 minutes for a 1-inch steak, 7 to 8 minutes for a 1.5-inch steak. I prefer 8 to 10 minutes for a thick ribeye. Transfer it to a cutting board (not a plate — a plate traps steam and softens your crust), tent it loosely with foil. Loosely — a tight foil tent steams the crust into softness.
While the steak rests, pour the remaining garlic butter from the pan through a fine mesh strainer into a small bowl. When you plate the steak, drizzle a spoonful of that strained, infused butter back over the top. Add a pinch of flaky sea salt — Maldon is my preference — and cracked black pepper. That’s your finish. That’s your restaurant moment.
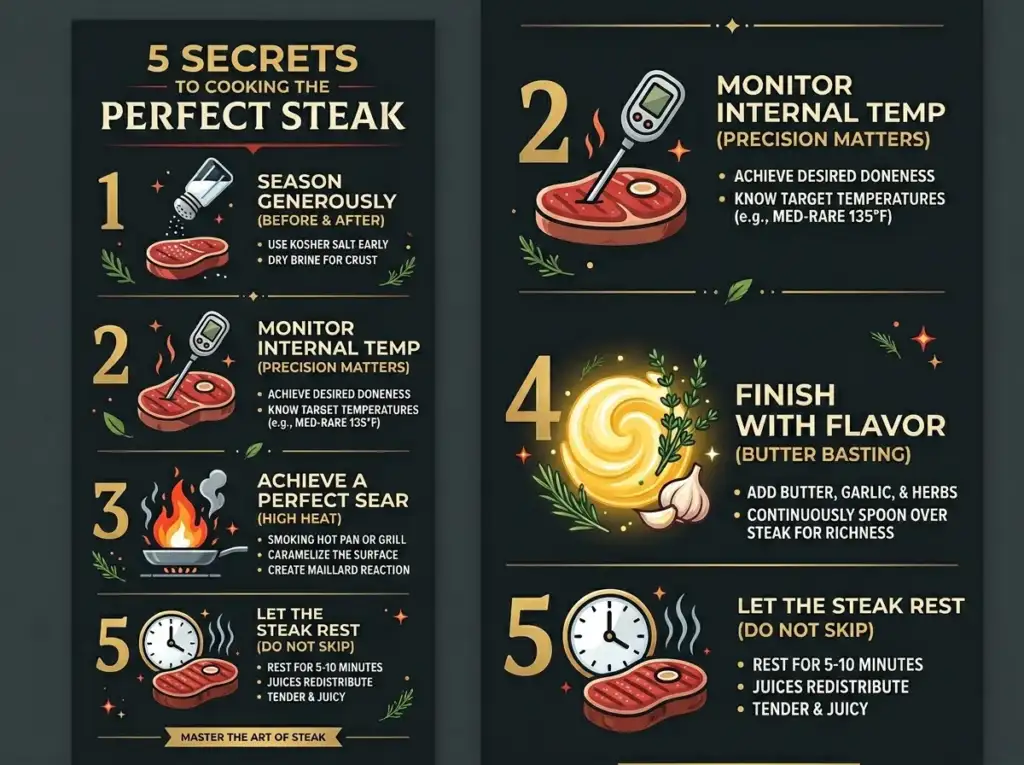
The Full Game Plan — Putting All 5 Secrets Together
To be completely clear about the sequence:
The night before (or 45 minutes before): Season generously with kosher salt, set on wire rack, refrigerate uncovered or leave at room temperature for the minimum 45-minute window.
30-45 minutes before cooking: Pull steak from fridge. Let it begin approaching room temperature. Pat surface bone-dry with paper towels.
5-6 minutes before cooking: Begin preheating cast iron skillet over medium-high heat. Add high-smoke-point oil in the final minute.
The sear: Lay steak in hot pan. Don’t touch it. 2.5 to 3.5 minutes per side. Sear the edges.
The baste: Reduce heat to medium. Add butter, smashed garlic, rosemary. Tilt and baste continuously for 1.5 to 2 minutes.
The rest: Off heat, onto cutting board, loose foil tent. 7 to 10 minutes.
The plate: Slice against the grain. Drizzle with reserved garlic butter. Flaky salt. Serve immediately.
That’s it. That’s the whole system. And it works every single time.
For a perfect comfort-food pairing with this technique, check out our Slow-Cooker Pot Roast Secrets guide — the same principles of thermal patience and proper fat management apply beautifully across both recipes. And if you’re building a full dinner spread, our collection of homemade dough recipes will give you the perfect fresh bread to soak up every drop of that garlic butter.
Choosing Your Ribeye — What to Look For at the Counter
Since we’re building a definitive guide, let’s spend a moment on meat selection, because even perfect technique can’t rescue fundamentally poor-quality beef.
Thickness: Minimum 1.25 inches. Ideally 1.5 inches. Anything thinner than 1 inch will overcook in the time it takes to develop a proper crust. If the butcher counter only has thin-cut ribeyes, ask them to cut you a thicker one — most will.
Marbling: Look for fat running in fine white threads through the red muscle tissue. This intramuscular fat (not the fat cap on the edge, though that’s good too) melts during cooking and bastes the meat from inside. More marbling generally means more flavor and more forgiveness in cooking.
USDA Grading: Prime has the most marbling and is found mostly at specialty butchers and warehouse stores. Choice is excellent and widely available at most grocery stores. Select is the entry grade — edible, but noticeably leaner and less forgiving. For this technique, Choice or Prime.
Bone-in vs. Boneless: A bone-in ribeye (sometimes called a cowboy ribeye or tomahawk depending on the rib-bone length) takes slightly longer to cook to temperature around the bone, but many cooks (myself included) prefer the flavor. The bone conducts heat differently and creates a slightly different texture profile near the joint. Boneless ribeyes are easier to manage and still extraordinary when cooked correctly.
Common Mistakes That Ruin a Perfectly Good Ribeye
Let me be direct about the errors I see constantly:
Using a non-stick pan. Non-stick pans cannot safely handle the temperatures required for a proper sear. The coatings begin breaking down around 450°F to 500°F, and you need surfaces hotter than that for Maillard browning. Non-stick also doesn’t develop the same thermal mass. Wrong tool entirely.
Salting right before cooking. We covered this. The 10-to-15-minute window is the worst possible time to cook a salted steak because the surface moisture has been drawn out but not yet reabsorbed. Salt 45 minutes ahead or more.
Pressing the steak flat with a spatula. This was my mistake at 24. Pressing the steak forces the surface away from the pan rather than into it, which you might think would help but actually doesn’t — it breaks the sear contact and squeezes juice out of the meat. Leave the steak alone.
Moving the steak around the pan. The steak needs continuous contact with one spot on the iron to build a crust. Moving it around distributes the heat contact and prevents the proper Maillard crust from forming on any single point.
Opening wine and forgetting about the steak. I have done this. I’m not proud of it. Use a timer.
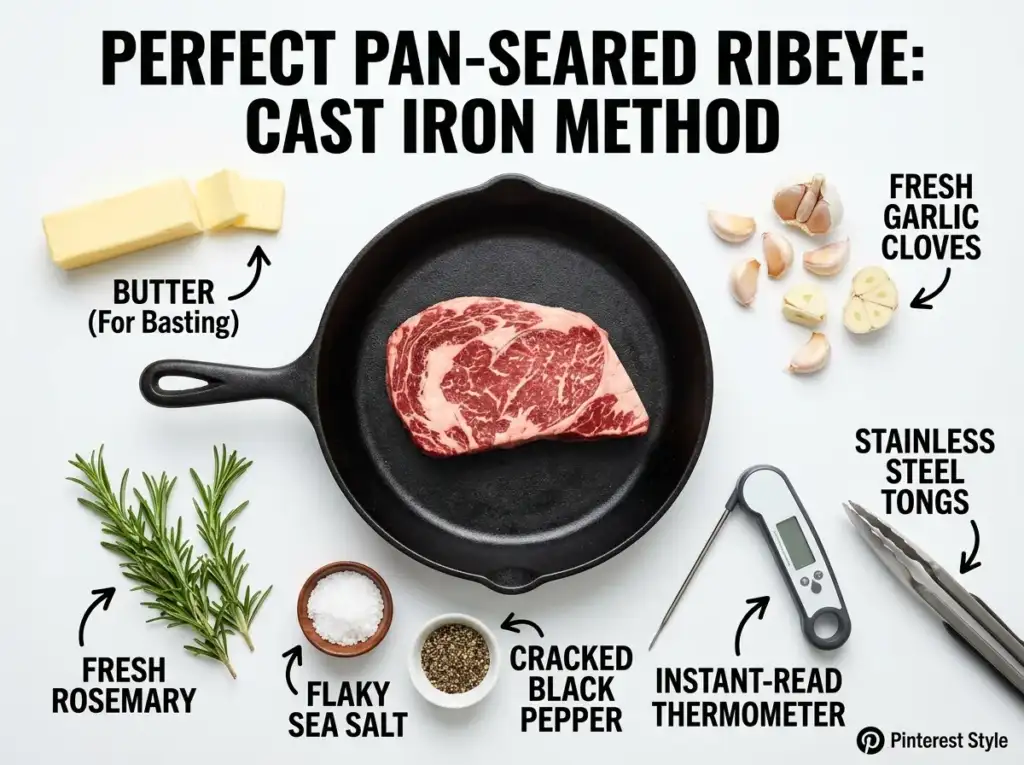
The Ultimate Pan-Seared Cast Iron Ribeye — 5 Steakhouse Secrets Revealed
Ingredients
Equipment
Method
STEP 1 — The Dry-Brine Ritual
- (45 Minutes to Overnight Before Cooking)
- Pat the ribeye completely dry on all surfaces using paper towels
- Season all surfaces — both flat faces AND all edges — with kosher salt
- Use the full 1 teaspoon of kosher salt distributed evenly across all surfaces
- Place steak on wire rack set over a sheet pan
- Leave uncovered at room temperature for a minimum of 45 minutes
- ⭐ Best Result: Refrigerate uncovered on wire rack overnight for maximum crust potential
STEP 2 — Thermal Equilibrium
- (30 to 45 Minutes Before Cooking)
- If refrigerated overnight, remove steak from fridge 30 to 45 minutes before cooking
- Allow steak to begin approaching room temperature on the counter
- Immediately before cooking, pat all surfaces bone-dry with fresh paper towels
- This second pat-dry is non-negotiable — removes any moisture drawn back to the surface
STEP 3 — Cast Iron Preheat
- (5 to 6 Minutes Before the Steak Goes In)
- Place 12-inch cast iron skillet on burner over medium-high heat
- Preheat for a minimum of 5 to 6 minutes — do not rush this step
- Test for readiness: Flick 2 to 3 drops of water onto the surface
- ❌ Water sizzles slowly = not ready yet
- ✅ Water skitters in tight beads and vanishes instantly = ready
- In the final 1 minute of preheating, add 1 tablespoon avocado oil
- Swirl to coat the surface — oil should shimmer and just begin to smoke lightly
STEP 4 — The Sear
- (Approximately 6 to 8 Minutes Total)
- Carefully lay the ribeye away from you into the preheated oiled skillet
- You should hear an aggressive, loud sizzle-roar — this is correct
- ⛔ Do NOT touch, move, press, or adjust the steak at all
- Sear first side for 2.5 to 3.5 minutes
- Steak will release naturally from the pan when crust is properly formed
- If it resists when you try to flip — wait 30 more seconds
- Flip once using tongs
- Sear second side for 2 to 3 minutes
- Using tongs, hold steak on its edges to sear all sides — 30 to 45 seconds per edge
- Sear the fat cap edge until it renders and crisps — approximately 45 seconds
STEP 5 — The Butter-Basting Symphony (Arrosé)
- (1.5 to 2 Minutes)
- Reduce burner heat to medium
- Add to the pan:
- 3 tablespoons unsalted butter
- 3 smashed garlic cloves
- 2 fresh rosemary sprigs
- Wait for butter to melt and begin to foam actively
- Using an oven mitt, tilt the pan slightly away from you so butter pools at the far edge
- Using a large spoon, continuously baste the top surface of the steak with foaming butter
- Do not stop — keep spooning constantly for 1.5 to 2 full minutes
- Butter should be foamy and nut-brown — fragrant and rich
- ⚠️ If butter turns dark or smells bitter — remove pan from heat immediately
STEP 6 — Temperature Check
- Insert instant-read thermometer horizontally into the side of the steak
- Push probe to the exact center of the steak
- Use the doneness temperature guide below to determine your pull point
- Remove steak from heat when it reads your target pull temperature
- Carryover cooking during the rest will raise internal temp by approximately 5°F
STEP 7 — The Sacred Rest
- (7 to 10 Minutes — Do Not Skip)
- Transfer steak immediately to a cutting board (not a plate)
- Tent loosely with aluminum foil — loose tent only, do not seal tightly
- Rest for 7 to 10 minutes without cutting or disturbing
- While steak rests, strain basting butter through fine mesh strainer into a small bowl
- Discard garlic solids and rosemary — reserve the strained butter for finishing
STEP 8 — Plate and Serve
- After full rest period, slice steak against the grain
- Arrange slices on a warmed plate or serving board
- Drizzle 1 teaspoon of reserved strained basting butter over sliced steak
- Finish with flaky sea salt and additional cracked black pepper
- Serve immediately — do not let it sit after plating
Notes
| Note # | Detail |
|---|---|
| Note 1 | Overnight dry-brine in the refrigerator uncovered on a wire rack produces the most dramatic crust results of anything you can do in this recipe — do not skip it if you have the time |
| Note 2 | If using a boneless ribeye instead of bone-in, reduce searing time by approximately 30 seconds per side as heat distributes slightly faster without the bone |
| Note 3 | Significant smoke during the searing stage is completely normal and means you have the heat exactly right — turn on your range hood and open a window before you begin cooking |
| Note 4 | The strained basting butter can be stored in an airtight container in the refrigerator for up to 5 days — it is extraordinary used for cooking eggs, roasting vegetables, or spreading on fresh bread |
| Note 5 | For ribeyes thicker than 1.75 inches such as a tomahawk or cowboy cut, sear on the stovetop first to build the crust then transfer the entire cast iron skillet into a 400°F preheated oven to finish to your target temperature |
| Note 6 | Never use a non-stick pan for this recipe — non-stick coatings begin breaking down at temperatures above 450°F to 500°F and the Maillard browning reaction requires surface temperatures well above that threshold |
| Note 7 | If the steak resists when you attempt to flip it, do not force it — simply wait an additional 30 seconds and try again, the steak will release naturally and cleanly when the crust is fully formed |
| Note 8 | Fresh rosemary is mandatory for the basting stage — dried rosemary turns bitter in hot butter, leaves unpleasant gritty debris on the steak surface, and does not infuse the butter with the same aromatic quality |
| Note 9 | The cutting board for resting must be a board not a plate — a plate traps steam underneath and around the steak which softens and destroys the crust you worked so hard to build |
| Note 10 | If you are cooking two ribeyes at the same time, use a larger 15-inch cast iron skillet or cook them separately — overcrowding the pan drops the temperature dramatically and causes steaming instead of searing |
⚠️ USDA Safety Note: The USDA recommends a minimum safe internal temperature of 145°F with a 3-minute rest for whole muscle beef cuts. Always cook to your personal health requirements. Refer to the complete USDA Safe Minimum Internal Temperature Chart for full guidance.
⚠️ Nutritional Disclosure Statement:
The following nutritional values are data-driven estimates calculated using the USDA FoodData Central database and standard nutritional calculation methodology. Values are based on USDA Choice bone-in ribeye steak at 16 oz raw weight (approximately 12 oz cooked after natural moisture loss during searing), 3 tablespoons unsalted butter, 1 tablespoon avocado oil, kosher salt, flaky sea salt, and black pepper as listeed.
Actual nutritional values will vary based on the specific cut purchased, USDA grade, degree of fat trimming, exact raw weight, marbling density, bone weight if bone-in, and total cooking duration. These figures are estimates only and are provided for general informational purposes. They should not replace the advice of a qualified dietitian, nutritionist, or medical professional.
📊 Full Recipe Totals (Both Servings Combined):
| Nutrient | Full Recipe Total |
|---|---|
| Calories | ~1,360 kcal |
| Total Fat | ~104g |
| Saturated Fat | ~44g |
| Cholesterol | ~370mg |
| Sodium | ~1,780mg |
| Total Carbohydrates | ~2g |
| Dietary Fiber | ~0g |
| Protein | ~96g |
| Iron | ~6.4mg |
| Potassium | ~1,040mg |
| Vitamin B12 | ~6.2mcg |
| Zinc | ~16.8mg |
Enjoy Other Recipes:
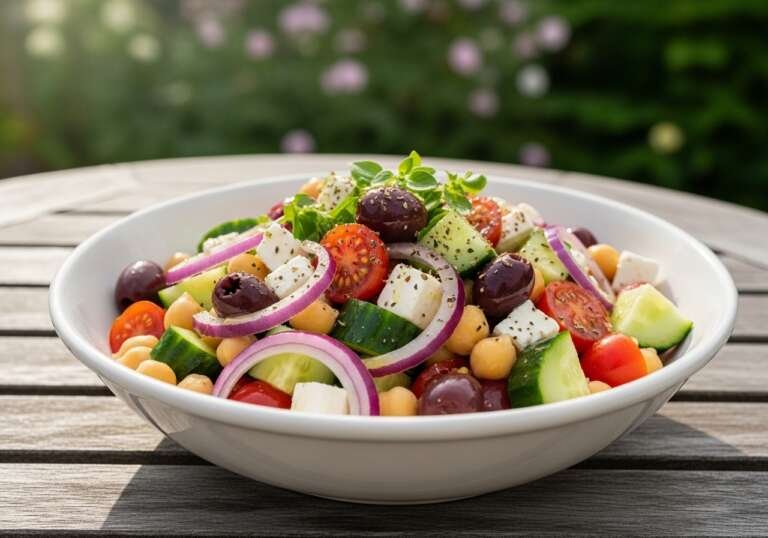
7 Secret Mediterranean Marinades for the Perfect Summer Grill
Air Fryer Garlic Butter Steak Bites That Actually Sear — Not Steam